
2006 Acura TL in Nighthawk Black Pearl (part 4)
by Todd CooperiderThis is part 4 of a 4 part series (read part 1, part 2, part 3)
Whew! I think we’re actually finished now. I appreciate the fact that you hung in there this long to go through all of the steps to keep your Acura TL (or other) looking its best.
While not everybody will get into machine polishing their vehicles, we still went over plenty of other useful methods and products for the average enthusiast to properly maintain their own vehicles.
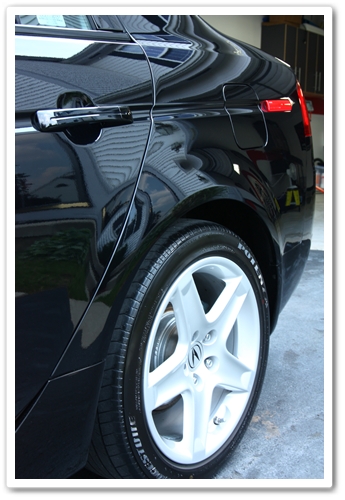
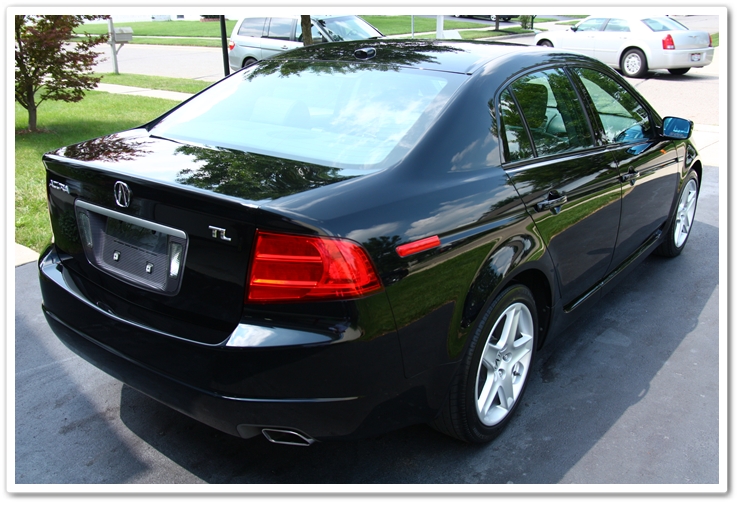
Okay, now we’re finally ready for some after shots! In the end I was able to achieve at least a 95% correction rate. Most of the 5% that remained was on the lower rocker panels. When the owner came to pick it up, he said that he didn’t think it looked that good when he first bought it. That’s what I like to hear!
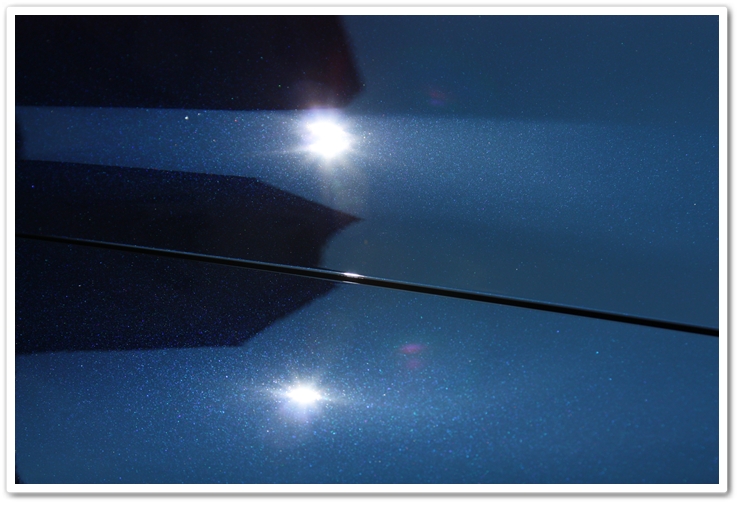
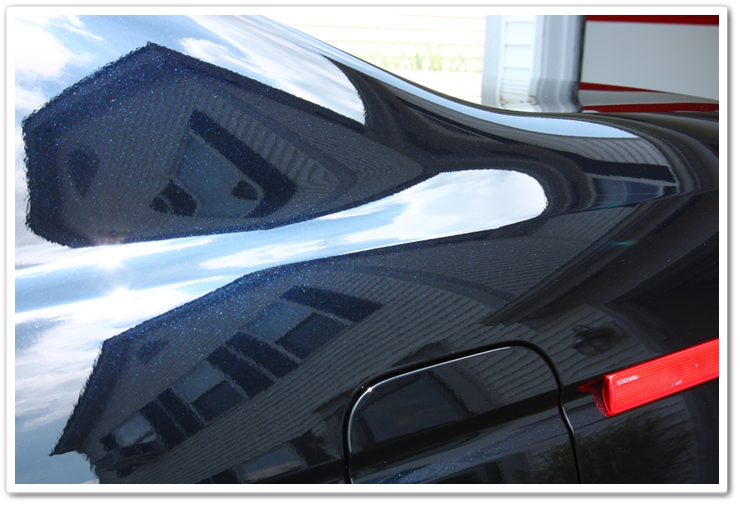
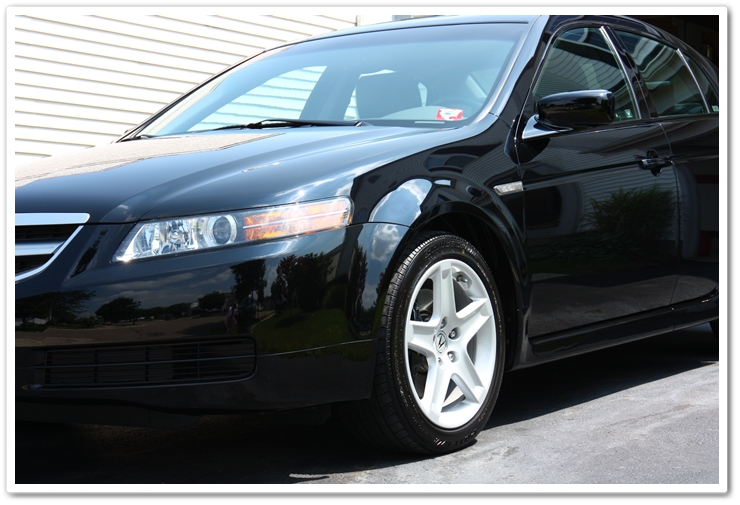
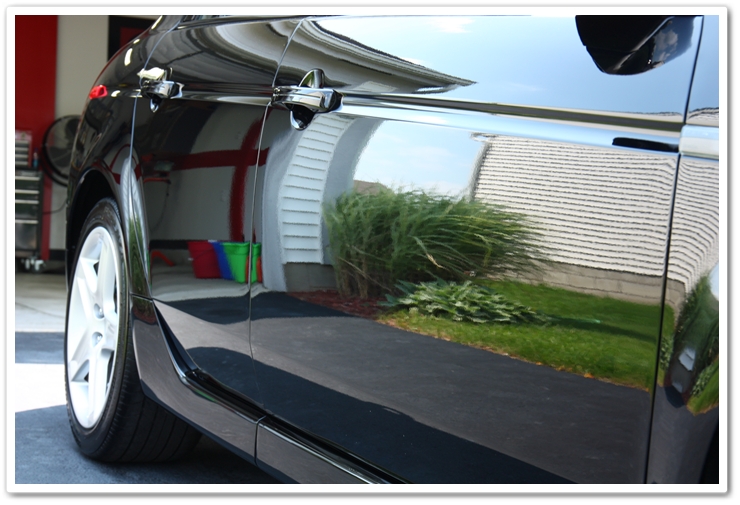
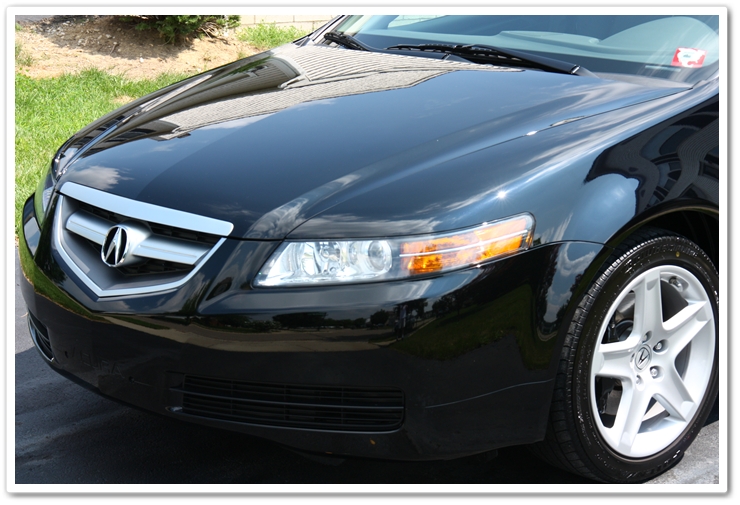
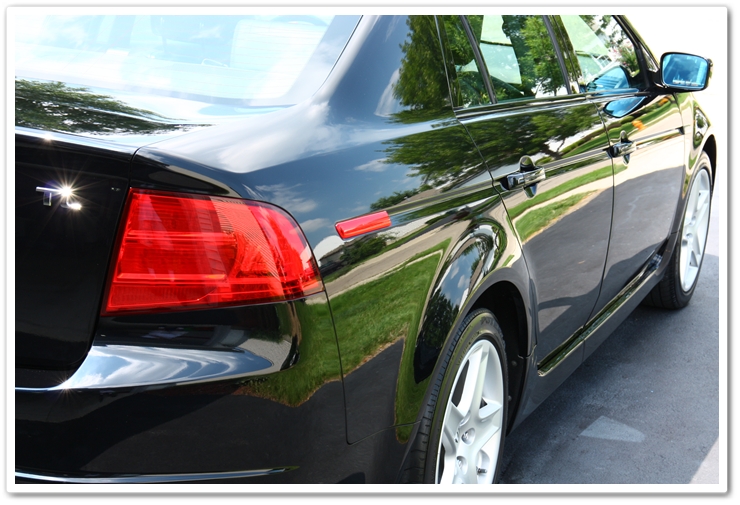
First up are the direct sunshine shots…also known as the light of truth. If there are any defects left, you will see them here.
I had to take the photos in the mid day sun, so some of them are a bit harsh. I would like to have taken them later in the day, but the TL was being picked up early in the afternoon.
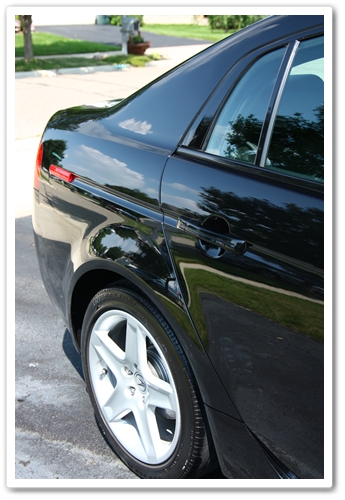
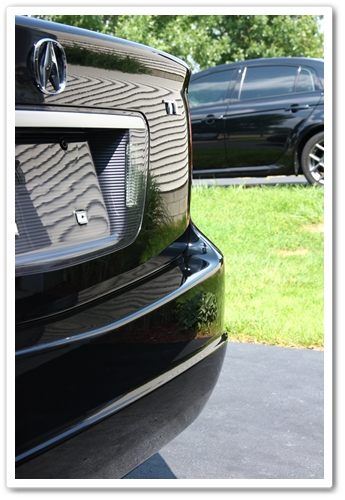
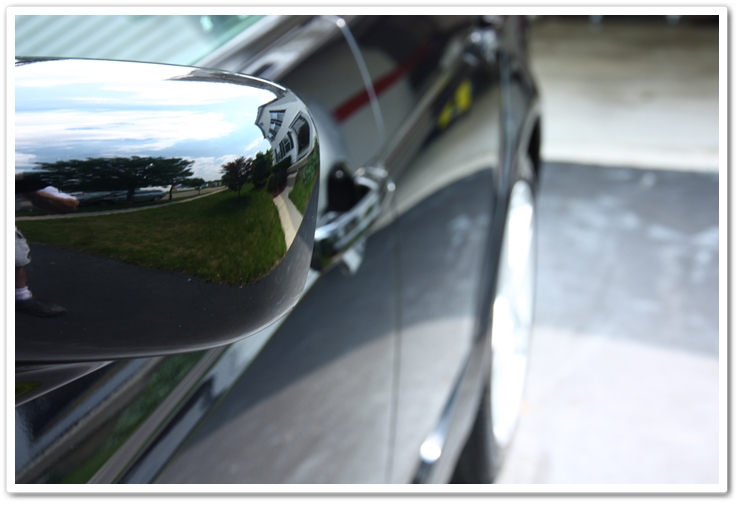
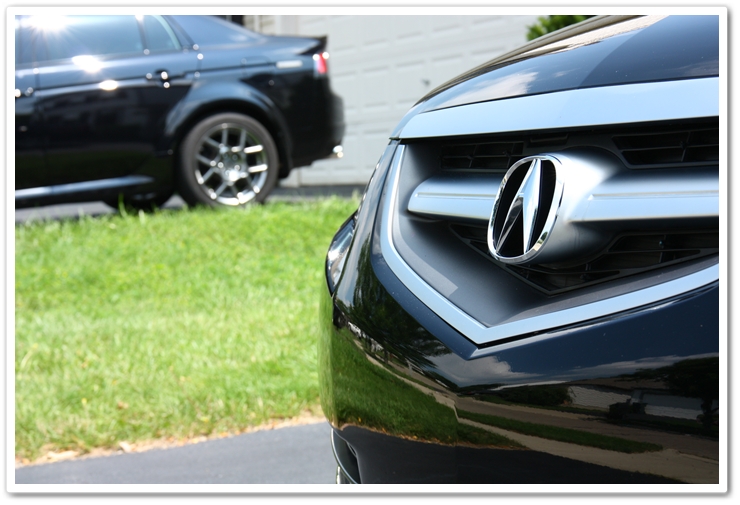
This is a nice shot where you can really get the appreciation of the Nighthawk Black Pearl paint. It also proves that I do in fact live in an alternate universe…notice the 4 suns in the reflection.

This is why we love NBP so much…the blue flake!
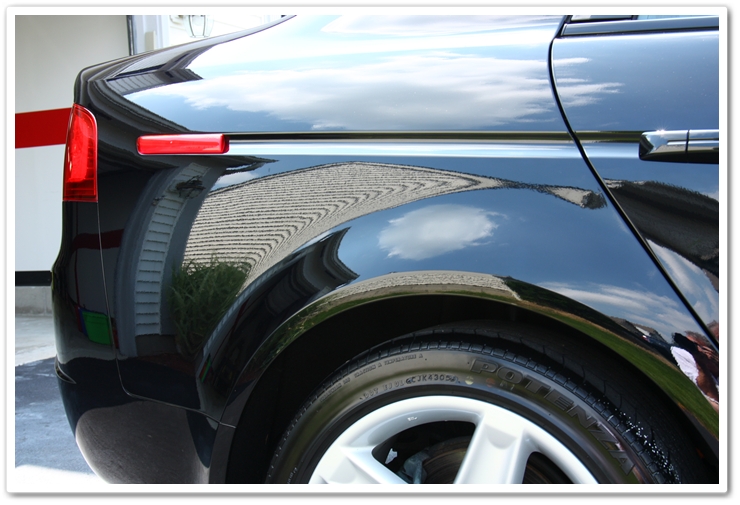

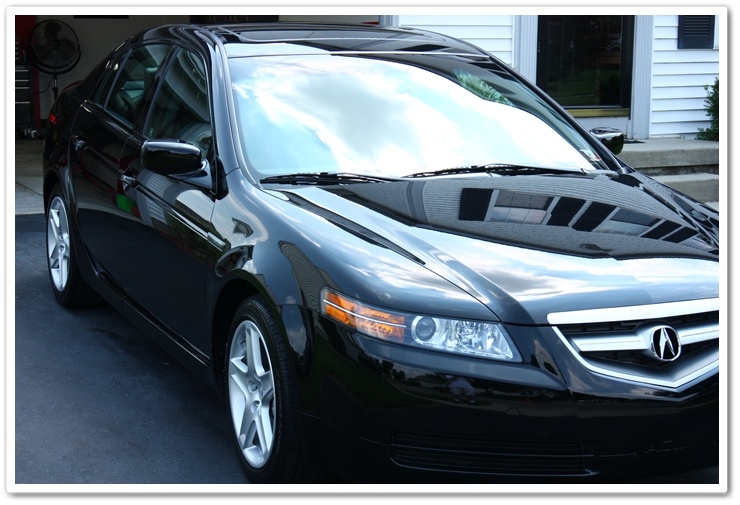
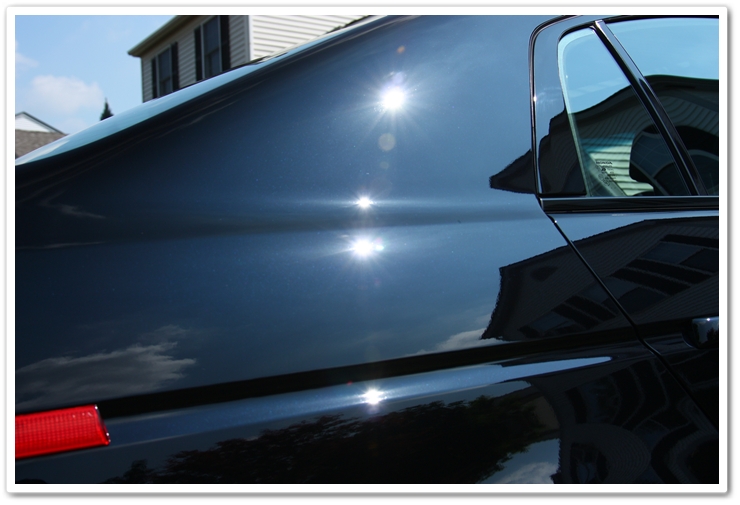
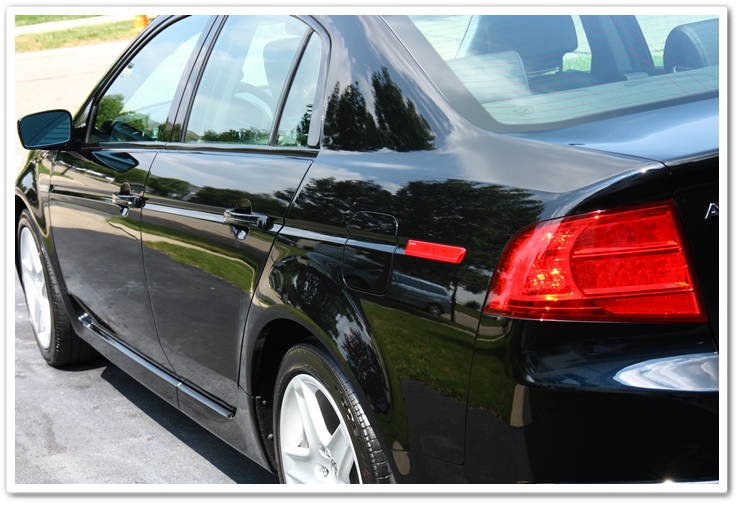
Notice the NBP TL-S in the reflection.
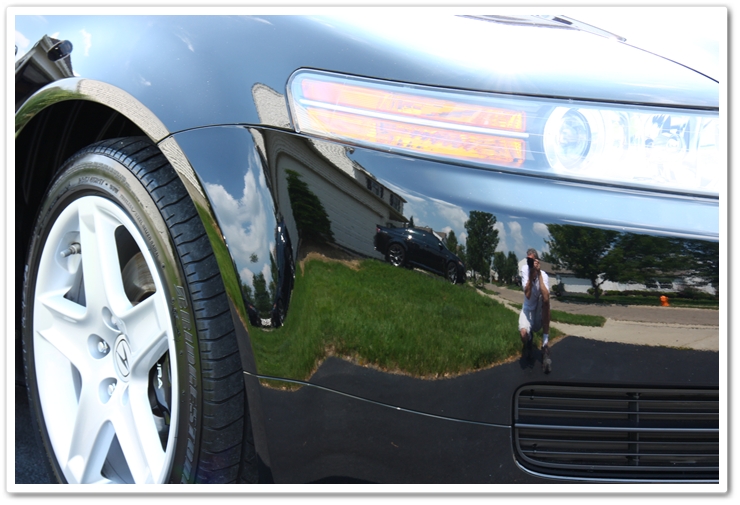
The side mirror looks like, well, a mirror!
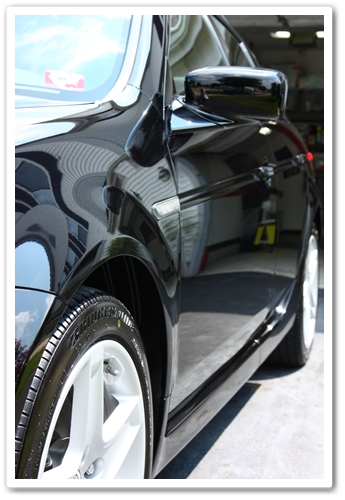
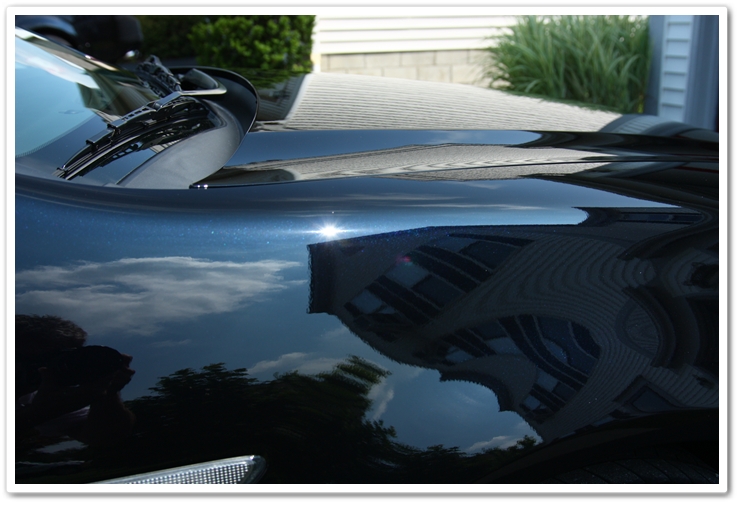
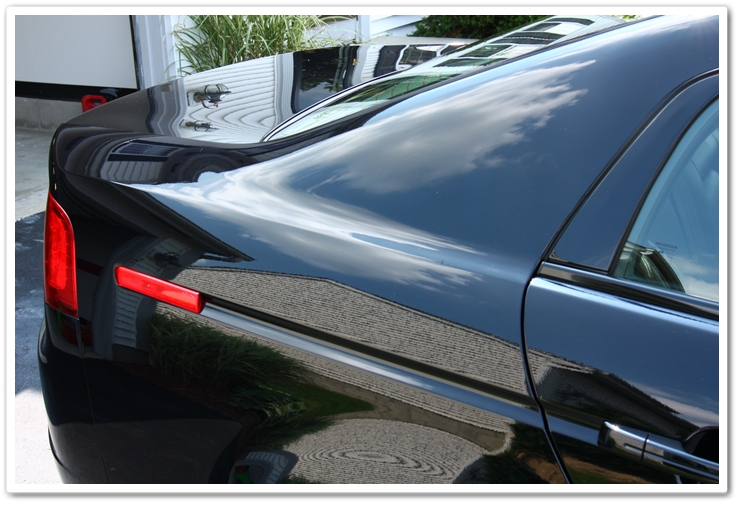
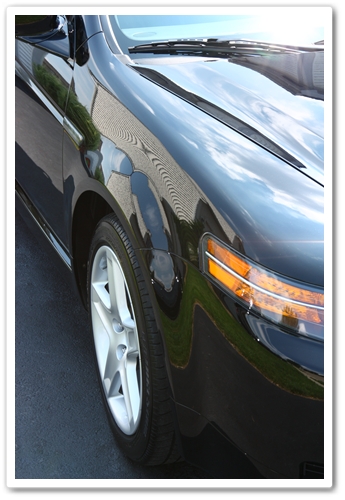
And finally, I thought this was a cool shot with the two NBP TL’s.
Hopefully you have found this to be a reference guide for properly maintaining your Acura, or whatever kind of vehicle you drive. With a little bit of patience, some practice, and combining the proper products and techniques you too can keep your car looking like the day you drove it off of the lot.
Once again thank you for investing so much time in this article.
Total time on the detail itself = 13 hours.
This is part 4 of a 4 part series (read part 1, part 2, part 3)
If you have any additional comments or questions, please submit your reply in the comment box below.


WOW i am speechless, if i had not read the entire article i would have tought it was a new paint job. you have motivated me to raise the bar on how to keep up my acura tl. How much would it cost to have this type of work done?
Thanks John! This TL is a prime example of the high level of paint restoration that can be achieved with proper polishing techniques and products. Seeing the transformation of these vehicles from start to finish is one of the most rewarding aspects for me…as well as seeing the look on the customers’ faces when they come to pick them up.
I’m glad that you’ve found this article to be inspiration for the maintenance of your TL as well. I would highly recommend that you familiarize yourself with my article on Proper Washing and Drying techniques, as this is the most important aspect of keeping your vehicle look like new.
It’s hard to say what a detail like this would go for because it varies greatly from area to area. Typically speaking however, if you were to hire a Professional Detailer that is capable of advanced paint correction, then you could expect between $500~$800 for this particular car with this level of defects. The rates are always dependent upon the condition of the vehicle, the type and color of paint, and the level that you wish to take it to.
I hope this helps!
Todd
Thanks Todd, I was wondering if you are located in Miami Florida. But by the looks of the pictures it look like up north.
Thanks
John
John…yes, I’m located in Columbus, Ohio!
if my my car looked like that my girlfriend wouldnt need a to carry a mirror anymore… hahah
Amazing article!
Your skills and knowledge are probably the best I’ve seen. Definitely going to try to tackle the exterior of my RSX for the summer with your guide. Any suggestions or tips on cleaning/prepping VERY small (less than 4mm in diameter) chips which have just slightly begun to rust so that they can be covered with touch-up paint and clear coat?
Are costs for this type of service less for lighter paint (i.e. Silver or White)? Have anyone you recommend in Canada (Alberta or BC specifically)?
Again terrific article and write-up Todd definitely going to spend some time reading your other write up’s!
Take care,
Chris
Chris,
Thanks for the kind words! As for the chips, I would try to remove the light rust in them with some abrasive polish. After you clean it up, then thoroughly prep the touch-up area with isopropyl alcohol to remove any polish residue. At that point you should be ready for your touch-up.
With lighter colored paint you can typically get away with less correction since defects are harder to see, but if you want the full treatment it would require the same amount of time. With dark colors you can usually just go with a light polish, or a full-blown multi-step job. With lighter colors, you can also go with a medium level without any worry of holograms or hazing.
Unfortunately, I don’t have any recommendations for you on that side of Canada.
Thanks again,
Todd
Todd,
Thank you for taking your time and efforts to document your superb expertise! I have bookmarked each section to use as a guide. You are the ultimate professional!
Mary,
It’s my pleasure! I enjoy writing these educational pieces, and I enjoy it even more when I hear feedback like yours. 🙂
Thank you!
Todd
Todd,
I just read the entire article. You have done the best job taking the car step by step for us “car geeks” to follow. I am inspired to keep my ride looking its best. I too own an Acura TL, color white. What product(s) would you recommend to bring the shine in the paint? It is very hard to see it in a white car.
Again, thanks for taking the time, photos, education, and inspiring us to keep our cars looking better than factory new!
-kelvin-
Thanks Kelvin, and I’m glad to hear that the guide has been helpful for you. I put a tremendous amount of effort into this article to document it all properly, and I’m always happy to hear such positive feedback.
As for your white TL, you can use the same products and combinations as I did with the NBP, and you will be very happy with the results. Sure, white doesn’t have the same “pop” as the darker colors, but it’s definitely capable of some serious gloss.
Thanks again,
Todd Cooperider
Esoteric Auto Detail
Columbus, Ohio
Todd,
Great article. I have a Ford Ranger pickup with “EDGE” decals on the sides of the box. How would you recommend I get around these with the polisher. Can’t really cover it with tape.
Thanks,
Chris
Chris,
If you’re using a PC, you can polish directly over the emblem (assuming emblem, and not actual vinyl decals)…just use slower speed and a white pad. This will help to clean up the emblem and at least some of the area between the letters. Then you can go back and finish it up by hand. Just don’t use high speed or a lot of pressure when doing this.
If using a rotary, then completely tape up the emblem and go back afterwards to polish the emblem and areas between the letters by hand.
Todd,
I truly enjoyed the detail in the TL paint restoration article, and all your how-to write-ups for that matter. Just wanted to say thanks. It’s great to see someone who enjoys detailing as much as I do. Stupendous work on the detail of your instruction. As it turns out, you really can teach an old dog (like me) new tricks!
All the best,
Brian
Brian,
Thank you kindly for the positive feedback on this and other articles. I put a tremendous amount of effort into both the detail and the educational write-ups. When I get comments like this, then I know that I’m on the right track!
Take care,
Todd
I am almost speechless! I have a question and/or recommendation for you. I too have an 07 NBP TL-S. I ordered the UDM, but i have not ordered any pads or polishes or anything else for that matter. I have always just used things like Meguires from the local auto store, but i want to start taking a little better care of my TL and Expedition (which is also black). You mentioned earlier it would cost $500-$800 for a detail job like that. I would like to know what it would cost for a complete kit with everything that you used on this detail. I look at this writeup as being the extremely thorough detailing, but i would also like to know if you have thought about writing something up that is less time. You said this was about a 14 hour job, so how about something that would be a 4 hour job, and something that is about an 8 hour job. I really cant see myself spending 14 hours on each car, but i think i could do an 8 hour job on each car once a year and a 4 hour job once every 2 or 3 months, and just some quick washing/detailing in between. So i guess what i am asking is could you/would you do a write up for a less intense detail that still gave optimal results, and then recommend the products for each of those scenarios? Would be a great walkthrough/kit you could sell on the site. Sorry for the rambling and thanks in advance!
Thanks for the comments Jared.
The biggest difference in a 4 hour, an 8 hour, and a 14 hour detail job would be the amount of polishing steps being taken, and the polish/pad combinations being used. Otherwise, you’re using the same basic processes and products. On a 4 hour job (maintenance polish), you would do everything except for claying, and on the polishing side you’d use Optimum Poli-Seal on a black pad. I can typically do a full wash, interior, and a light Poli-Seal job in 3-4 hours. For the 8 hour job you’d clay the car, and do a more complete one-step polish to get light correction and restore gloss and clarity. For this I would use something like Menzerna 106FA and a white pad, or Meguiar’s M205 and a grey pad. Seal it up after that and you’re done.
I hope this helps.
Todd
Hey Todd, got another question for you. Regarding some of the exterior plastics like the cowl where the windshield wipers are, would the 303 Aerospace Protectant work for that as well or do you recommend something else?
Jared,
Yes, 303 Aerospace Protectant would work great for that area…
Todd
Great article Todd!
What tools do you use to polish the paint inside the rear badges?
Thanks Johnson,
I have compiled more detailed information on this topic in the following article: How To Polish Under Emblems
I hope this helps.
Thanks,
Todd
Todd,
This article is truly incredible. I thoroughly enjoyed reading it from beginning to end, and it was particularly interesting for me because I recently purchased a 2004 NBP TL as well. This is my first car purchase entirely on my own, so I just started trying to bring out the paint a bit more. When I purchased the car, the paint was in rather poor condition (100k miles) and just to give you an idea, I didn’t even realize my car had blue chips in it until after I washed/waxed it myself (I even wondered if I accidentally purchased a dark dark blue car) and did a bit of research. Anyway, I must say that your article showed me how beautiful NBP paint could really be – I had no idea! Thank you for enlightening me.
Would you recommend any products and/or techniques to bring out my paint a bit more? I am on a bit of a budget (getting it professionally detailed is a bit too pricey), but I’d love to bring out the NBP on my car. I know your article is full of suggestions, but for a newbie like me, do you have any top-priority suggestions outside of a simple wash and wax?
Also, on the very front of my hood there are little white lines throughout the paint. I’m not sure exactly how to describe them besides that they are about 1-3mm long and look almost like a pattern. They didn’t buff out when I waxed the car and I’m not sure how the previous owner got them there. Any ideas?
Thanks Todd! You make me wish I lived in Columbus!
Marcus
Marcus,
I’m glad you enjoyed the article, and hopefully you picked up some helpful tips to keep yours looking its best.
You may want to start out by doing some polishing by hand.
As for the white lines, it’s hard to say without seeing pictures, but at almost sounds like checked paint, which is un-fixable without re-painting. Some older Honda’s are pretty notorious for this, but I haven’t really seen it much on newer ones.
Thanks,
Todd
this is amazing. i love it. i have a 05 nbp tsx and it has swirl marks and want to remove some but im on a budget. can you tell me what i should to use to get a 70-85% correction and then maintain it. and can you give me a little more insight about the rubbing of alcohol.
William,
Let me suggest a current article that may help you out a bit: How to Remove Swirls by Hand by Chad Raskovich.
As for the Isopropyl Alcohol, it’s used for a couple of reasons. For one it fully cleans the surface after polishing so that you can make sure that the polishing work you’ve just done has actually removed the swirls and not fill or hide them. Secondly, it helps to fully clean any polishing oils or residue so that you get the best bond and durability out of your wax or sealant.
I hope this helps.
Todd
and i plan on doing this by hand to if that helps
This article is wonderful, I’m going to purchase several of the products you recommend however I am not up to the polishing part, so I’m curious if you know anyone in CT that can be trusted to do a good job on my 2006 RSX? It’s magnesium metallic and doesnt seem to have any swirls that show, but it does have some scratches that I’d like to have polished out and a few rust spot dings from rocks on the hood touched up. I dont feel like I can trust anyone after seeing how meticulous you are with your work.
Thanks!
Hi Todd,
From Toronto, ON, great write up! I picked up a lot of neat tips and found it easy to follow.
Hoping you can lend me a hand with working on my 07tsx, also in nighthawk black. I am having trouble blending new paint, over the existing paint to cover a few scratches on the rear bumper. Chances are, I don’t have the painting technique down because the pearls are too much in the new paint and the transition from the old to the new paint isn’t smooth.
I had a local auto paint shop brew me a can of B92P and was wondering if I should spray lighter coats to get the pearls right. Also, should I wet sand a bit deeper into the old paint because the thickness new paint plus the clear coat is creating a ‘raised’ (or not leveled) surface.
Thanks a million!
Thanks for the feedback.
Blending of pearl or metallic is quite difficult to say the least. I’ve seen blends that were done by professional painters, and I could easily tell where it was done. Unfortunately I’m not a painter myself and can’t provide much qualified advice on how to make it look its best. I wish I could be more help in this situation…
Todd
Todd,
I stumbled upon your site while looking for detailing supplies to give my yellow C5 a good detail and get the paint up to par. I am amazed at the results you have achieved here! I have used some of your tips in the past, but there are many here that I will definitely try out the next free weekend I have. I used to detail during my college days but unfortunately haven’t kept up on the latest detailing products. I really appreciate having the recommendations and links to those aforementioned products, I’ll definitely be trying out a few in the near future. Thanks for the inspiration & getting me excited again about keeping my car detailed properly!
Thanks again, take care.
Sal
Thanks Sal, and I’m glad to have helped you to catch the detailing bug once again! We’re continuously posting new content, so be sure to check back often and search through all of the articles that we already have.
Take care,
Todd
I have a 2007 TL, but the grey one. Could I get it too look that good..with the products you have mentioned?
Adrian,
While grey is not going to have the level of deep reflections as black, you can get it looking very good with the same products listed in this article…
Todd,
That’s an amazing work you’ve done on TL. What’s your opinion on waxing the car after doing these type of works? Does it really help to maintain the finish longer? What kind of wax do you suggest? Carnauba or synthetic waxes like Meguiar’s TechWax?
Kevin
Thanks Kevin,
Well if you’ve used a sealant like I did after this work, then there’s no need for using a wax afterwards. You can if you want to change up the look a bit, but sealants will out last waxes as far as durability is concerned.
ABSOLUTELY AWESOME!!! Thanks for taking the time/effort to explain and document this for us all. Quick question though. What do you use to actually clean the interior surfaces of the car (non-leather)? I saw that you treated the surfaces with 303 or Optimum’s Protectant Plus (customer’s choice), but what do you use to initially get the dirt or grime off? (microfiber towel+???)
Thanks in advance
Glenn,
You actually have some options here. You can use a general purpose cleaner like Meguiar’s D101, or you can use specialty products like 1Z Plastic Deep Cleaner or 303 Fabric/Vinyl Cleaner.
I hope this helps.
AWESOME WRITE UP!
I have a black Honda S2000 which is pretty good as it sits right now as far as needing any type of correction.
I am looking at getting the Blackfire products to use and am wondering if you find it worth it to add the carnuba wax over the sealant.
Also what are your thoughts on the Glaze with the fillers???? I have a few spots that might benefit from it but i am not sure if its a product that will last long enough.
What are your recommendations for pad and product on this car? I keep reading this site over and over and getting the menzerna vs megs over and over and over……should i stick with white, black, and orange pads,…..or are these crimson and blue pads totally different???? i’m getting frustrated.
Thanks for the hard work
Josh,
Is your S2000 the plain black color (as opposed to the metallic / flake)? If so, this is a very soft paint and requires a little different method than the NBP. I’ve recently worked on one of these as well as an NSX with the exact same paint. If you only have light defects, then Meguiar’s M205 with a black pad is as aggressive as you’ll need. This will leave some marring on the ultra-soft paint, and I found that following it up with Poli-Seal on a blue pad at speed 5 worked very well.
You don’t need to top BFWD with a wax. You can if you want to compare the looks, but you don’t need to. For ultra-soft paint like yours, I would probably recommend just using the sealant because you want to buff the paint as little as possible because of how easily you can mar the finish.
Lol, this article is like the gift that keeps on giving. I was bored this morning so figured why not read it again……. for the 5th time! It inspired me to order some PO85RD and PO203S and 2 orange and blue pads!
I’m just a giver Jared…
Enjoy the new polishes!
Todd I love this article!! I’m going to do this 4/26/2015
I enjoyed this article so much I wanted to drive to u just so u can do this to my 08 tl base nav!
Hi, I do similar detailing on my 3 cylinder Suzuki hatch (Silky Silver) but we don’t get most of the products you mentioned here. So i use brands like 3M, sonofagun, turtle wax etc
Your work on the Acura is out of the world, to say the least.
Todd,
Guess your parents misspelt your name – should have been Godd – God of detailing. I have a Honda CIty – got it repainted recently due to the bad condition of the exterior and interior. After reading your BIBLE I have decided come what may I will keep my car as good as new. Its sad that the products you have mentioned are not available in India. Request you to suggest online stores that ship these products overseas. You will be an inspiration to all bad car owners like myself. Thank you very much – keep up the good work and sharing the knowledge. Watch out man Rolls Royce might kidnap you. Thank you.
Thank you Parn! Those are very high remarks you gave there, and they’re much appreciated.
Your best bet would probably be to look into detailing supply companies in the UK. I know it’s big business over there, and that’s probably where I would try to get supplies from if I were in your position. Sorry though, I don’t have a recommendation for a specific company.
Thanks again for reading, and please be sure to visit back often for new articles.
Best regards,
Todd
Hi..
This is Prashanth all the way from India. That was an fantastic article on how to care for your cars paint. Had a lovely time reading it and Im buying most of the polishes that you’ve used !!
Kudos to a job well done!
Cheers,
Prashanth
Thank you, and I’m glad to hear that you’ve found the information to be helpful!
Todd Cooperider
Hi Todd,
This is Ramakrishnan from India.. I thoroughly enjoyed your article and admire your passion. I have a question.. Is there any particular technique of using the polishing machine? I mean is there any particular force with which I should use the machine? I am not a professional car detailer.
Regards,
Ramakrishnan
Ramakrishnan,
The amount of force you apply to the machine depends on a lot of different factors…what kind of polishes you’re using, what kind of pads, whether you’re compounding or finishing, etc. It also depends on the kind of machine. You’ll typically use more pressure with a dual action random orbital like the Porter Cable 7424XP than you will with a rotary polisher. It also varies based on whether you’re working with hard or soft clear coat. As a general rule of thumb though when using the Porter Cable, you’re going to use about 10lbs of pressure on the machine. Just keep an eye on the amount of “squish” you get with the polishing pad. If it stays the same, then you’re probably not applying enough pressure. You want to see it flatten out a bit, but not to the point where you completely flatten it out. You’ll quickly get a feel for the machine and the polish, and it shouldn’t take you long before you know when to vary the amount of pressure based on the type of paint, polish, pads, correction, etc. Good luck!
I love coming back and visiting this write up every once and a while for inspiration Todd. Great job breaking down every step and providing tremendous insight. Class act all the way!
Thanks David! This was definitely a fun tutorial to put together, albeit a very lengthy one!
Todd, I am speechless and my eyes are stunned with such a detailed cleaning and polishing.
I can say i never found such a perfect guide on internet in last 10 years.
This is AMAZING, and I am sure such quality products are not yet widely available in India.
I need to to clean the rubbing marks(tiny scratches) from my front windscreen, can you point me to some good glass cleaner please.
Thank you, and I’m glad you enjoyed the article. This one has been quite popular…
If you have fine scratches in your windshield (ones that follow the wipers, for instance), then you need an abrasive glass polish that includes cerium oxide. If you have either a rotary or random orbital machine, Lake Country sells a nice glass polishing kit. If that’s difficult to get in India, then just do a search for cerium oxide glass polish to see what you have available there.
Nice write up Todd! all this just makes me want to start detailing my car already. I also own a Acura NBP only bad side is where I live, it get’s dusty real bad here so what would you recommend using when dusting the car?
Jacob,
I would recommend against trying to “dust” your car between washings…especially with the soft and easily scratched NBP paint. I would rather have a dirty looking car with paint in great shape, than a dust-free car with scratches and swirls! It’s tough to learn to live with it, but it will pay off in the long run when your paint remains in great condition.
Well done Todd!!
I appreciate the detail of your work and writings. It took me a while searching for sites with this much detailed information and know how. I do have a question. I just purchased a 2010 Acura TL (Diamond White Pearl). What is the first step I should take (other than proper washing) to keeping the new showroom finish protected? I have heard that sealing it is the first thing I should do but wanted your opinion. If sealing is the answer, what product would you recommend best and should it be applied hand or buffer? Thank you again for giving me piece of mind that I can follow in your footsteps myself without having to spend hundreds of dollars for someone else to detail my car!
Thanks!!
Derek
Derek,
You definitely want to start off by proper washing, claying, and sealing your new car. Please refer to an article I wrote on prepping a new vehicle.
A couple of my favorite sealants are Optimum Opti-Seal (by hand), or Blackfire Wet Diamond (by buffer or by hand).
Thanks!
Todd
Great article as others have said. It is my bible of polishing my NBP. My question is: Do I need to do anything to remove nasty water spots that clay won’t touch before polishing?
Thanks
Rob
Thanks Rob. If you’ve clayed the area, and it won’t remove the water spots, then just proceed directly to polishing.
One other question Todd. I jsut ordered all of the gear you recommended in this article ($$$) I noticed that 95% of the work was done with the Makita rotary. I am assuming the same results cannot be acheived with the PC. I’m getting ready to buy both.
Thanks
Rob
Hi Rob,
You CAN get great results with the PC, and on some cars I work on I will use the PC exclusively. Most of the time, I end up using both. On certain paints however, you’ll find that they finish down better with the rotary. On NBP Acura paint in particular, it’s hard to beat a rotary for the finishing process.
Thanks Todd,
I got the Makita and the PC and all the gear. Now I just need it to warm (Utah) up so I can put them to use. I will use my 98 Civic as a test vehicle.
Thanks Again
Rob
You’re welcome Rob. For the Makita in particular, first get used to it with finishing pads and polishes first at slow speeds, and then work your way up to the more aggressive stuff. You can also practice on your washer and dryer just to get a feel for it!
Todd I have just joined this site. I love having a great looking car (I own a 2001 Audi A8 L)After reading and seeing what you did with this Acura, I am in aww. So far everything I have read is exactly what I have been missing in trying do to get that “look” I want in my cars. I can’t wait to try these lessons out on my car, I am a auto tech by trade, but a love detailing my car. I want to say, thank you for taking the time to write these awesome articles for guys like me to read and learn from, I also got my p/c polisher last year, I thought what I did with my car last year was looking good. Now i want my car to look like the ones you have shown.
Robbie,
Thanks for the comments, and I’m glad you’re finding these articles to be helpful. Just take your time, learn one new aspect of proper detailing at a time, and always continue to improve your skills. When it comes to polishing, don’t get over-anxious and expect perfection the first time around. It will take some time to really get a feel for the polisher and polishes, but once you do you will really enjoy what a perfect finish can look like.
Todd,
It finally got warm enough (50 deg.) here sunday for me to wash the car. I did it step for step by your method and all turned out great. Still waiting on the weather to get some practice on my ’98 civic and get proficient enough to tackle the Acura.
I have another question on this detail. How do you treat the lights? Same methods and just treat them like the paint (I assume not) or slightly modified?
Thanks
Rob
Rob,
I’m waiting for the warmer weather to break here as well! As for the lights, just do a light polish/pad combo if you’re using a Porter Cable, and then you can use your favorite sealant on them afterwards.
Sounds good. I’ll hit them with the PO85 and black pad on the PC.
Come on spring!
Thanks
Rob
Simply amazing! one of the best detail write ups thus far. you are a good man for this!
Todd,
Your review of the Meguiar’s microfiber package was great. How does a package like that paired with a Flex 3401 deliver on a project like this?
Ben,
For the paint on this particular car, I think that the Megs MF Cutting Disc and D300 compound would work great, but I’d probably finish with Menzerna 106FA. That’s obviously all based on theory and experience…only testing that combination on that particular car would tell exactly which combination works best.
I would pay real money if I could find an expert like you to detail my cars on a regular basis. Unfortunately in the Atlanta area we’ve only found idiots. *sigh* I’m totally jealous. Awesome job!!
All I can say is WOW! I have bookmarked this for reference. I got into detailing (my own car) last year and I have gone through the financial swings of trying out new products to see what works and what I like. If I would have seen this excellent write up I could have bought the right products the first time around. Turns out though I have settled on using a lot of the products you mention in the 4 part series, so at least my trial and error landed me in the right spot.
Thank you so very much for all the time and effort you put into this as it is extremely easy to follow and the blue hyperlinked text to the product is a lifesaver!!!
The stellar quality for the car detail executed and even more amazing is the high quality article you have written for the same. The narration, the pictures are worthy of their own article, a classic you have written for us all car enthusiasts.
I will only come to you for car detailing given the quality of service and skills you invest, is unbelievable.
And I am in India, half the world away!
Thank you for the kind words…they are much appreciated!
Todd,
I started my paint correction last night on my NBP TL following your instructions in the great article you posted previously. First off, thanks for the great write up. I would be lost without it.
During this process I came across several issues that raised questions. Let me start by giving you some background. This is my first full on detail using a rotary polisher and the system you have described. I practiced on my 1998 Civic prior to starting in on the TL. I have all of the pad/polish combinations you recommended. I also have two twin light 1500 watt halogen light towers. The TL is one I purchased last winter and has been very neglected paint wise. I can tell it has been washed regularly in a car wash as I can see the hose drag marks on the trunk and roof. I did have several areas painted as they were beyond repair such as the rocker panels and such. The hood still needs repainted due to 1000’s of rock chips. The rear bumper was VERY scratched up from being banged by cargo being loaded in and out. I suspect this car was used to move a person more than once as attributed to some damage inside the car from TV’s and such scratching the plastic. That’s another topic.
So I started on the trunk lid as I thought this was an easy spot and it was in pretty bad shape. So far I have about 5 hours into just the trunk lid and back portion of the trunk lid. I would say I have achieved about 85 to 90% correction. There are some scratches that I can’t get out. I am either not being aggressive enough or they are beyond removal. I started out with an orange pad and Power Finish. I could not get the swirls and scratches out with this so I stepped up to an orange and Meg’s 105. This got most of them but took several passes. I even hit the lid with the purple foamed wool and 105 for a few passes then back over with orang and PF. I don’t know if I am not putting enough pressure or what. I also have a problem in that my working time is very short as far as I can tell. Of a couple of occasions I was working the 105 and orange and it apparently dried and left thick patches that were very hard to remove. (i suspect to much product). I found that misting the pad with water would extend my working time a little. Is this bad? I also found out the hard way not to hit the masking tape so the wheel contacts the glue. Flings glue everywhere!
I guess my general question is do I need to add more pressure or change my technique a little for more correction or are the scratches I’m trying to remove to deep. I think I read somewhere that if you can catch it with your fingernail it’s too deep?? Do I need to go more aggressive than what you described? In addition, when using the orange pad and Power Finish your article says to work it in at 900 rpm for 3 passes, 1500 until it breaks down and then back to 900 for three passes. I have two problems here. I cannot tell point at which it breaks down and I think the product is dry long before I can get the passes you recommend. I am thinking about working a smaller area. I realize this all depends on environmental conditions. Here in Utah right now it is 90-95 degrees and 25% humidity. I did notice when a rain storm passes my working time seemed to increase.
I am also very disturbed by the emblems. I cannot get the paint polished around and in them. Do these TL emblems come of easily? I wasn’t sure if they were held with double sided tape or screws or both.
On a side note. I did treat the seats with Leatherique the day before and all I can say is AMAZING. Seats are looking like new again instead of hard, slippery and shiny.
Sorry for being so long winded (fingered?)
Thanks Again
Rob
Rob,
Since I can’t see the defects in person or take measurements, there’s no way for me to know whether they’re too deep, or you’re not being aggressive enough. And since you still have limited time with the rotary, I’d say the best advice for me to give you is know when to say when…and don’t try to be a hero on your first go with it! It takes time to master and know how to get the most out of the machine, pads, and polishes. 85%-90% correction is quite good, especially for a car that was in bad condition.
For the 105, make sure your pad is fully primed (not dripping wet…just evenly covered. See my 105/205 article). Then just apply a couple of drops of product. If you need more working time, a quick mist of water is fine. With Power Finish, 2-3 pea sized drops should do you for 1/3 to 1/2 of the trunk lid and you should have no problems with it drying up. Both of these polishes will be affected by the temperatures. Try it earlier in the morning and compare to how it reacted in the heat of the day.
The emblems should be attached with double-sided tape. You could remove them and polish and re-attach, or just work the area around it by hand as best as you can.
Just remember that when you’re seeing the before and after shots by the blog authors, you’re seeing results by guys that have a tremendous amount of experience. The first cars that you do will take you a lot longer until you work out systems, learn how to read and react, and figure out the learning curves on each of the polishes. It all takes time, so be patient.
Thanks and have fun.
Todd,
Thanks for the reply. As usual you are spot on. Since I posted my question I have put another 6 hours in. I am now finished with the trunk, rear bumper, left quarter panel and left rear door. I did read your article on priming the pad when using 105. That’s what saved me. I find I can actually work an area and see when the 105 flashes. I wasn’t using nearly enough compound before and it was immediately drying. I am learning to say “when”. I can get all of the spider webs and swirls out and work the deeper scratches until they are less visible. I do find myself using the M105 and 4” orange for everything except the pillars so far. My plan is to use 105 and purple foamed wool on the hood. Sound ok?
I don’t see myself using the larger pad until I hit the roof and hood. Is this bad? I am using a lot of 105 though. I ordered a larger bottle. I had the small one and it’s dwindling fast. I do get a lot of dusting since I started priming the pad. I am getting better and a little faster as the experience comes.
I am getting a good finish with the 105 and plan on going over it again with PO85RD and blue pad, and finishing up with Opti Seal. I debated on an intermediate step of the Power Finish and orange, but don’t think I would gain much.
Just bought a bunch more pads and compound to add to my arsenal.
Oh, and I am having fun. Did your wife complain you were spending too much time in the garage when you started?
Rob
Todd,
Thank you for the in-depth article with pictures – I’ve read it more than once! I have a similarly colored Acura, and your steps helped out tremendously when I embarked upon giving it a full detail. About 10 years ago, I bought a PC 7424 (not XP) and used this for my detailing project. I was able to get good paint correction from the machine, but I certainly did put a lot of time into it. Do you think it is worth it to upgrade my polisher to the 7424XP? Will this save me a lot of time and give me better results than my current machine?
Thanks much,
Jason
Jason,
If you have heavy correction to do, then yes…the newer machines like the PCXP or the Meguiar’s G110v2 will make quicker work of it as they have more power and are less likely to bog down under pressure. If you’re just doing lighter work though, or are simply using an AIO-type product for maintenance, then you should be fine with your current machine.
Todd,
Ive got a little problem with the paint on my VW jetta. Its a black car and I had a small scratch on it on the right rear fender. It was actually a scratch with some kinda rubbery thing sticking along. I had asked the dealer to take care of it for me and he just wiped it with alcohol. Now the rubbery texture has gone but the alcohol wipe down has left a faded finish. I can clearly see a slight fade in the paint right where the alcohol wipe happened. What do I do?
It’s difficult to say given the information. You may just need a simple polishing out by hand in that area, or you could have more severe issues that you’re dealing with. I’d recommend trying the easiest method first, which would be to get a mild abrasive polish and lightly work the area by hand (follow the instructions on the particular polish) to see if it makes any improvements. If not, then you may want to visit with a local professional. Thanks.
hi, very helpful tips,can u tell me what to use to clean the stereo and gps area,i’m affraid to ruin it,tyvm
You can use something like Meguiar’s Quik Interior Detailer or 1Z Cockpit Premium.
Hi todd,great review, stupid question what do you use to wash the floor matts and what is the rigth way to do it? Thank you for being so helpful and courteous,have a great week end…
My car is color gray…what are the basic tools i should have, i just order optimum protectant,i got a mitt and mf towels…what to use for cleaning the navigation system screen and the plastic covers for the odometer/ thanks again.
Thanks Jose. For your matts, you might find Rasky’s article to be helpful. And for the nav screen and similar areas, I’d recommend Meguiar’s Quik Interior Detailer.
Hello Todd,
There is a ring of dirt around the outer edge of my tires, I scrub and scrub trying to get it off but it doesn’t. What do you recomend I do? What product should I try using?
Try using some Tuff Shine cleaner and brush. You can find more information by watching Greg Nichols’ video here.
thank u so much for your help,todd….i have no words to thank u for all of your help,it makes it so much easier,have a a great day!!!!!!!!!
Remarkable job, I love the deep gloss in the paint you achieved. My hope is one day I can have the level of mastery that you have Todd. Thank you for the write up and the share.
Thank you James!
Absolutely unbelievable results. The “money shots” are just beyond words.
I corrected my NBP TL and while it does not look anywhere near your results, it looks great compared with my start. I have a question of how to maintain the paint going forward. I had to use LC cutting pads and Menzerna cutting polish plus a finish and sealant to get where I am now, but what do I do on a regular basis?
I will of course wash the cash but how often should I do a “maintenance” wax or sealant and what type of pads and product should I use? I don’t want to cut any more paint, just protect and keep the sine! You could even do an entire article on just maintenance jobs.
Zak,
You’ll want to follow the wash and dry instructions, as well as the information I have provided about using Grit Guards. These are your “foundation articles” for detailing, and your future needs will be dictated on how well you follow these instructions and perfect your methods and technique. If you use something like Chemical Guys V7 spray during your drying phase, then you should be covered on a regular “touch-up” for a sealant. And how often you completely wax or seal depends on what products you use as some of them are more durable than others. If you hand-wax, then you’ll need to do it monthly. If you use a sealant, it would need to be re-applied anywhere from every other month to every 4-6 (depends on a lot of factors).
Hey there
Awesome article.
I was curious if you knew of any detailers in the Minneapolis area who do this sort of detail.
Otherwise its tempting to drive to ohio! I have a ABP 05 TL its not nearly in the shape this one is, but i want to get a nice polish on it but too coward to use a polisher in fear of F’n up the paint. IDeas?
Yes, Chad Raskovich from Rasky’s Auto Detailing (one of the blog authors) is your go-to guy!
Just the kind of article i was looking for . Picture perfect and must say was blown off by the pics . i always like to keep my car clean 🙂 . i dont get to ride much as am abroad but whenever i get the chance i make sure car is clean. next time am going to my home am going to doth entire cleaning 😀 .
Thanks
Sam
I’m glad you enjoyed the article Sam…thank you.
wow, thanks Mr. Cooperider you truly inspired the car lovers, i just happened to found out the link of ur article on a web site as i was looking for polishing for my car and i am thrilled to try out the expert advice.
thanks
Thank you!
Todd,
Awesome!!! I left a comment earlier after reading Part 1, but now that I finished the entire article I’m speechless, absolutely beautiful job… I hope to get my NBP TL-S in this condition soon, it was detailed at the dealership upon purchase but I doubt they put in the time and effort that you did. True Inspiration for Honda/Acura lovers.
Thanks!
Marshall
Thank you Marshall!
Todd,
Very interesting articles. I own currently NBP Honda Accord in the UK. Have owned 3 previous Honda’s the same paint colour. Love the colour!
I have kept them all in A1 paint condition. Never ever ever gone through a car wash – would be fatal on the paint. I will use some of your tips also now.
One frustration I get is in paint shops – more times than not they paint the wrong shade of NBP…there seems to be several versions of the paint on the market. This even happens at Honda approved paint shops despite me telling them before they paint to please select the correct NBP shade version. Do you ever come cross this problem in the US?
The problem shows when the sun shines particularly. Why paint shops don’t use the VIN code I never can understand. I currently have a problem where the front wing has had to be resprayed due to a car park ding….a good paint finish but the wrong damn shade! So they are going to have to respray – so frustrating – any advice about this shade of NBP paint problem?
Thanks
Peter in the UK
Peter,
I haven’t heard of several different shades of NBP, but then again I haven’t had to deal with any repaints on this color. As for the plastic parts (front and rear bumpers, rocker panels), they will look different straight from the factory! This is the case with most manufacturers. On my NBP, and most other cars I have owned, the bumpers are a different shade when looked at in the right lighting.
Hey Todd, I recently came across these articles while looking for car maintenance tips and I must say I was blown off by your sheer knowledge in car detailing. It has greatly inspired me and I thank you for such a great write-up and such a detailed explanation ! Keep up the mindblowing work !
Just re-read all 4 parts of this article. A friend who owns a 2001 CL with NBP paint won a $300 detail at a local “professional” detailer, so i have arranged with him to see the car after it’s done to see what he gets in a $300 detail. I might just buy the products you used in preparation to re-do it lol.
Hello Mr. Todd – As I earlier mentioned, your articles have greatly inspired me, and so I have also compiled something similar in a blog. Although the detail process is not even as close as descriptive as yours, but it is my first attempt at it and I would love to hear if you have any corrections to point out ! Here is the link to my attempt at explaining car maintenance: http://boltnblaiz.blogspot.in/2012/06/waxing-blaiz.html
This is awesome!!! I have the exact same car and color, however I only have a Porter Cable 7424 XP. My paint is nowhere near this bad though. Is it possible to get that amazing of a look with just the Porter Cable 7424 XP? Would a Flex XC 3401 VRG be a better tool for tougher scratches?
Hey Todd,
I have a black dodge ram with all the same swirls, hazing, and marrying as described in your 4 part series. My questions is, where does “waxing” come in to play? After I wash, clay bar, polish and seal…. is waxing required to maintain? Thank you
Hi Todd,
Great work sir,
This is Vikas from New Delhi, India.
I could not really stop myself from appreciating the level of detailing put in this article and more than that, in your approach. I own a Suzuki 2011 Alto F8D. It’s a micro car and wears a, what they call, midnight black shade. The car was bought in Sep 2012 but was manufactured in Feb 2011. It had been sitting in the sun at the dealer’s stockyard for as high as 19 months. I bought it for the huge discounts the dealership offered me. While the paint is rather dull, it still has potential. I intend to invest in a buffing machine and a couple of buffing pads to bring back (or may be even just exceed) the glory of how she looked when she rolled out of the paint shop.
Your article, Todd, is extremely helpful for someone like me, who instead of spending $50 on a one time Teflon job at a professional workshop would like to spend $200 instead and do it as a DIY thrice every year or may be four times a year (costs indicated are a direct conversion from Indian Rupees to US$ as per the current For-Ex rates).
Thank you again Todd and best wishes for, well… in your case, the road ahead.
Fantastic job ! I saw your article,and I am in the process of doing a pearl white 1997 Acura TL with 150,000 miles on it.
I just spent 3 hours on the hood alone. Washed,clayed,M105 on a 5.5″ LC yellow pad ,2 applications,6 section passes each,followed by M205 1 application 2 section passes on a orange LC 5.5″ pad, followed by a wipedown and Blackfire Wet Diamond. 96 percent corrected.
It looked like someone tried to sand it down with a brillo pad when I started.
Better than new now.
I worked on the trunk first to determine what pad and combo to use.
I havnt tried jeweling with a rotary yet, but I love my D/A polisher
I appreciate the info guys like you,Mike Philips,and others put out here for us newbies ,it helps speed up our learning curves.
I just started detailing a year ago and really enjoy it. Again beautiful job Todd !
Hi Todd,
I echo all of the praise listed above, insanely detailed. I am looking at purchasing a 2005-2006 Acura TL. I have passed over the cars that have shiny leather seats (most noticeable in black). It appears from your article that this can be corrected. How would I know if the treatments you recommend would bring the leather back or if it was too far gone. One last question. Since I live in Georgia and not Ohio how would I find a “professional detailer” that does the level of work you describe? If I lived in OH I would just schedule an appointment.
Great article but I have a question. I have an 04 TL and the dashboard recently developed two cracks in it! I’ve read online that this is a common problem among 04 and 05 TLs but I’m looking for a solution or prevention from further damage. I keep it in a garage more often than not.
Hello Todd–
I have been hand-detailing my personal cars for years–always afraid of using any machinery/tools when it comes to polishing. Thank you SO MUCH for enlightening me–what an amazing article!!!
But before I dare attempt to replicate your process, will you please help me to understand what’s actually going on during the polishing (cutting/buffing) process.
From my (very naive, admittedly) perspective, I am having a difficult time understanding how using a rotary tool on a swirl mark will make the swirl mark go away. I’ve always stayed away from rotary tools thinking that they were in fact the creator of such swirl marks.
I’m not doubing you in the least bit–just looking to understand what’s really happening during the process. Are the swirl marks actually embedded in the clear coat or in the paint? When using rotary or orbital tools, are you removing clearcoat? Removing paint? What’s actually going on here that makes the scratches and swirl marks go away?
Thank you again for all that you have shared!
Hi Todd,
This was a great write up. I own the midnight pearl 2012 TL and I had two questions. How would you deal touching up paint chips and if there was a detailer in the Toronto area you would recommend. Thanks!
So does polishing eliminate the need to polish with a denin pad if you want to get rid of orange peel?
Tuan – It really all comes down to personal preference when using a denim pad, or any other pad for that matter. Take a look at the below two part article on orange peel and how to remove it. It is a big help explaining how polishing can remove orange peel before you ever consider the need to repaint.
Part 1 – https://www.detailedimage.com/Ask-a-Pro/ask-a-pro-orange-peel-part-one-of-two-what-is-it-and-why-is-it-a-problem/
Part 2 – https://www.detailedimage.com/Ask-a-Pro/ask-a-pro-orange-peel-part-two-of-two-how-to-rid-your-paint-of-it/
So great post ! never found anything so complete ! Thank you for all, you are an expert ! (I hope you don’t mind I post this comment on every part of your post to be sure that I will receive the next comments by Email)
Hi!
I am from India and just starting my way in detailing i want to start with my bike first as to do a car i will need to buy lots things which i can do one by one
I have pearl white finish bike which a month old here is where i need advice from you
As i understand the intermediate level detailing the following are the steps
Washing
Claying
Polishing
Waxing
I need to get the bike washed outside as in India i do not have the liberty of connecting a pressure washer
Do i need to clay the bike as its just one month old and has done 200 kms and is parked in a cover most of the time
Polishing i have premium Formula 1 liquid polish with me can i use that or do i need to buy something
Waxing – I was thinking of going for collinete 845 as thats the one i can easily buy in India and has good online reviews or so u suggest something else
I also need to know since a bike has lots of plastic painted panels is the process same or do i need to take care about certain things
Also it has lots of black plastic panels what do i use for them to restore the shine and protect them