
Polishing How To with Meguiar’s M105 / M205
by Todd CooperiderMeguiar’s M105 Ultra Cut Compound
For as long as people have been performing heavy paint correction on cars, detailers and body shops have been reaching for heavy-cut compounds for their most aggressive needs. While these abrasive compounds have done a tremendous job of removing the most severe defects, they would unfortunately leave a significant amount of micro-marring and compounding swirls that would require several additional polishing steps to completely refine the finish.
A short time ago, Meguiar’s recognized the need for a heavy-cut compound that would finish down nicely and save time in the process. Their product development team started to work on this project, and when they emerged from behind closed doors they introduced the detailing world to one of the most significant breakthrough polishes that the industry had ever seen: Meguiar’s Mirror Glaze #105 Ultra Cut Compound! I don’t like to over-hype a product, but a product that cuts like a (very) aggressive compound yet can finish down like a polish while saving time is simply unheard of.
The key to M105 is their super micro-abrasive technology. Unlike traditional polishes that require a long working time to break down the abrasive particles, M105 utilizes ultra-hard non-diminishing abrasives that retain their size and shape throughout the polishing cycle. These abrasives are designed to cut hard and fast, and the fact that they maintain a consistent cut from start to finish means that the process goes much more quickly than traditional polishes or compounds. The end result is a heavier cut, with a finer finish, in less time! M105 is capable of removing 1200 grit and finer sanding marks, scratches, acid rain etching, and severe swirls and holograms.
And another great feature of M105 is that it produces tremendous results whether you use a random orbital polisher, such as the Porter Cable 7424XP, a rotary polisher, like the Makita 9227C, or by hand. For those who own a random orbital polisher, and thought that you weren’t able to achieve heavy correction without stepping up to a rotary…think again! You can achieve great (and safe) results with a PC7424XP, an orange pad, and a bottle of M105.
Here are a few examples of M105’s capabilities:
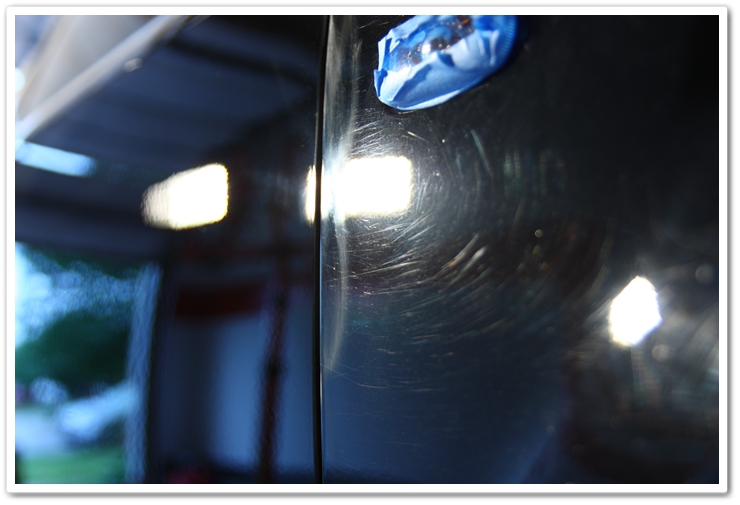
M105, wool pad, Makita rotary on ultra-hard Audi paint. Left side corrected, right side un-corrected.
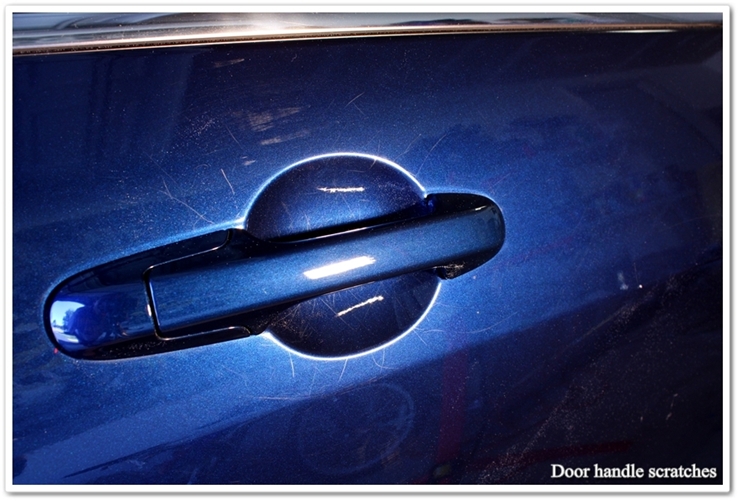
 Heavy scratches under the door handle before:
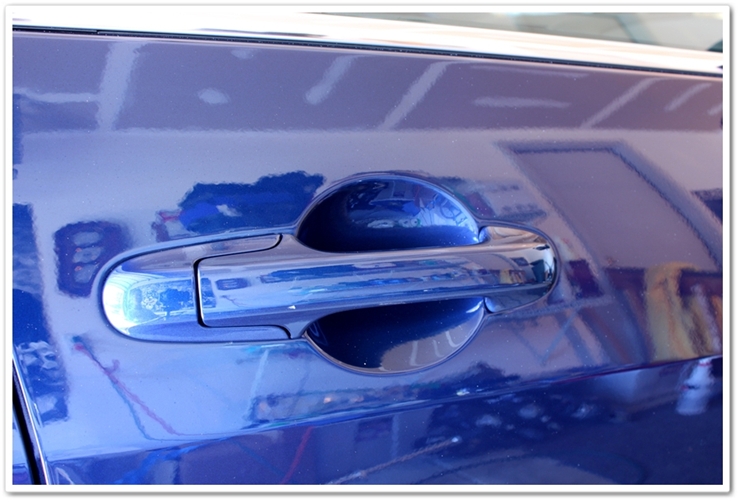
 After working M105 by hand with a foam applicator:
Meguiar’s M205 Ultra Finishing Polish
After the Meguiar’s team released the powerful M105 compound to the market, they developed M205 Ultra Finishing Polish as a companion to create the most complete two-step polishing system available. Utilizing the same super-micro abrasive technology, M205 is the perfect follow up to M105 to remove slight hazing and to restore a deep gloss, and it acts as a great one step polish to remove light swirls and defects.
M205 quickly restores a high level of gloss after compounding with M105; so long working times are not required. You will be amazed at how little effort is required with M205. It provides incredible results with minimal time.
M205 permanently removes swirls and light defects from all paints, and can be applied by hand, by a random orbital polisher, like the PC 7424XP, or by rotary, such as the Makita 9227C.
Here’s an example of what M205 is capable of as a one-step polish to remove light defects and to produce rich, deep reflections: Light swirls and haze were permanently removed after one pass with M205, a White Lake Country pad, and a PC 7424XP. Door has been corrected, rear quarter panel has not. 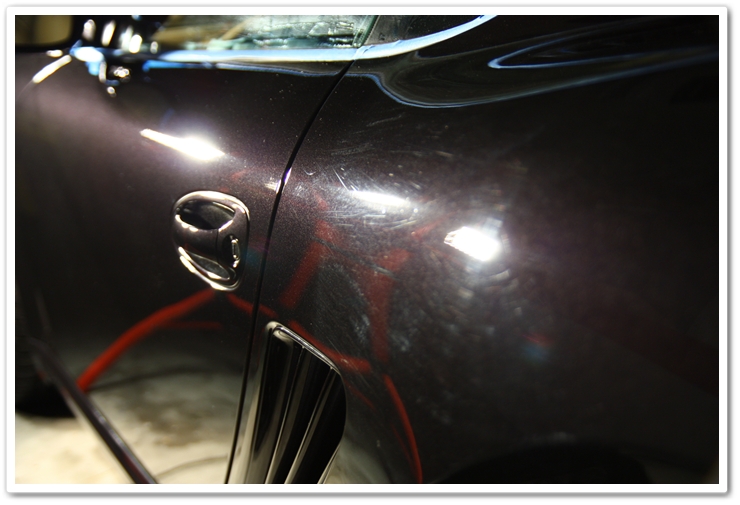 Now completely swirl and defect free with a high level of reflectivity.
Meguiar’s M105 / M205 Tutorial on a Porter Cable 7424XP
The combination of M105 / M205 is capable of correcting a variety of paint conditions, and it is very dependent upon pressure and pad selection. If you require heavier correction, then use a combination of more aggressive pads and higher pressure. If you have lighter defects to tackle, or you’re working with softer paint, then use a less aggressive pad combination with reduced pressure.
Pad Selection:
There are a lot of different factors to consider when choosing a pad to use, so it is always best to test a few combinations going from least to most aggressive before deciding which to use. What may work perfectly on one car may not for another, so always use pad selection tips strictly as a guideline.
In terms of pad performance from least to most aggressive, your choices are Black (finishing), White (polishing), and Orange (cutting).
For lighter defects, or for vehicles with traditionally softer paint (such as Acura/Honda, Lexus/Toyota or Porsche): M105 with a White polishing pad, M205 with a Black finishing pad.
For heavier defects, or for vehicles with traditionally harder paint (such as Audi, BMW (except Jet Black), Mercedes-Benz, or Corvettes): M105 with an Orange cutting pad, M205 with a White polishing pad.
Like I stated though, these are merely guidelines. You may find that your needs require the use of an Orange pad with M105, and a Black pad with M205. Always do a test section first to see what works best for your specific needs.
Pad Priming:
Meguiar’s non-diminishing abrasives work best when the pores of the pads are evenly primed with polish. This ensures the fastest and most complete cut, as well as the finest finish when complete.
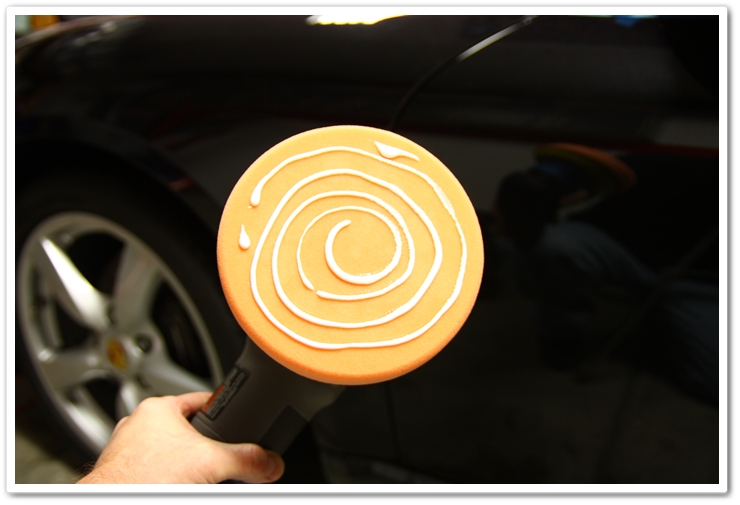
The first step is to take a fresh, clean pad and apply a generous amount of M105 or M205 on the surface.
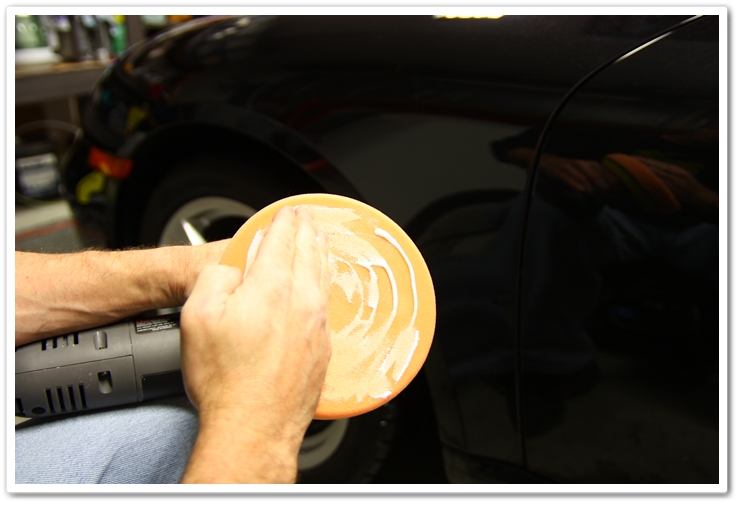
 Now massage the polish into the pores of the pad with your hand to get an even coating of product. You may need to go back and add a little bit of product in some areas to ensure an even coat.
 Once completed, your freshly primed pad should look similar to this.
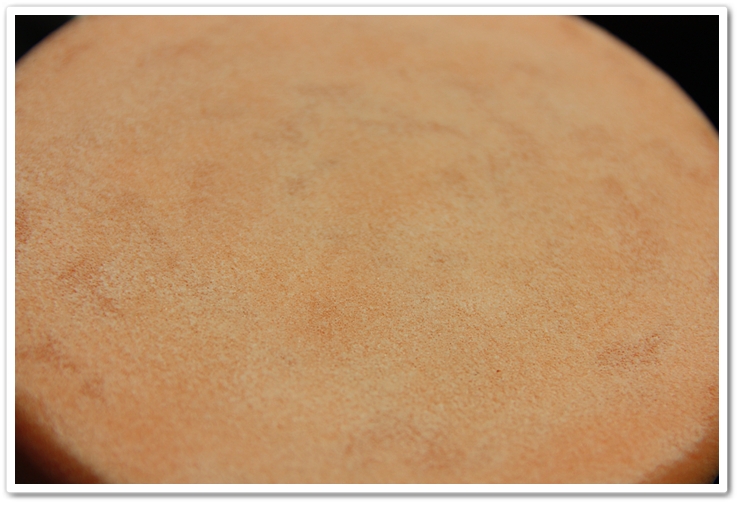 You want the pad to have a light coat of polish in the pores, not soaked. To remove any excess product, lightly press a microfiber towel against the pad while it spins on the slowest speed.
Now that your pad is primed, you are ready to begin polishing on your prepped finish (washed and clayed).
Pressure:
Both M105 and M205 are sensitive to pressure. Typically speaking you will achieve heavier correction with higher pressures, and less correction but a finer finish with lighter pressures.
Especially when performing heavy correction with M105, you will be using more pressure than you’ve probably used in the past with other polishes. You want to apply enough (even) pressure that the pad starts to spin slower, but not so much that it stops spinning altogether.
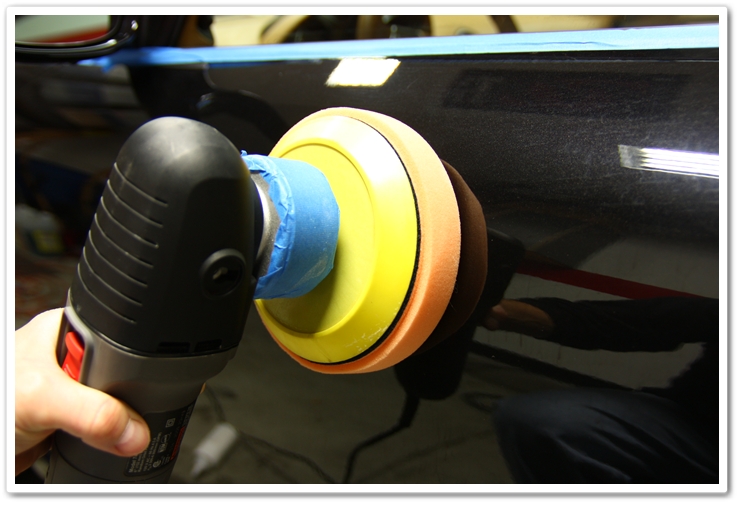
In this photo, I have my PC 7424XP resting lightly against the surface. There is no compression on the pad whatsoever.
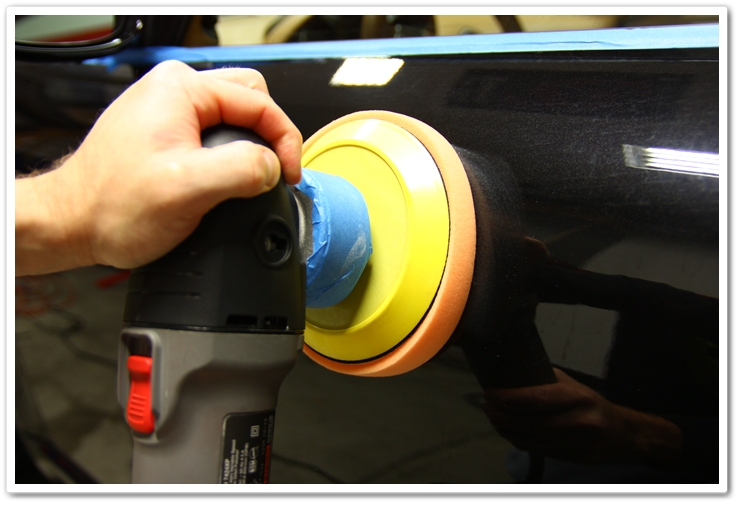
 When polishing with M105, you want to use enough pressure to slow the rotation of the pad. Notice here the amount of compression on the pad from the pressure being applied.
 Use a high amount of pressure on your first few passes, and reduce the pressure on the final few passes to remove any micro-marring you may have left while polishing.
Meguiar’s M105/M205 Summary:
Now that you have the basics of pad selection, priming, and pressure down, let’s put it all together with some other important notes so you can use the M105/M205 system to polish your car’s finish to perfection!
- Thoroughly prime your pad.
- Apply a small bead of polish (approximately 2″) directly to the surface.
- Work in a small area, roughly 2′ x 2′ or smaller
- Do not spread the product around, as the M105 in particular dries (flashes) quickly.
- Place the pad on the bead of polish, and immediately start at speed 5 or 6 (depending on the condition and your comfort level).
- Work in a cross-hatch pattern with high pressure…up and down, then left and right, overlapping passes. Work the section until the defects are gone or until the polish begins to dry. If defects still remain, apply another bead of polish on surface (no need to wipe off residue from previous pass), and work the area again. On the final passes, reduce pressure to burnish the finish.
- If you work the product too long, it may harden on the surface. To remove, apply a small amount of polish and quickly re-work the area at slower speeds (3~4) with very light pressure.
- After each panel, clean off the built-up residue on the pad by using compressed air or a soft brush (turn machine on lowest speed while brushing). If you allow product and clear coat residue to build up too much on the pad, the polish will be less effective and can induce micro-marring.
- When performing your finish polishing with M205, you will use the same basic techniques as with M105, but you will typically use less pressure and a lower speed (4~5). You will also find that the polishing residue left over from M205 is very easily removed with a plush microfiber towel. M205 has a longer working time available since it’s less aggressive, so for the best results work the polish with medium pressure until desired results are achieved, then reduce pressure for the final two passes.
The M105/M205 combination from Meguiar’s is capable of heavy paint correction while finishing with a high level of depth and gloss, and it does it in less time than traditional polishes. It does require a different technique than you may be used to, and it may take you a few times to get the system down to make it most effective. Once you’ve accomplished this however, you will be very pleased that you gave it a try!
If you are looking to get started using a buffer and the Meguiar’s polishes, be sure to check out this PC7424 and Meg’s polishing package for a great value!
Buy Products From This Article
Purchase the products used in this article individually or in one convenient package here!


- Subscribe


hi todd i have a question, i was wondering if you put 2″ of m105 on a primed pad or a clean one, because i saw in another video this person primed his pad and he only used 3-4 pea size of m105, 2″ and 3-4 pea size looks like a big difference, just asking to cleared thing ups thanks 😀
Tommy,
I prime the pad first, and then add a small amount of M105 directly to the surface. I don’t apply the polish onto the primed pad. You can try a small strip of polish to the surface, and then compare it to 3 or 4 drops of polish to your pad and see which one works better for you. You may speak with 3 different detailers, and they may have 3 slight variations of how to work with M105. This happens to be the method that works best for me.
also i would like to ask what is your understanding of the kb method of pc ty :]
Tommy,
The method I have described is pretty much the basis of the Kevin Brown Method (KBM). The keys are pad priming, heavier than normal pressure, and keeping the pads clean…
Yes keep the pads clean!! I even change tham in the middle of a job if they start to get dryer
I hit a yellow pole in my dad’s Buick and wondering if there is anyway to remove that yellow paint from car without ruining the original paint
.ty
Please contact us (https://www.detailedimage.com/Contact/) and a rep can look into this for you asap!
Todd, thanks for the comprehensive and well-written tutorial on M105 & 205. I’m new to DI and just ordered the CP7424XP Starter Kit two days ago online with DI . . . prior to finding this tutorial. Just so happens that I also ordered these two products with the kit because I’ve always found Meguiar’s products to be very good quality at a reasonable price for the “hobbyist” that I am. Thanks to you, I will now know how to use them on my ’95 Mitsubishi 3000GT VR-4. Do you know if that car’s paint is considered hard or soft?
Many thanks again,
Bill
Hi Bill,
I’m glad to hear that you found this tutorial to be helpful! M105/205 are great products, but do have a little bit of a learning curve. Once you get the process dialed in however, you will be very happy with the results. 🙂
I don’t have the experience with that particular car, but if I were to guess I’d say it’s probably a medium-level hardness. If anybody else knows for sure…please chime in.
Thanks,
Todd
Very soft. Stay away from the edges if you wanna use a buffer
Todd, how do you clean your pads when you are done of do you throw them out after one use.
Rick,
You can get many, many uses out of your pads if taken care of properly. Wash them in the sink by hand afterwards. Although something like Dawn dishwashing liquid will work, I like to use Chemical Guys Citrus Wash. After letting them soak for 10-15 minutes, I’ll work each pad by hand to make sure all of the polish residue is removed. I’ll then thoroughly rinse them out by running the pad under water and squeezing the soap out. After that you can gently wring as much water out as possible and allow them to air dry. Be sure they are completely dry before using them again.
Hi Todd,
Just one newbie question. When you talk about passes for example “then reduce pressure for the final two passes” What do you mean by a pass? Is a pass after you work the polish. Check results then add more polish and get rdy to work it again Would that be the second pass?
thanks
A pass, commonly known as a section pass is going over the entire area once. So if you were working a 2′ x 2′ area (which would be the absolute maximum size you should work with) it would mean you go up and down and cover the whole area once. That would be a section pass or a pass.
You typically do anywhere from 4-6 passes and then you would be done with that section and move on to the next section you want to correct.
So if you were going to do 4 total passes you would use around 15-20 pounds of pressure for the first two passes and around 10-15 pounds of pressure in the last two passes to reduce marring. Keep in mind that a polisher/rotary weighs around 6 or so pounds.
During the polish process you alternate directions of your passes. So you would go up and down for a whole pass and then go side to side. Keep alternating untill you are done.
The reason m105 leaves marring marks is because it is so abrasive which it has to be in order to get the deeper scratches out. This is why it is strongly advised to use m205 after using m105 since m205 is less abrasive and does not leave marring marks after it is done taking the scratches out. You must use a less abrasive polish after you use a highly abrasive compound like m105.
I know this explaination was getting a little off topic, but I want to make sure everyone understands the reason to do the certain steps we detailers do.
This also took a really long time to type since it was on my iTouch 🙂 I hope I have helped.
Great explanation, Max. Thank you!
I will be detailing a 2008 black Mustang GT next week. I have Menzerna PO203S polish and Meguiar’s 105 and 205. I also have all types of pads. The GT has light swirls and scratches. If you had experience with this vehicle, what would you suggest for polish and pad selection? Remember Todd, I talked to you about black cars before! I hate black cars! Thank you.
Mike,
I’ve seen the Mustangs that were medium, and some that were hard. I’d probably try the PO203S first with an orange pad and see what kind of results you’re getting. If you need to step up, then go with the M105/orange. Either way, you’ll probably want to finish up with M205 and a black pad on a PC.
Good luck!
Todd
Try the yellow pad with the 105!!! Almost comes out as it was polished .
just remember to use te least agressive pad/compoind to get the job done! 🙂
Todd,
thanks for the help with the Mustang! It came out quite well! I have a question though. I use the same technique you do when applying m105 to the pad. I work the polish in of course at speed six and it looks like a very thin layer of polish is being worked in the polish. But after I reduce the speed to 3 or 4 for the final passes, a thick layer appears on the area I am working on. Is this is a good or bad thing? Did I soak the pad with too much polish? Thanks!
Mike,
When using 105, you don’t need to back the speed down on your last couple of passes. Hit it fast, hit it hard, and finish it fast. Only if you get some dry, hardened compound on the surface do you need to go back and hit it on a lower speed.
If you get a thick layer that comes off, it means that you have too much polish built up on the pad. Use a light (clean) brush or compressed air and clean off the pad after each panel or two. When you prime it at the start, just get a light coating…not “soaked”.
Sometimes with 105 you may find yourself tweaking your technique as you go depending on the conditions. Once you really get the feel for 105, how it reacts, and when you need to modify your technique a bit, then you wil have mastered it! 🙂
It’s common for people new to 105 to be a little frustrated with it at first until they get their system worked out (I was too). When you get it dialed in though, you’ll absolutely love it.
HI Todd,
I used M105 on my Dark Blue Honda Civic SI with an Orange pad on PC7424XP and I am not quite getting the results I expected. There are some scratches and water spots that are not coming out. I have read that Honda paint is soft so I am not sure what my next steps should be? Also, the orange pad seperated from its hook and lap backing while I was using it, is this common or was I possible doing something wrong or could the pad have been defective? Any advice would be greatly appreciated.
Thanks,
Raj
Raj,
Did it make a significant different otherwise (besides the deep scratches and water spots?). Don’t worry if your first attempt doesn’t get the final results you initially desired…it takes a time or two to get a feel for the polish and procedure, and then you will see even greater results. Keep in mind too that some defects like deeper scratches and even water spot etching can become too severe to correct without wetsanding and a rotary polisher. Just be sue that you’re using the right amount of product (not too much that it clumps, or too little that it dries out too fast), and a pretty fair amount of pressure as well (but not so much that the pad stops spinning). As for the pad, it’s probably just a defective one. This rarely happens, but I’ve see it before. Just get in touch with DI on that one and I’m sure they can help you out.
Thanks,
Todd
What a great article especially for a beginner like me =D
I’ve never heard people use M105 and black pad (finishing combo)… Since everybody’s raving about least aggresive method… Why isn’t this even considered ??
I’m glad you found this article to be helpful.
If you’re going for the least aggressive method, you’d try first with black and M205. Even a compound like M105 will only finish down “so fine”, so there wouldn’t really be much use in pairing it with a finishing pad.
Todd, what do you recommend for fine scrateches in chrome?
Rick,
Actually, M105 also works well on defects in chrome when a simple polish won’t work. If using it with a buffer however, just be very careful because you can find thin spots in chrome (especially on older cars) just like you can with paint.
[…] Polishing How To with Meguiar’s M105 / M205 – Detailed Image Check out this article Todd shows you how he applies the KBM method when using M105 and M205 he is one of the top ten professional detailers in all of the U.S. once you read his articles you will see why __________________ See Garage Almost Fully Bolt-On […]
[…] Polishing How To with Meguiar’s M105 / M205 – Detailed Image read this article it will help you decide if you want to attempt using M105 / M205 if not go with like Adams polishes are a good start up line MP loves it and have a great site with how to videos also we get a discount for him being a vendor. The method used on the article is the Kevin Brown Method (KBM) using the PC7424XP not the rotary thats for pros. __________________ See Garage Almost Fully Bolt-On […]
Hi Todd,
Quick question, would you recommend Meguiar’s products or Menzerna polishes?
And a separate question, if I were to try and get the head of a keyed scratch (which usually the most pressure is applied) out on an Acura RSX, what kind of polish and pad combo should I use for my PC? I’m thinking about either a orange or purple pad with Meg’s M105. It seems that there isn’t a deep cut Menzerna polish offered on this site, so would my only option be Meg’s M105 ultra cut compound?
Thank you once again.
Eric,
You must have missed Menzerna Power Gloss. I think it cuts even more than M105, but it doesn’t finish nearly as well. Even with a rotary / wool / heavy compound you may only make the deepest part of the scratch just slightly better. Once defects are that deep, they’re typically not safe to fully correct. I would just work it as best as you can with orange / M105, and then follow it up with M205 and a black or white pad.
Thanks,
Todd
Yes orange or yellow pad with the 105
[…] UC correctly? Read this…very comprehensive and concise guide on polishing with 105/205 combo Polishing How To with Meguiar’s M105 / M205 – Detailed Image The technique in that blog will work for UC as well.. UC+NXT2.0 is a heavenly match combo and will […]
What kind of wax/sealant do you follow up with after the 105/205 combination? or does the 205 provide enough protection?
You can use whatever wax or sealant that you prefer. M205 doesn’t provide any kind of protection, so you definitely want to add something. Also be sure to thoroughly clean and prep the surface after polishing and before applying your wax or sealant to ensure a good bond. You can re-wash it, wipe it down with isopropyl alcohol, or use another product like Chemical Guys 408 Vertua Bond or EZ Creme Glaze.
Hi Todd
I’ma little confused between M10/M205 and Menzerna PO203S and 106FA. I have a red Audi with swirl marks. I will start with the least 106FA and LC Green but I’m very curious about M205 with LC white.
Regards
Art
Art,
M105 is a heavier cut compound than Power Finish. Power Finish is a medium-to-light polish. I would categorize from most aggressive to least aggressive as follows: Megs 105, Power Finish, Megs 205, 106FA (205 and 106FA are pretty close though).
On the BMW and Audi paints that are hard (which is…just about all of them), I’ve had good luck compounding with M105, and then finishing with either Menzerna 106FA or Menzerna Power Finish (PO203S). Last week I worked on a black Audi S8 and did M105 with a Cyan pad for compounding, and then finished with 106FA and a Tangerine pad (both on the Makita rotary).
I hope this helps.
Todd
Todd you are good you know your business!!!!
On your resent Audi S8 why did you finish with Menzerna 106F instead of AM205 since you compund with M105?
You also use Meguires Cyan and Tangerine? In your opinion is there a noticeable difference between Meguires pads and LC?
Best regards and I do enjoy ALL of your articles!
Art
Art,
Thank you.
On Audi (and a few other very hard paints), I just find that 106FA on a rotary after 105 finishes better than 205/PC. I don’t use 205 on a rotary because it’s very difficult to get it to finish down hologram free. I’ve gone straight from 105/wool/rotary to 106FA/white/rotary on Audi paint and it turn out spectacular. If it were a little bit softer paint I would have used 205/PC to finish with.
Excellent Todd
I have both PC and Flex XC3401VRG. I love the Flex but it is hard to work with.
Regarding the pads you mentioned the Cyan and Tangerine, any preference vs. LC Orange and White?
Art
Todd
For final shine on Audi will you use 106FA/White/Rotary at what speed??
Regards
Art
Art,
Spread it around at 900, then kick it up to 1200 for a few passes, then to 1500 for a few passes until the polish breaks down (goes clear), then back down to about 1200 for a few, and finally finish it down for a few passes at 900rpm.
Todd,
On the Audi will you use Polish 85RD/Blue AFTER Super Finish 106FA/White/Flex dual action?
Regards
Art
Yes, 106/white first, and then follow it up with 85rd/blue second.
Those are yours alright! . We at least need to get these people stealing images to start blogging! They probably just did a image search and grabbed them. They look good though!
Also for 106FA/White for light surface web on the Audi what speed on the Flex will you recommend?
Thanks
Art
PS How do I keep up with all you postings?
[…] LSP (845 in my case) but instead did it by hand. Here's a good article I read before starting. Polishing How To with Meguiar’s M105 / M205 – Detailed Image Good luck! Reply With Quote + Reply to Thread « […]
Hi Todd,
What would you recommend on a Corvette C5 in Millenium Yellow that has light swirls/holograms? I have the PC, but need to get some new pads & polish and compound.
Thanks in advance!
Sal
Sal.
The M105/205 combination is hard to beat for a two-step, or Menzerna PO203S for a one-step with heavier cutting ability. Check out DJ’s recent article of a yellow Corvette he corrected.
Hello Todd,
Thanks for putting this together and maintaining it! I’ve just started the process of cutting/buffing/polishing on a new paint job I just completed. I’m using a rotary with the M105 on a foamed wool to start, M105 on an orange pad, then M205 on a white pad. So far so good. On one of the panels, I wiped it down with IPA prior to my next polish/pad pass. It went all dull and looked just like it did before polishing. Is this a sign of fillers or that I just didn’t polish enough? And I have a number of places that are small areas so very interested to hear how you recommend using these products to hand polish. I plan to sand these areas to 3000 prior to the polishing but am leery of doing any sanding if they don’t apply/work well by hand. Thanks much for your time! James
James,
It’s hard to say exactly what you’re experiencing when you notice the dullness, but I definitely wouldn’t say it’s a sign of fillers. 105/wool/rotary is a very heavy combo, and will leave a lot of marring (especially if it’s on fresh, soft paint). At some point in the process are you planning on using a Porter Cable? The reason I ask is that you may find it difficult to finish down 205 hologram free with the rotary. For the smaller and tighter areas, can you use 4″ spot pads on the rotary or the pc? If not, then just use the appropriate 4″ spot pad by hand to get in there. Even after 3000 grit, you may find it difficult to get it completely cleaned up by hand polishing though. When I need to work small areas by hand (areas that the machine won’t reach), I just pair up the polish and pads the same as I would if doing it by machine and work it until I get the desired results.
Thanks! I don’t plan on purchasing a DA polisher but do have 4″ pads for the rotary. Hopefully all will go well. On the really small stuff, I’m still debating whether to sand or maybe just go straight to the polish by hand. I guess we’ll see when I get there. It’s a Jeep afterall and the trees and rocks won’t mind too much I suppose 🙂
Thanks for the help.
Cheers,
jlc
Hi Todd,
I have a 2010 BMW 335i with black sapphire paint. The vehicle was purchased from a BMW dealer with about 50 days of lot time. The paint is in great shape, of course; however, under florescent/sodium lighting light swirls and fine scratches abound, primarily on the bonnet, boot, and the upper side-panels just below the window trim. These were no doubt incurred from the less than careful dealer detailers. I understand that this paint may be on the harder side; however, I want to be extremely careful at my attempts as I am a novice and the car is new, afterall! What progression of Menzerna/Megs products would you use to attack this project with a PC 7424XP, maintaining only modest aggression? Have you had any experience with a project of a similar type?
Regards,
Ray
Hi Ray,
Sorry to hear that your new BMW is in that condition, but unfortunately that’s not uncommon for a car that has spent some time on the lot. A mid-level combination that I find works very well on that paint in particular is Menzerna PO203S Power Finish with a Green Light Cutting pad on the PC. This is aggressive enough to get rid of the medium to light defects (but not deep ones), and fine enough to finish LSP-ready. If you needed to go heavier, you could start with 105, and then finish off with 203/green.
I hope this helps.
Thanks,
Todd
Todd,
Thanks so much for your reply! Excellent…I can’t wait to begin my first attempts at serious detailing. I’m assuming that the 105 would be used in a manner consistent with THIS tutorial.
And would the 203S be:
— 2′ by 2′ area…Do you create a small rectangle with auto tape for each area of attack?
— 3 or 4 pea-sized dots near the outside of the pad
— PCXP on ~6, moving up down/down up then left right/right left @ 1 inch per sec
— Any other speed changes?
— Wipe off with microfiber when product is clearing…Which microfiber would you choose?
— Iso/water 50/50 mix to check the panel…Do you spray directly on panel or apply to a microfiber first?
Thanks so much for your insight!
~Ray
Yes…use this tutorial for your 105 attempts.
For PO203S, you can use this article as a reference.
Don’t tape off polishing sections…only areas that you need to be careful. Check out this article on pre-polish prep.
You can lower your speed to 4 or 5 on the last couple of passes, and reduce pressure to a minimum to ensure the best finish.
You don’t need to wipe down after each small section. You can just to do your first check to see how it’s working, and then wait until you can an entire area completed before wiping down (finish the hood, or the door, or the entire side of the car). Wiping down after each small section will cost you a lot of time, and when you wipe down a freshly polished (hot surface) area it’s easier to mar the finish.
I like using the Great White towel for this process.
Spray IPA directly onto the panel.
I hope this helps.
Todd
Thanks for your awesome help, Todd!
~Ray
Hi Todd, I appreciate this forum and the opportunity to ask my question. Thank you for any advice you can offer.
I just bought a black Infinti G35. The finish has typical swirls marks likely made by hand drying. I’ve read with great interest about the use of Meguiars 105/205 process and the wonderful results folks have been having. But do I really need to use such an aggressive polish as 105, or even 205? Would SwirlX work just as well? And if so, what pad would you recommend I use with my PC?
Thank you and continued success,
Michael
Forgot to mention it’s a 2008, so it’s likely had quite a few hand dryings.
Michael,
There’s no real way to tell you that combination (x) or (y) will be the best for your particular application. Please see my recent post on polishes and wax for black paint. Even if I were to work on your car, I would probably try 3 or 4 different combinations before deciding on which one was the best to use for that particular car on that particular day. It also depends on if you just want to clean up the light stuff, or if you want to try to get it back to original looking condition. I doubt however that SwirlX will be the product that you’d want for this situation.
You always want to start with a light combination of polish and pad first to see what results you get, and move up in level of aggressiveness from there as necessary. If you already have a PC with some pads and polishes, then try something light (like Menzerna 106FA or Megs 205) and a black pad and see what kind of results you get with it. You also might want to just do a light polish at first just to learn how the paint reacts, and then if you want to take it further, you can go with a more aggressive two-step process later down the road.
Sorry I couldn’t give you the perfect combination for your application, but hopefully you at least get an idea of how to approach the process. And besides, the testing process helps with learning, and that’s part of the fun!
Hello Todd,
First off I would like to start off with you do a fantastic job! It really is an amazing job, keep up the great work!!
I have a 2006 NBP Acura RSX. I purchased a few weeks ago and it looks like someone tried to buff or polish it because you get a bad hologram affect on the paint. Also there are a ton of swirls that I would like to remove. This will be my first time using the PC7424. I purchased the following products
-Meguiars #105
-Meguiars #205
-Meguiars #7
-Poorboys EX sealant
-Meguiars #26
LC Orange CCS foam pads
LC White CCS foam pads
LC Gray CCS Pads
LC Blue CCS Pads
-Pinnacle XMT pad care combo
Im not looking for 100% correction since there are a few deep scratches but would these products be ok to achieve a decent amount of correction? In what order would you use these products? What pad and product combo should I start out with? Should I wash the car in-between steps?
[…] get you everything you need to properly polish your paint. I'd recommend reading this article on how to polish with M105 / M205 to help too. Another option is to go with the Menzerna polishes, which tend to work great as well. […]
Hi Todd. I just picked up a 2011 red Audi A5 in October 2010. Unfortunately within two weeks after picking up the car, I had to have some warranty-covered repairs. During the process, the dealer put swirl marks/fine scratches on the roof and trunk and rear bumper areas. I think the scratches resulted from wiping away rain water with a towel. I’m OCD about the car, so I don’t like seeing these marks!
I would like to do some hand polishing (which I’ve never done before) to try to remove or at least diminish some of these scratches, but, of course, I definitely don’t want to create more scratches or make the existing ones worse! I intend to order some M205. Following my next wash and prior to waxing, I’m planning to hand polish these few areas. I’m a newbie, so how much pressure should I be using and how much time should a spend working in the M205 in a 2′ x 2′ section (1 min., 2 min., etc.)?
Also, would you recommend a different polish (instead of M205) for what I’m trying to accomplish? It seems like there are hundreds of polishes out there, and it’s hard to tell which are appropriate for hand use.
Thanks so much for your input, and keep up the good work.
Eric
Eric,
Sorry to hear about that! Depending on the severity of the defects, you might need M105 as well since Audi paint is quite hard. These polishes will be your best bet by hand since they use non-diminishing abrasive technology. There’s not really a set amount of time to recommend…just work it at medium pressure and check your progress frequently. Rasky has put together a tutorial on this that may help you out a bit: How To Remove Swirls By Hand.
[…] and on your last couple passes for your work area, lighten up on the pressure. I'd suggest reading this M105 article. Menzerna is almost the opposite as it's a diminishing abrasive polish. As you polish the […]
Todd,
I wanted to update you on my 2011 A5 (see 11/10/10 message above). The M205 by hand (with a white polishing pad) worked well. Removed many of the scratches and reduced others. I will do a few more passes on the remaining scratches next detail. The one thing I liked was how easy it was to work with the M205 and also the fact that it removed some water spots and other contaminants. Do you think M205 would be safe to use as a pre-wax cleaner by hand on a regular basis? I know it’s abrasive, rather than cleaning chemically, so I don’t know if this is a good idea. What do you think?
Thanks,
Eric
Eric,
M205 is very good by hand, and I’m glad to hear that you’ve found that to be true. If you’re doing your washing and drying correctly, you shouldn’t need to use a product like 205 on a regular basis…perhaps just a couple of times a year or to spot-polish some defects. I would use it only as necessary to remove light defects…
[…] quality buffer. I'd highly recommend looking into this Porter Cable 7424XP kit. I'd read over this how-to article and our polishing guide to get a better idea on what's entailed in properly polishing your paint […]
On a car with no fine scratches would you still need to do the M105/M205 combo or would you only need to do the M205 finishing polish?
Always try the least aggressive method first to see if it gets you the desired results. You can use M205 with a finishing pad first, and if it gets you the correction level you’re looking for, then you’re good to go. If not, then step up to the M105 for the correction stage, followed by M205 for the finishing stage.
After polishing with M105, do I need to wipe off remaining residue with a microfiber towel before moving on to the M205?
Yes you do…
Thanks for the great information Todd.
I have a Black 2002 Camaro SS. I’ve got M105 and M205, and Meguiars DA Polisher.
Do SS Camaros typically have hard paint like Corvettes? I was planning on using at cutting pad with the M105, a polishing pad with the M205, anda finishing pad with the wax.
Also I have aftermarket hood decals (the 35th Anniversary Stripes) will the 105/205 harm these?
Ideas? Suggestions?
Jim,
I can’t say for sure on that particular color/model/year, but typically speaking they’re not as hard as the Corvettes. As for your stripes, take a look at my polishing prep article, and you can see how I addressed this exact issue on a Camaro. When you start your process, just do a test section to see which combination nets the best results first…you might find that M205 on a finishing pad after compounding is enough to remove any marring, yet finish down better than it would with a polishing pad. Once you make a couple of comparisons in a test area, you’ll quickly find the best combination for the results you wish to achieve.
[…] How to use Meguiar’s M105 / M205 Polishing System: This tutorial will take you through the proper steps and procedures to use the game-changing polishing system by Meguiar’s. […]
[…] Prime the pad! Just like with the Meguiar’s M105 system, the new DA Microfiber system requires a thorough and even priming of the pad with your compound / […]
I have a 34 foot airstream that has been clear coat removed to bare aluminum and polished out about 7 yrs ago.. still looks good but needs a good going over. Before it was done by a professional in riverside calif, but since then I have been doing it. Its a real beauty, but im tired of polishing with expensive nuvite.. and wonder what you recommend for me to try. It only has water spots and slight oxidation.
Bill,
It may not be the answer that you want to hear, but if the Nuvite is working for you, then you should probably stick with it since it’s designed for that very application. If it were me trying an alternative product (chemical versus mechanical), then I may give Klasse All-In-One a try. It’s good on light oxidation, and provides a durable layer of protection as well.
Hi Todd — I have a question RE: polishing using Meguiers M205 with a white polishing pad. My BMW salesman (and now my dear friend & guitar student) said the car only needs a light polishing.
FYI, I had my ‘mint condition’ jet black 2006 BMW 325i professionally detailed 2 years ago at Ridgefield, CT. In the meanwhile, I’ve kept the car garaged. I use it sparingly since I live in NYC and choose public transportation over driving & parking in the city 🙂 The BMW has been washed regularly by me … and by a very careful attendant at my parking garage.
As a beginning “hand” do-it-yourself-er, is the M205 a one-step process requiring no ‘haze removal’ after polishing? Or do I need to have a micro-fiber towel on hand to complete the process?
Thanks very much, Dr. Larry Newcomb
PS I have been using Meguier’s polish on fine guitars for years with great results!
Hi Larry,
This is definitely a polish then remove residue by a plush microfiber type of product.
Are you going to be using this by hand, or by machine? And is it the Jet Black BMW you’re going to be polishing, or something else?
Thanks,
Todd
How many times i and use the polish? I have the new products OTC such are Ultimate Compound and Ulitmate Polish. Is it safe to use them regularly ? i mean by using the Ultimate Polish and PC Orange pad once a month?
If you’re using the proper wash and dry techniques afterwards, you shouldn’t need to do a major polish more than once per year.
Hey Todd, Fantastic review as usual! I was just wondering as a general guideline what pads and polishes you would recommend for my 1998 Lexus SC300. I know Lexus generally tends to be on the softer side. I have all Lake Country pads ranging from yellow to white. For polishes I have M105/M205 and Menzerna PO203 PowerFinish. Im working with a Porter Cable 7424XP and I would say my car has mostly moderate scratches and swirls. Only a minuscule amount of deep imperfections. Any advice would be greatly appreciated.
Thanks,
Josh
Josh,
Each vehicle and paint has its own specific set of needs, so it’s really hard to say exactly which combination(s) will work the best. I’ve even found that the exact make/model/year/color cars may sometimes react differently from one another and require completely different approaches. My guess is that Powerfinish with a white pad would provide a really good cut with a nice finish for a one step. And for the 105, you might first try it with a white pad to see how well it cuts, and then step up to an orange pad if you need more cut. And then you’ll need to decide which combination would work best for the finishing stage…most likely being 205 teamed up with a black pad. Always do your test spots first on both the cutting and finishing stage to see what works best before tackling the entire car.
I hope this helps.
Hi Todd,
Thanks for the comprehensive article on 105/205. I just purchased them along with a suite of other items to detail my new LeMans Blue BMW 135. What is a good product to complete the detail after applying 105/205? Would you apply a sealant? Or a carnuba wax? Or both? And can you clarify how you know when either/both the 105/205 have been worked enough that they can be wiped off? Thanks!
Scott
Scott,
These polishes are non-diminishing abrasives, so they don’t go through a break-down cycle like traditional polishes do. Given this, you can really work it as little or as long as you need depending on the amount of correction needed. You will find that 205 provides more working time than 105 just because it’s a lighter abrasive.
I like to follow this up with an application of Chemical Guys EZ Creme Glaze on a blue pad (quick…only takes 20-30 minutes for the entire car), then either apply a wax or sealant of choice.
Eric, I have wet sanded sections of my car starting with 1500 and finishing with 2000 grit wet 3M paper. The surface is very smooth and free of any visable scratches. Is the combination of 105 and 205 correct? The color is black.
Jim,
So are you wanting to use 105/205 to finish up after you have done wetsanding, or has the car already been polished out and you want to use this for follow-up polishing?
Todd, I have already completed the wetsanding step and the finish is now really slick with no visable scratches. I used 1500 and 2000 3M wet sand paper. Now the finish is really dull and I have been told to use Meguires 105 and 205 to get the appearance I want. Due to the nature of the pieces I am working with I will be applying the Meguires products by hand.
Thanks
Jim
Jim,
I honestly can’t think of a better product / combination to use by hand. It will definitely require some effort, but since it is a non-diminishing abrasive, you’ll have much better results than if you used a traditional polish / compound. Best of luck to you.
Hello Todd,
Great article. Thanks for all of the advice you and your fellow DI pros provide. I recently bought a Jaguar XF that looks like it was repeatedly tortured by automatic car washes. I have tried the Orange Pad with M105 but am not getting the results I expected after reading several articles on this site. Is the Jaguar paint (Grey) considered a hard paint and do I need to try a different combination of pad and product? Or is it just a matter of me developing my polishing skills? I would appreciate any advice as I am trying to avoid buying every single pad and product in search of the best combination.
George
George,
I don’t do many Jags, so I can’t say whether they’re considered to be hard or not.
As with anything in detailing, it takes time to develop the techniques and get the results you’d like. Nobody is perfect with their technique the first few times they use this product / method. Without seeing what you started with, and what level of correction you achieved, it’s hard to say if you have an issue of exceptionally deep defects, or issues with your technique, or perhaps a combination of both. Many first-time users of 105 in particular don’t use enough pressure, or use too fast arm movement. Now with all things being equal, and the orange pad doesn’t cut it, then you’d want to look into the Meguiar’s Microfiber Cutting Discs or the Surbuf Pads if you need really heavy cut!
I’ve browsed a number of articles, and I can’t seem to find any clear advice on pad _size_ for the average Joe home detailer using a PC 7424 in the mild polish stage. The “Auto Detailing Guide – Polishing” seems to suggest that 4″ would be best for this, but the product recommendations seem to suggest using a 4″ Lake Country Porter Cable 7424 Backing Plate with 6.5″ pads.
My current agenda is to get a 7424XP and start learning how to use the M105/M205 Meguiars products–the no-breakdown capability seems to favor those of us with little experience. And I have a ’93 F150 to practice on before I move on to the G37 and the WRX, so I can’t hurt much there. I think part of it’s Rustoleum anyway.
There’s good advice on cutting/polishing pad grades in this article and these blogs in general, I’d just like to see specific recommendation for what size and what specific hook-n-loop backing pad to start with.
For overall use, your best bet would be the 5.5″ pads with the 5″ backing plate.
That’s exactly what I needed to know. I really appreciate the link to the exact backing plate.
Thanks for all you do around here. It’s particularly nice that someone so knowledgeable about the subject matter can also write so well. Some of your articles are quite long, and would be painful if written in typical forum-speak.
I’m thinking that the Porter Cable 7424XP 5.5″ Starter Kit (https://www.detailedimage.com/DI-Packages-M29/Porter-Cable-7424XP-55-Starter-Kit-P457/) with that backing plate and 8 LC pads is a good deal, but I don’t think I need that range of pads.
I was thinking 2 black finish, 2 white polish, 2 orange light cut. Not sure about the other two. Should I just make it 3 each of black and white, since that’s what I’ll use most often? Or should I have 1 each of a more coarse cut and more fine finish?
If you have those 3 pads, you’re going to cover the majority of your needs!
Hi Todd, thanks for all the great info. I have used my PC 7424xp with Meguier’s 105 on 3 hondas with dark paints, and find that it leaves small white spots/marks wherever there are any paint chips or scratches. I work it a nice long time, but haven’t followed with the Meg 105 because I didn’t see an appreciable difference after using it. I’ve used the yellow wax (26 I think) to protect the finish afterward, but the white areas seem to remain no matter what I do. Is this just a product of not sanding the deeper defects before cut and polish? I have been reluctant to sand so just want to know if there is something I may be doing incorrectly. Thanks for any tips.
Especially on dark Honda paints, you should most definitely see a big difference in gloss and clarity by following 105 with 205. 105 by itself should be leaving a bit of noticeable haze on the soft Honda paint. If you notice a compound buildup in deep defects like chips, then try to lightly wipe those spots in particular with alcohol to break down the compound.
Thank you. I will give it a try.
hey Todd
if i use m105/m205 then would like to use klasse do i have to use all in one or can i go right to klasse sealant, also do i have to use a pre wax cleaner before i apply klasse
For best bonding of your Klasse SG, you should at least wash the car or lightly wipe it down with a 50/50 mix of alcohol and distilled water to ensure that all of the polish residue is removed from the surface.
Thanks for both a great tutorial and for shepherding this neophyte through buying his PC/pad bundle. I did a practice session on my ’93 F150 over the weekend. I’m the second owner, and had never given it much appearance attention because I never dreamed it could look this good!
what should i use after the ultr cut compund
You’ll need to use a finishing polish like M205, or Menzerna 106FA, or something similar. After your finishing polish, you’ll then want to use your favorite sealant or wax.
This type of information is exactly what I have been looking for, thanks very much for helping me out.
excellent info..same question as above..what to use after the 105/205 process?..was gona hit it with some meguires deep crystal polish(3 step polish have some left over) and than was going to finish it off with meguires 26 high tech yellow wax…thoughts (07 dodge ram)
again excellent info..kudos
If it finishes down fine after 205, the only product you’ll need afterwards is your sealant or wax of choice…no need to use any other type of polish.
My black car has several chip repairs done by the previous owner that isn’t up to my standard. Do you think I may be able to smooth out the dimples with the M105? I was also considering giving the Dr. Color Chip a shot….Your expert suggestion will be appreciated….
You may experience some smoothing of the filled in chip, but typicaly speaking they need to be lightly sanded down, and then followed up with machine compounding and polishing to refine. Dr. Color Chip may be an option for new chips, but it won’t help you much on the previously “fixed” ones that you’re unhappy with.
https://www.textise.net/showtext.aspx?strurl=bestpornsites.club
Hi Todd,
I have been following this discussion for a quite some time on how to use M105, M205
finally i got a chance to use it on rotary (Makita 9227C) with PWFP, LC CCS Orange curved 7.5inch and 3M ultrafina SE on a BMW X5
Steps:
Iron X spray , followed by Iron Xsoap gel
Clay bar- Waxoyl
Tapped all edges, emblem and rubber
the car needed quite a bit of paint correction as it was filled with Swirls and deep scratchs some of them that cannot be fixed as they were too deep.
applied M105 on LC purple foam pad and spread it on the body with out turning it on
spread it 900rpms- 2pass’s
worked it at 1200 rpms- 2 pass’s (sprayed a little water on the body) 1 more pass
continued to polish it 1500rpms-2-3 pass’s and reversed back in the same order and finished at 900rpms.
The results were great.
washed the car with Ironx soap gel
step2.
M205 on LC CCS orange pads.
primed the pad with M205
laid around 3-4 small bead on the body and followed the same method as above,
i used 2 orange pads in step2,
cleaned the pad with a medium soft brush after every panel and used a fresh pad for the second half.
Results were great.
now it was time for 3M ultrafina SE,
applied a few beads of 3M ultrafina on 3M black pad as blue were out of stock (since it was a white car i gave it a try)
spread it 600rmps-2 pass’s
polished it at 1200rpms with no pressure – 4pass’s and finished at 900rpms
found some sort of black dust on the panel, i changed to fresh pad and had the same issue
decided not to use 3M and switched to M205 on Meguiars white finish pad,
great results
used car pro eraser with a fresh microfiber and inspected the car i found a few light scratchs,
went back to step 2 used M205 on on orange pad to recorrect i did the entire hood, front fenders 3times for some reason the scratchs kept coming back in different places
i am not sure if it from the microfiber or if M205 were hiding them.
iam not a pro but trying to learn as much as i can, i promised my best friend to fix his car i worked on it for almost 2 days finally i had to seal it as it was his B-Day gift,
he is extremely happy but i am totally frustrated as my LSP was Cquartz not eazy to strip it, however it has just one layer as i plan on re-doing in 6months.
ive used PPG system one previously and have had some great results but it leaves a lot of oils and haze i have to wipe it down 3-4times with eraser and the haze keeps coming back in some places so i decided to switch to M105 and M205 and i still cant get results.
Note-
i reprimed the pad a few times after cleaning them.
I require your advice
regards
zahir
[…] Quote: Originally Posted by Neufe_77 Unfortunately I reside(Ontario, Canada) no where near a good detail shop and prefer to detail myself. I own a 2005 OB SRT4 and would love to maybe get a detailed step instructions as to what you did to make that OB look the way it does. You did a fantastic job and I would like to try those products and your methods on my car. If you dont mind sharing your secrets or just your methods I would love to try them out for myself, Pm Me . Car looks awesome great job. Ill just keep the thread going instead of a PM. All you need is money, the machine does the rest of the work pretty much. porter cable 7424xp (wont burn the paint if you dont no what your doing) Orange lake country 6.5" pad. Use meguiars #105 with this pad for the whole car. Than you need a White lake country pad 6.5" and use meguiars #205 with that over the whole car. Than you can use what i wish i had which is meguiars #21 sealant and use a Lake country Black 6.5" pad. after that your good. This page below really helped me Polishing How To with Meguiar’s M105 / M205 – Detailed Image […]
Hi Todd,
Just picked up my new rosso 458 Italia and unfortunately there were some deep scratches in the clear coat. In some spots the scratches look quite deep and others look relatively fine and easier to remove. I suspect a quick and easy by the local dealer detailer may have been the primary contributor but ceratianly not keen to take it back for more punishment. I have seen your mega detail on the 458 (on your website)so I guess its not an isolated case. I was going to use 3M perfectit rubbing compound with an orange pad to tackle the deeper scratches and then finish it down with menzerna 2500/4000 all done with an orbital. I have been practsing on my bmw 330 coupe and am starting to build up confidence before I start on the Italia. Any help would be appreciated.
Hi , I do believe this is an excellent blog. I stumbled upon it on Yahoo , i will come back once again. Money and freedom is the best way to change, may you be rich and help other people.
[…] 0 thats good then mate ,i can imagine its satisfying to finally get rid of the swirls ! found a nice guide with some good pointers aswell . just need to get my hands on a da and im good to go . Polishing How To with Meguiar’s M105 / M205 – Detailed Image […]
Well, i don’t know what i am doing wrong, but my first attempt at using these products was nothing but a frustrating, messy, experience wanting me to throw these products in the trash and going back to 3M’s perfect it.
I primed the pads as detailed above. Actually, pretty much did everything as detailed above, and experienced huge caking, product flung all over the place, the apparent need to keep priming the pads (it seemed like more product was needed to prime the pads than actually was applied to the surface to do any polishing), and the PC kept bogging down with the slightest pressure, but without some pressure the results were substandard.
Not sure if i should bother persevering with this stuff. Is there a video somewhere on using this stuff?
Lee,
From the sounds of it, there was too much product used during the priming stage. All you want is a very light film…you don’t want to saturate the pad. If you get caking or fling, then there’s way too much product there somewhere. And you shouldn’t need to re-prime the pad, either. Once you place just a couple of small drops onto the pad, you’ll work it in and after a short period of time it should almost disappear into the paint. with very little residue at all.
If your PC is flat, then you shouldn’t get much bogging down, at least to the point that it stops spinning. It’s OK if the spinning is very slow, but you don’t want it to completely stop. You should be able to apply a lot of pressure before it completely stops. If it does stop spinning, then either it’s not flat on the surface, or there’s potentially something wrong with the PC (also check the backing plate to make sure that you have your washer installed…without it I’ve seen the screws hit the counterweight which makes it bog easily).
While not with a foam pad, you can see some useful videos in the following places: M105 / Surbuf -or- Proper buffing with PC and rotary.
I hope this helps.
Thanks for the reply Todd. Turns out i didn’t install the washer when i swapped out the backing plates. Made all the difference. Still working on perfecting the technique, but i’m getting something right i think…
Hi Todd!
Before to use Meguiars M105&M205, i have to use clay bar +quik detailer to clean the car? 2) I have a makita 9227C and i want to know what speed (RPM) i have to use for M105 with W7207 Cutting Pad and for M205 with W8207 Polishing Pads? Thank you!
Hi Todd. I noticed you taped off part of the PC 7424. Any specific reason for this?
Another question: So if I understand this correctly, you only prime the pad once for each session? You clean the pad after each panel and then apply more polish directly to the surface and keep going? No need to re-prime after cleaning?
[…] at the level of correction that can be achieved with this powerful combination. If you’ve been using the standard method of using M105 with an orange pad on a PC, and you still require more cut, then step up to the Surbuf Pad for an even more aggressive […]
Hi Todd:
I have a huge confussion between Meguiar’s Professional products Meguiar’s End Consumer products. Is there any equivalence/corespondence between Ultimate Compound, Swirl X, Scratch 2.0, Rubbing Compound, etc., and M105, M205, Diamond Cut, Mid Cut, Fine Cut, etc.?
I will really appreciate your comments and advice…thx!! =J
Todd: Just wanted to throw out a quick thank you for this article. I almost sold my M105 / M205 package after reading more and more “horror” stories about their use. After reading your article, which is very thorough, yet direct and informative, I decided to go ahead and tackle my black BMW. After a some practice on the trunk I got my technique down and cannot be happier with the results so far. Thanks again for this great write-up!!
Colin (and Todd),
Can’t believe I’m seeing your comment right here. Our situation sounds a lot alike, ha. Just a few weeks ago I bought a Griot’s polisher and it came bundled with the 105 and 205. I also tried the 105 on the trunk of my black BMW and after about 15 seconds I freaked out because I didn’t know it was going to feel so dry! Out of fear and also available time I decided just to do the 205 with a softer pad and then some Mother’s liquid carnauba with the wax pad. Good results, but I’m still hoping to get those swirl marks out.
It looked good, but I definitely can’t wait to use these products right and get those swirl marks out!
aaand I just noticed that I didn’t delete that last sentence which only repeats the previous one. Ha!
Todd, just to be sure, after priming the pad you put a 2″‘ bead on the vehicle surface or on the pad. I had been putting it on the pad after priming it so I wanted to make sure. I have had great results with this combo and with 205 alone followed up by Blackfire Wet Diamond.
[…] Seems like M105 and M205 would be a good place for you to start, Beto. Between the compound and the polish it should get rid of most of your swirls… https://www.detailedimage.com/Ask-a-P…ars-m105-m205/ […]
Todd,
Will either the 105 or 205 remove the factory “Orange Peal” from even the best paint job on a newer BMW? Will I need to wet sand to remove the “Orange Peal” and follow with the 205.
I have used both 105 and 205 with great results (and confidence) but have never wet sanded.
Your comments would be appreciated.
Removing orange peel on factory paint is not recommended…bad things can happen down the road as a result.
Todd,
Can you explain what exactly can happen after removing the “orange peel” from the car? Does it cause an uneven clear coat?
Should I be reapplying (and priming) polish to the pad after each 2×2 section?
Todd, I’ve compounded a Jet Black 325ci with M105 and polished with M205 and am very satisfied with the end result. Would you recommend finishing up with Menzerna SF4500 to further enhance the depth and clarity (if that’s even possible)?
ive got a brand new 2013 scion tc in a cement grey color, had a problem with the dealer upon picking it up cause the detail department they have are idiots and got swirl marks and scratches in the clear coat that annoy me beyond belief!! i got the 205, the no.6 wax and yellow wax with the applicator pads, im gonna do this by hand btw, i was told to use the ultra polish then the wax, but was given no instructions as to how to do so by hand, id appreciate ur help as i wanna dedicate 5 hours to it tomorrow.
thank u
[…] Yezz. Polishing How To with Meguiar’s M105 / M205 – Detailed Image […]
How does the m105/205 combo compares to the CG V32-38 products? Any preference?
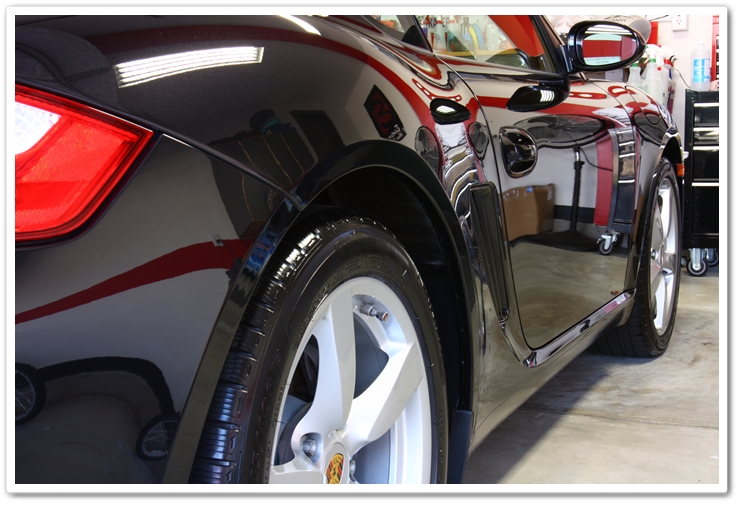
Todd…what tire dressing was used on the Porsche…love the look!!!!
Abosoulty beginner here.
I allways kept clean shiny car, with nice black tires. But my PEARL WHITE 2006 Hyundai sonata needs more love and I think professional products.
What do you recommend for Hyundai and white cars ?
Please do tell what the tire dressing is. It looks fantastic!
Hi Todd happy new year.Im applying m205 by hand for light swirl removal im skipping the 105 to much cut.Do i use a microfiber disc or foam?
Thanks
Jack
Hi Todd, I just purchased an NBP Acura TL and I found your 4 part detail guide. Would you be able to tell from any of the pics in the link below if these are even correctable flaws? The car had a clear bra on it, as the front 1/4 of the hood and the bumper arent that bad, but the majority of the hood looks quite bad. At first glance, it’s as if it has small white pieces of fiber in it. The pictures are after I followed the M105 tutorial. I’m new so I may not have done it quite right. I found with heavy pressure the pad will stop spinning. I put a black sharpie mark on my backing so I can make sure it spins. I have the PC 7424XP, using CSS orange pad and M105. My pad was not brand new, but freshly cleaned. I’m prepared to repaint, but was curious if there is any salvaging of this? Would a rotary with wool give better results? Is wetsanding an option? Thank you for sharing all of your knowledge. I read and learn every day here!
http://s902.photobucket.com/user/lansgsbri/library/TL%20Paint
What would you use on a BMW Jet Black? You have a BMW (except Jet Black) in your article about Pad Selection.
[…] I have black too and will be correcting the swirls soon. I've just been waiting for some time and some nice weather. Waxing it won't remove the swirls. A black wax may hide them some but it's just a filler. You need something like M105/m205 by Meguiar's. If the swirls are light you might be able to use just the 205. There are a bunch of other products out there that will give you the same results, that is just what I use. I'll be using a Porter Cable 7424xp. Here's a pretty good link. You can see they got some pretty good results by hand in the door handle picture. https://www.detailedimage.com/Ask-a-P…ars-m105-m205/ […]
[…] love the 7424XP! M105 and M205 a two great cutting compounds from Meguiar's. More here. For newbies, paint correction is an art. If you dedicate time, a few dollars, and patience you […]
Thanks for the info Todd. I recently bought a red 1990 miata w/single stage paint that is pretty bright, but has some light swirls and a few spots from household window cleaner overspray. The previous owner said it did contain ammonia. I clayed the area with the megs clay kit and obviously the spots remain, but the clay surface was red, so I’m a bit hesitant about polishing. Do you feel the m201 and black pad treatment would be too aggressive? Thanks for your advice.
[…] and looked at a ton of videos online before I attempted anything. Used the orange pad etc.. Polishing How To with Meguiar?s M105 / M205 | Ask a Pro Blog I tried the fishing line method to start but see the image that didn't come out so well at the […]
Can m3 be used inconjunction with m205 as a duel finishing process, or is this just over kill ?
Hi Todd,
Can we use market available pad of 4inch with Meguairs DA Power system, which has Backing pad of 4inch?
great view very clear and a great read for the beginner or someone just refreshing .. however unless i failed to read it properly i didn’t see any suggestions on what micro fibre cloths to use as using any old one will just result in marking the clean surface you’ve just spent hours on any suggestions I’m from the uk btw so maybe any that do Shipping world wide. thanks
Wow I’ve buffed before with regard stuff and was wondering if I should try going straight into this or take my time learning, I wanna see results nto waste money?
My spouse and I stumbled over here coming from a different website and thought I may as well check
things out. I like what I see so now i’m following you.
Look forward to checking out your web page repeatedly.
I too stumbled across this website and find the articles very informative. And I have some questions. I’m somewhat a rookie at detailing. I’m working on some older cars and wonder if there is an easy way to determine if the surface is paint or clear coat. Any guidelines. Removing imperfections and swirls from black cars is very important. What is the best type of light to use to inspect progress indoors. I have one of the newer style flashlights by Cree (I think) and I find that when I shine the light onto the surface, no matter what I do, it seems to have a lot of very small specs, has fine swirls and looks cloudy. In other words, it’s difficult to achieve that mirror finish when doing close distance inspection with that flashlight. However, in the bright sun the car has a stunning shine from 5 feet or more. Are this tiny, white flecks normal to see, is this ‘cloudiness’ normal when inspecting at close range? Or is it possible that the paint is simply old and these imperfections are deep in the paint and that I’ll never be able to remove them? It’s odd, even when I’ve polished my newer car that has clear coat I’ve seen the same kind of cloudiness.
Dave – Please contact us here (https://www.detailedimage.com/Contact/). With so many questions, it will be easier to answer them all, send links, etc. via email. Once we hear back from you I will be sure to take care of you asap!
Ok, I will reply under ‘Detail Questions / Polishing’
Hello Tood. I got one question. I m begginer in detailing. I have done some cars. I mean Paint correction. But i got one problem. On Friday i have to make correction on Bmw Z8 Hamann. I started today but problem came over. I startedcorrection with M105. aND correction looks lovely. Problem came over when i wanted to clean up M105 with using Izopropanol or APC. When i cleaned up panel with APC panel was looking horrible. Scrtaches are everywhere paint looking worse than before. I have done some correction on porsche or audi paint and every time when i want to finish off correction with swirl free compound i using befroe APC. What am i doing wrong. Or i shouldnt use apc atfer using m105 and before add m205. The paint is basic black bmw without mettalic. Please help i must have done all by friday. thanks i tested to koch compunds and menzerna . the same problems came over.
The IPA is removing any polishing oils from the paint. I would highly recommend inspecting the paint during polishing as you may not be removing all of the imperfections while polishing with the M105. Remember that the panel can look great in one light, but terrible under another. This is why good lighting is key, so you know exactly what the paint condition actually looks like. If you are removing all of the imperfections and the paint just looks hazy and ready to be finished with the M205, then the towel you are using to remove the IPA may be dirty. To check this, I would wipe the towel on an old CD. If the towel scratches the CD it will scratch the paint and is most likely the culprit.
Curious,
Looking to remove some light to medium swirls/scratches in my 2011 Audi S4. Blacklight on its own hasn’t been “cutting it”, excuse the pun. Was thinking of going to the M105, and then instead of the M205 going directly to the Blacklight which I think also provides protection? Would this combination work okay, and would have I have to wash in between the two?
Thanks!
Also, what pads would you recommend for this car? Believe it has typically hard Audi paint..
A couple examples of what I’m trying to correct/minimize..
http://i1002.photobucket.com/albums/af146/sdpbc/Audi%20S4/20160925_104921_zpsjn3domia.jpg
That’s probably the worst of it. Rest are more minor swirls like this…
http://i1002.photobucket.com/albums/af146/sdpbc/Audi%20S4/20160925_104941_zpsizssyikz.jpg
awesome post!
Thanks for the great articles, I put in a good size order thanks to them. I have a 2014 Obsidian Black Lexus IS350. A few areas have some very light swirls, and front bumper is somewhat pitted from road debris. I bought the M250 and Manzerna 3800 Super Finish and white,orange,black. I’m still not clear on what pad I should be using. With M205 step 1, I was thinking white or orange if needed on the light swirls and rest of car, maybe orange on the front bumper, and then black pad in the 2nd step with the Manzerna 3800. Does that sound reasonable?
Hi Todd – when using megs 205, I seem to get an abundance of white powder/dust all over the place. Is this normal, or am I doing something wrong?
TODD man, I am having a very hard time removing swirls from a 2010 Lincoln MKZ black metallic. The clear is rock hard. I bought a random 10fx and chemical guys v line and the compounds cand touch the clear with a orange pad. Ideas? Was considering microfiber pads? To put thing in perspective a 1000 grit 3m tri pad has issues sanding the clear without 10lbs of pressure and some aggression.
i was bit confused about pad selection pad pressure but after reading your blog doubts are cleared.
thanks for sharing detailed information with us. keep sharing such blogs in future.
Thank you very much Gina for that very useful information
Orange peel on 2k finish (classic car)…no clear cote. Is the same system used to get superior finish and is it as easy to get gloss back.
I抦 not sure where you are getting your info, but great topic. I needs to spend some time learning much more or understanding more. Thanks for excellent information I was looking for this information for my mission.
thank you bro
Todd, Thank you for your excellent advice. I had a few light scratches on my 2017 Ram and had never done any removal before. I used Meguiars M205 and a yellow pad with a random orbital polisher and achieved really great results. Your tips on priming the pad and applying proper pressure were spot on.
[…] With the M105, you also get a superior finish, this is thanks to the superior abrasive technology. This feature also ensures ultra-fast compounding as the compound can remove 1200 grit sanding marks. […]
Excellent content, thanks for putting together these for the enthusiasts.
Most of the car polisher centers feel comfortable using Meguiar’s M105 / M205. you can use many swirl removers but Meguiar’s are best especially I use for my car and I thank the car author for this post
Both M105 and M205 are slightly more aggressive than their consumer counterparts. It’s also my understanding that Ultimate Polish has more polishing “oils” than M205.
They all use Meguiar’s Super Micro Abrasive Technology (SMAT). Simply put, they shouldn’t induce scratches/marring if properly applied.
Also, if you’re investing this much labor, you should remove the bonded contaminants that seem to be present on most brand new cars with a Clay Bar Kit.
I have a dewalt variable speed random orbit polisher. What would recommend for the speed to use when using the Meguiars 105 and 205
Zach – Always start slow and bump up the power as needed.
is it also useful in trim plastic part?
Excellent content
Worth reading
[…] Utilizes super micro-abrasive technology for effective cutting. […]