
Overview and Before Pictures
Here we have a ’99 Chrysler LHS that, quite frankly, has been a bit neglected for the past 10 years. The customers biggest concern was to bring the interior back to life. I don’t think that the leather had ever been cleaned, and it was showing a bit of wear. I saw this as a great opportunity to outline the processes of simple leather restoration.
Even in a short period of time, light colored leather in particular starts to get soiled from dirt, grime, perspiration, airborne contaminants, etc. Without the occasional cleaning, this will build up over time making it quite difficult to remove. Since this vehicle probably was never cleaned, I knew it was going to require a lot of effort.
Given this, I decided to use Leatherique as it has always performed very well with the more challenging leather restoration jobs. Two products are actually used were Rejuvenator Oil and Prestine Clean. The Leatherique system works backwards compared to what you’re normally used to. First you use the conditioner, and then you use the cleaner! Yes, it sounds counter-intuitive, but it works (well)!
For the before and after photos, I tried to use the exact same lighting and exposure setting so they are all accurate comparisons. I also do not use any post-processing either other than to re-size and add a border.
Here are a few before pictures showing the condition of the interior. As always, the driver’s seat was the worst.


Here you can see that the lumbar support is actually cracking.

Passenger seat:

Leatherique Rejuvenator Oil – Step 1
The first step in the process is to vacuum the surfaces to make sure all of the debris is picked up.

Here I have the Rejuvenator Oil and Prestine Clean ready to go. To make it easier, I utilize a spray nozzle on the Prestine Clean, and I put the Rejuvenator Oil in a small bowl and apply it with a foam brush. Leatherique recommends applying it with your hands so you can rub it in, but I find that I have much more control of the Oil when using the brush. After I have applied it with the brush however, I will then go back and massage it into the surface of the leather with my bare hands.


Here I am applying the Rejuvenator Oil. Be sure to get a thick coating everywhere, and work it into the stitching as well. After you’re done applying the product, you can further work it into the surface, folds, seams, and stitching either with your hands or with a leather brush.

You can see where the seating surface is completely coated.

The Rejuvenator Oil works with time and heat. The best way to allow the product to work is to roll up the windows, and let the car sit outside in the sunshine for the day to create a steam room effect. During this time it conditions the surface and brings all of the dirt, grime, salt, and other toxins to the top leaving a sticky or tacky finish before it’s removed. I prefer to let it sit for about a 24 hour period. If it’s cooler outside, you’ll need to leave it on longer. You could cover the seats with plastic wrap and heat it up with a hair dryer (or drive around with the heater and seat warmers on!)
Here’s a good tip. If you need the ability to pull the car in and out of the garage, then cut up a large plastic garbage bag and cover the seat. You won’t have the worry of getting the Oil all over yourself, and the plastic won’t remove it from the leather. Afterwards I wipe down the plastic, fold it up, and store it in the cabinet for future use.

Fast forward now to 24 hours later…
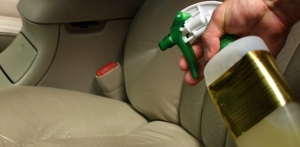
Leatherique Prestine Clean – Step 2
Now that you’re done with the first step, it’s time to clean the surface off with Prestine Clean. You’ll need to have a bucket of warm water, a soft brush and towel, and a spray nozzle for the next stage as the Prestine Clean isn’t thick like the Rejuvenator Oil.
First, spray the Prestine Clean directly on the leather surface.

Now you want to use your leather brush and work the product in. Pay particular attention to the creases, seams, and stitching. You’ll quickly see the grime being removed. If you don’t have a leather brush, you can simply use a microfiber towel.

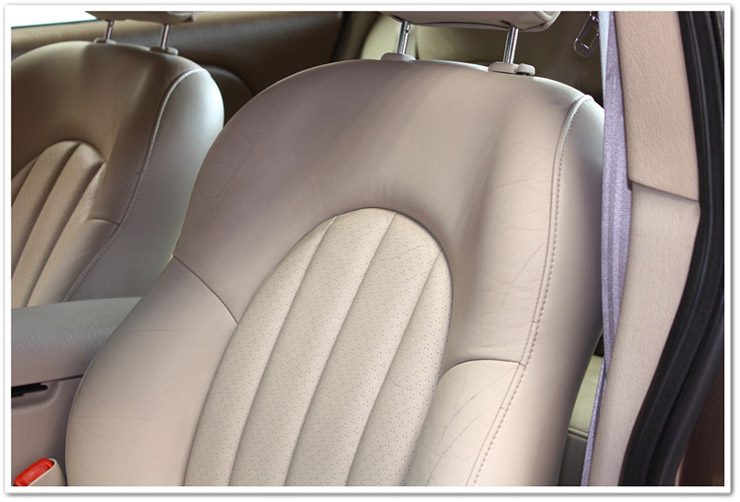
Now that you’ve worked that particular area, wet your towel in the bucket, wring it out, and then wipe down the leather to reveal a remarkable new look. I like to wipe it down, rinse out the towel, and then wipe it once again with the same towel. Next grab a dry towel, and lightly buff the surface. After I’ve done this, I’ll then move on to the next section and spray, scrub, wipe and buff. In this picture the surface has already been wiped down…look at the difference in the color of the leather in comparison to the photo above!

Since this process removes so much dirt and grime, you’ll probably want to refresh your bucket with clean water halfway through the cleaning to make sure you’re not re-introducing dirt (or use a two-bucket method).
In this photo, the passenger seat has been finished, but not the driver’s seat…notice the difference in color on this one as well.

Leatherique: Before and After Photos
Passenger seat before:
Passenger seat after:

Driver seat before:
Driver seat after:

Driver seat before:
Driver seat after:
For convenience, DI has both a Leatherique 16oz kit and a Leatherique 32oz kit available in cost savings packages.
Buy Products From This Article
Purchase the products used in this article individually or in one convenient package here!