
The age old question… What causes all the swirl marks seen in the paint on nearly every vehicle out there? The short and simple answer is “improper techniques and inferior products”. However, from my experience, the answer is anything but simple because there are numerous tasks within the detail process responsible for swirl marks. For this article, I’ll address a few of those tasks, explaining how they usually cause swirl marks and share simple techniques to avoid such results.
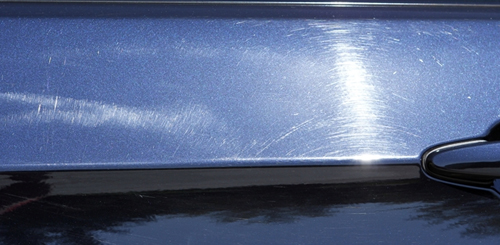
First off, to clarify, I consider swirl marks to be any lighter scratches in the paint, whether they’re circular, straight or diagonal. These are light scratches caused by different dirt particles being dragged around the paint with insufficient lubrication and with the incorrect media. As I’ll explain below, these swirl marks can be caused by the person detailing the vehicle through multiple processes, starting with…
Washing
Washing is one of the processes most responsible for creating swirl marks. Whether we’re using some old, cotton wash media or quality mitts like the reTHICKulous Wool Wash Mitt, we are always scrubbing the paint to a certain degree. What this means is that even with the most careful of methods and products, we will eventually start seeing some swirl marks. It’s up to us to decide how soon we want to see those swirl marks. Choosing the right products and proper tools for the job is a huge plus in reducing the chance for swirling during the washing process, so a quality sheepskin wash mitt will make a dramatic difference over a sponge from a local store, especially one used at a local $5 car wash! Quality wash mitts tend to hold dirt better and allow for plenty lubricity when cleaning the paint, both of which are extremely important in keeping swirls at bay. On the other hand, a wash mitt that doesn’t hold water/dirt well tends to press the dirt against the paint and not give enough lubricity for the cleaning process, resulting in light swirl marks. Worst of all is the local car wash that uses mitts on hundreds of vehicles daily, so while you may get away with it if you’re one of the first few cars through the wash, anything coming through later will leave in poor shape. In short, washing is the process during which swirl marks begin to show, so being as meticulous as possible with the tools, products and techniques is mandatory to keep your vehicle swirl free for as long as possible.
For those wondering how long it usually takes for swirl marks to appear, I wish I could give you a straight answer. The reality is that, considering you use the best products and tools available, it helps greatly if the clearcoat on your vehicle is on the harder side. In that case, it will take much longer to start seeing swirl marks on the paint, anywhere from 4-6 months or more. On darker colors, especially jet black paint where clear coat is extremely soft, swirls will probably appear after a couple months or so, depending on how often the car is washed and how dirty it is at the time. Regardless of the color, you can randomly expect to get a swirl mark here and there due to dragging some dirt inadvertently, but if it’s taken care of properly, your car should never get to the point where it looks as horrible as 99.99% of the cars out on the road today. For reference, one personal experience involves maintaining a brand new Ferrari 458 in dark blue color with somewhat soft clearcoat ever since August of 2011. Between myself washing and waxing monthly and the owner washing every week or two, the car has maybe 4-5 random swirl marks in the paint.
Drying
From my experience, next to washing, drying is the second most responsible for creating swirl marks. In fact, washing is in a way the most important part of drying because if a vehicle isn’t properly washed and cleaned, the drying process will surely result in quite a few swirl marks by dragging around left over dirt. Assuming proper washing is done, the right products and techniques are a must when drying in order to keep the paint as swirl free as possible. Cheaper towels of lesser quality tend to get hard after only a few washes, which leads to bad absorption and possible swirling. Pressure and technique are also greatly important. Pressure should be extremely light or none at all, simply enough to hold the towel on the paint to let it do its job. As for technique, the only way to all but completely eliminate possibility of swirl marks is to use to blotting method. Otherwise, wiping the paint even with little to no pressure can create swirl marks if something gets caught under the towel. Whenever I’m working on a car, I like to use the DI Microfiber Waffle Weave Drying Towel and prefer to use the blotting method, as described in my Winter Washing with Optimum No-Rinse article. This ensures I’m being as meticulous as I can with the drying process in order to try and avoid swirl marks as best as possible.
Claying
I was debating listing claying here at first but figured I’d include it. Reason being, claying itself is an abrasive and many people don’t realize that it can easily leave marring in the paint. Swirl marks are potential with clay bar decontamination if you get a piece caught between the clay bar and the paint. At the same time, unless the paint is fairly hard and plenty of lube is used, clay will almost always leave at least some marring and swirls of its own. This isn’t a bad thing as you should polish after a clay bar anyway, but for those who simply want to clay then wax, the only solution is less aggressive clay bar and plenty of lubrication!
Waxing
When I tell this to my clients the response is typically “Really?! Waxing causes swirl marks?” The simple answer is Yes! The reason that question gets asked a lot is because people don’t associate waxing with swirl marks at all due to the fact that the car has been completely washed and cleaned. However, waxing can surely cause swirl marks through the application and/or removal process. Reason being, some waxes, typically the older carnauba paste waxes, are fairly hard to apply and especially remove, requiring quite a bit of pressure during wiping to completely remove. As you can imagine, on a vehicle with softer paint it will be that much easier to create swirls with heavier wiping during wax removal. Also, many enthusiasts don’t realize how much pressure they’re capable of applying by hand because it’s so concentrated. I’ve had experience with a client who removed too much clear coat using a hand applicator and an over the counter scratch remover, all due to heavy pressure on a small concentrated area! For these reasons I always recommend waxes that are easy to apply, such as the P21S 100% Carnauba Wax and Pinnacle Souveran Paste Wax, or sealants like Klasse High Gloss Sealant Glaze and Blackfire Wet Diamond. All of these protective products are extremely easy to apply and are removed with very little to no pressure, as a result minimizing or eliminating chances for swirl marks.
Car Covers
This is an issue I keep seeing with many new clients. They keep the car under the cover over winter and start seeing swirl marks soon after, getting worse and worse throughout the winter and requiring polishing in the spring. Why? It’s because they cover the car one day, take it out for a drive, then bring it right back and put the cover on. This is a big no-no! No matter how soft, expensive and reliable the car cover, it will cause swirl marks when placed on a car that wasn’t washed just before the cover goes on. Even a 10 minute drive to the grocery store and back will leave dust particles on the paint, so when the cover goes back on it’s simply rubbing all this dust into the paint. On some very hard paints, it might not do anything for a while, but on softer black paints the car will look horrible after going through only a few of these situations. So, wash your car before putting a cover on it AND make sure the cover is completely clean inside to avoid swirl marks.
Dusting
Dusting is a touchy topic with many car owners out there. There are a few dusters that are highly recommended and work great for everyone and there are some that just drag dust around. I personally only recommend cleaning the car with a mitt while washing and I will leave it at that. Reason being, dusting can definitely cause swirl marks because you are dragging a duster across the paint finish trying to pick up dust particles. If you must use a duster, I would advise the obvious like keeping the duster clean and using it as delicately as possible.
Quick Detailer Wipe-downs
This is one of the most poorly advertised processes and products within the detail industry. There are numerous quick detailers sold by a few different manufacturers that encourage car owners to simply spray on and wipe off for a great shine and some protection. What they don’t tell you is that along with the shine and protection come some swirl marks and scratches. Similarly to, but much worse than dusting, doing a quick detailer wipe down is a process where dirt and dust is basically pushed along and into the paint with a towel. As you can imagine, if there is a good amount of dust on the paint, especially if the paint is soft, one wipe with the quick detailer and towel will easily cause swirl marks. This is regularly done at car shows and concours events, so ironically the cars are being damaged while at the same time being displayed as great pieces of machinery. To avoid this I would simply recommend avoiding any quick detail wipe downs unless it’s just after a thorough wash or wax application, so basically after the paint is thoroughly cleaned. Otherwise, swirl marks are just about guaranteed during this process.
If you must do the quick detailer wipe-downs, I would highly advise first using Optimum No Rinse (ONR) as a quick detailer to clean the paint before using other quick detailers to get the extra shine and gloss. This recommendation is based on my experience with an old client, who had to do 4-5 of these wipe-downs on his black limousine every day! He did so in order to have a clean, shiny car for each client, but as you can imagine it resulted in polishing every couple months. Every time I saw the car it was covered with swirl marks as expected, so I recommended he switch from the product he was using to ONR. Next time I saw the car, after about 1.5 months of daily ONR wipe-downs, the amount of swirl marks was only about 50-60% of how it was originally when he wiped it down with the other product, so it definitely worked very, very well.
Well that’s about it for now. As always thanks for reading and hope you enjoyed it!