
This week’s feature detail is a 2005 BMW M3 Coupe in Silver Grey Metallic. The M3 has always set handling standards, and with 333HP and 262 lb/ft of torque, it’s a very well balanced machine that is an absolute blast to drive. I was fortunate to drive this particular vehicle during the initial inspection…the owner handed me the keys and said: “let’s go for a drive”.
The car has 27,000 miles on the clock, and was in very good condition for a 4 year old vehicle.
Upon initial inspection, I noticed moderate to light swirls, and I also quickly found that it had previous detailing history. Light holograms were noticeable on the hood in particular, as well as other areas of the car. Had this been a darker color, they would have been quite obvious. When I pointed them out to the owner, he said that it had been worked on by a few other detailers since he owned it, and wasn’t sure which had caused them. No worries though because many vehicles come to the Esoteric garage with holograms, but they leave with them properly and permanently removed!
I was contracted for a full detail on the M3: Exterior correction, engine detail, and interior as well. We agreed on a goal of a 95%+ correction rate for the paint.
First up was the interior which was in pretty good shape, and just needed a thorough cleaning with proper protection.


I started off with a vacuum of the interior and trunk areas, and then used a small brush to clean out all of the cracks, crevices, and other places where dirt, dust, and debris can hide.

Once that was done, I then cleaned all hard surfaces with a light mixture of Woolite and water. Especially with dark interior like this one…you may think it’s clean, but do this method and you’ll be amazed at the color of the bucket of water when you’re done!
For protection of these surfaces (door panels, dash, console), I used Optimum Protectant Plus. This is a great product to use when the owner doesn’t want any gloss added to the finish. OPP leaves it looking new, not dressed. And it smells nice too!
Next I moved onto the footrest and pedals. Somehow I managed to misplace the detailing brush I normally use for these areas, so I had to improvise by grabbing my wife’s toothbrush. She was, err, “not happy” with me the next morning!
I find that Chemical Guys Grime Reaper at a 5:1 ratio works well for the pedals. I lightly spray it on, agitate it with a brush, and then blot it down with a damp microfiber towel.

For the leather seats I opted for a light cleaning and conditioning by using Leatherique Prestine Clean, which is my go-to leather care product.
I’ll spray it onto the leather surfaces, massage it in by hand, then come back about 15 minutes later and wipe it all down with a damp microfiber towel that I rinse out frequently during the process. This does a great job of cleaning and restoring the natural matte finish of the leather, and adds some UV protection as well.

Basically any leather, rubber, or vinyl can be treated with Prestine Clean, so here I’d like to show you a few other areas that you can use it.
Here you can see that the door seals are dry and discolored.

Simply spray some Prestine Clean onto a microfiber towel, and then wipe down the seals. Now they’re cleaned and conditioned, and will help to keep the cabin sealed up properly.

This particular car has rubber window trim on the exterior, so I treated them with Prestine Clean as well.

The windows were cleaned up with Stoner’s Invisible Glass using both a DI Easy Reach Mini Mop for the heavily slanted front and back windows, as well as a DI Glass Polishing Towel.
The interior is now all tidied up!


After the interior was done, it was time to move on to exterior and engine washing.
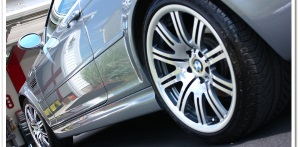
First up were the wheels. I soaked the rims with Chemical Guys Sticky Wheel Gel and let that dwell for a bit. While that was working I cleaned the tires and wheel wells with Chemical Guys Grime Reaper at 5:1.
Here the CG Wheel Gel is going to work on the build up of brake dust and road grime.

Here is use #507 for the Mini E-Z Detail Brush…between the tight BMW spokes! I used the large E-Z Detail Brush for the inner wheel barrels, and the Mini version for between the spokes.

Next I moved on to the very dirty exhaust tips. Below is a 50/50 shot with one inner barrel cleaned and the other not. Big difference! If you want to learn more about the specific process and products used, please check out the Exhaust Tip Cleaning Tutorial that I put together while working on this particular vehicle.

Next up was the engine compartment.
As you can see, required a bit of effort as well, and most likely it had never been properly detailed.


For the engine, I soaked everything in P21S Total Auto Wash, and agitated with a variety of brushes and sponges.
The next step was to thoroughly wash the exterior of the M3 and get it ready for claying and polishing. As usual I used Chemical Guys Citrus Wash & Clear at paint prep ratio (2oz/gal) to make sure that any previous waxes are stripped from the surface. I used my Gilmour Foamaster II foam gun to pre-soak the car, and then used the 2-bucket method and a DI Sheepskin Mitt for washing.
After the wash process was complete, I pulled the car back into the garage and proceeded to clay using Clay Magic fine grade clay and Dodo Juice Born Slippy clay lube. As usual I found most of the contaminants just behind the wheels, on the horizontal surfaces, and on the rear of the car.

Once claying is complete, the next order of business is to tape up any areas that could potentially get damaged (or stained by polish) during the polishing stage.
The black plastic vent on the hood is a perfect candidate for damage, so it’s best to completely cover it up.

The rubber trim by the windows should most definitely get covered otherwise you’ll be spending a lot of time trying to remove white polish residue from black rubber!

Here are a few shots I took the day before so you could see the holograms and swirls that needed to be removed.
Silver is a difficult color to capture details in photography, but I think you can get a good idea of what I was dealing with on this particular M3.
Notice the holograms/buffer trails:


A close up of light to moderate swirls:

The tail lights would also require polishing to remove swirls and restore clarity to the lenses:

I started off by taking paint thickness measurements all around the car using my DeFelsko PosiTest DFT gauge. I’m looking for overall thickness, but mostly looking for any inconsistencies that may indicate previous heavy corrections or repainting. If I find any particularly thick or thin spots, I’ll treat those areas accordingly. Fortunately everything looked good.

BMW’s typically use hard clear coats that require more aggressive methods to correct them. Since this M3 had mostly light swirls, I decided to first try a lighter polish and pad combination. I tried Menzerna PO203S with a white pad on the Makita rotary, and found it to remove the defects and finish down LSP ready (no final polishing required).

When using PO203S, all it requires is 4 small dots of polish on the pad to work a 24″ x 24″ area. I’ll do the first few passes at about 1000rpm to spread the polish, then bump up the speed to 1500-1800rpm with medium pressure until the product goes clear, and then back it down again to about 1000rpm for a few passes to finish it out.

Most people like working with silver cars because they are so much more forgiving than dark vehicles. The problem with them though is that they’re very difficult to see the defects when you’re doing correction work, even with 1000w halogen lamps! I practically had to become a contortionist to see how well I was correcting the paint on this light silver color.


For the tight areas and bumpers I used a 4″ spot pad.
Before:

After:

I polished the tail lights with a 4″ orange spot pad and Menzerna PO203S. Notice the clarity in the light reflection.

Once the polishing stage was complete, I did an alcohol wipedown and inspected the vehicle in the sun to make sure everything was corrected. I was going for a 95% correction, and was very happy to get even better than that. There was also a tremendous improvement in the overall gloss of the paint.
Swirls and holograms are permanently removed!


Swirls are also removed from the tail lights as well.

Next up was to seal the finish. For the M3 I decided to use Blackfire’s Wet Diamond paint sealant. While it’s not as quick as an application process as Optimum Opti-Seal, it does provide a beautiful finish with durability upwards of 6 months. It can be applied either by hand or by PC, but I like to apply it by PC to ensure even coverage. Here I am using a Blue finessing pad on a speed of 3.5-4.

With Blackfire Wet Diamond sealant, you need to let it cure for at least 8 hours after removal before you can top it with wax if you wish.
For the engine compartment, I dressed all of the plastic, rubber, and hoses with Chemical Guys Fade 2 Black.


Before:

After:

For chrome trim and emblems, I like to use Klasse All-In-One polish. It does a great job of cleaning and polishing the metal, and adds a nice layer of protection as well.
This intricate grill was a bit dirty inside, and was showing water spots as well that were hard to get to.

So I used a large detailing swab and put some KAIO on the tip to clean those hard to reach areas.

You can see here just how much dirt and grime was hiding in there.

All done!

I did the same for the front grill.
Before:

After:

Tires were treated with Blackfire Long Lasting Tire Gel. It has good durability and a nice level of gloss without being too much.

All black plastic (exterior) trim was treated with 303 Aerospace Protectant.
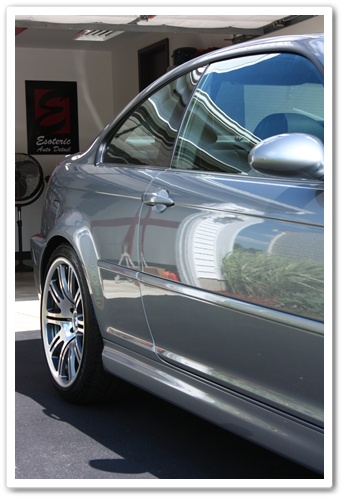
The Wet Diamond sealant is curing before I can apply a coat of wax, so I pulled the otherwise finished M3 outside to snap a few photos. Between the polishing and the sealant, the finish already looks brilliant! Remember, these next photos are before applying any wax.


I let the Blackfire Wet Diamond cure overnight, and the next morning I applied a coat of Chemical Guys E-Zyme Natura wax. This is definitely a high-end wax at $275, but it’s a 16oz container compared to most others being just 8oz. So when you look at the cost of the real boutique waxes, the price of the E-Zyme is right in there.

Applying the E-Zyme was buttery smooth and it was easy to put on a very thin layer. The removal with my reTHICKulous towel was easy as well.
As I stated before, the finish looked beautiful after polishing and applying the Blackfire Wet Diamond, yet the E-Zyme definitely managed to kick it up a notch. There’s no question that it added another level of clarity and wetness to the finish. The M3 looked like liquid silver metal when I was done with it.
Here are the final photos…enjoy!


As always, thanks for taking the time to review my work.
Total time = 11 hours!
If you have any additional comments or questions, please submit your reply in the comment box below.