
As detailing enthusiasts look through posts outlining a complete detail of a car, they’re always impressed with before and after photos showcasing the fine polishing skills and products being used. We as professional detailers do our best to make them as informative and educational as we can, and sometimes we even get lucky by adding a bit of humor while we’re at it to keep the readers’ attention.
Many times however, these posts can skip over some of the most important steps in the process…proper preparation of the vehicle and the paint to get it ready for the crucial polishing. If we fail to properly prepare, we may not produce the best results, or worse yet we risk damaging the vehicle. That’s what you call ready – fire – aim!
Because I want to make sure that enthusiasts and detailers alike don’t fire before they aim, I decided to put together an outline for vehicle preparation to make sure that you are getting the most out of your polishing session and achieving the best results.
I know you’re anxious to pick up your Porter Cable 7424XP, Flex, or Makita polishers for a full-blown beautification session on your car, but put it back on the work bench for now because we’ve got some very important topics to cover first. I realize that the prep stage isn’t the fun part, but don’t worry…we’ll get to polishing.
Before we can achieve this:


We first need to deal with the realities of this:

Washing and Decontamination
First up is the washing stage. I know this sounds obvious, but stick with me here because I’m going to try to cover some critical information why this is all important. If you haven’t already read through my washing and drying tutorial as well as my Grit Guard 2×4 method article, now would be a good time to check them out so you get a better understanding of how the process works. It’s OK, really…we’ll all stay right here and wait for you to get back.
We’re waiting, and waiting…
Alright, you’re back! Did you pick up on anything that you may have been missing before? There’s some great information in those articles, right? (meanwhile Todd strains shoulder while patting self on back).
Despite the fact that we’re getting ready to polish, we still want to use the same safe techniques as we would when doing a normal maintenance wash. There’s no reason to cause any more damage by improper washing techniques just because we’re getting ready to polish. We’re going to be spending enough time with a buffer in our hands…no need to create more.
Before starting your wash, remove license plates and brackets whenever possible. First of all these are hiding places for gritty dirt, and secondly they get in the way when polishing. It only takes a few moments to remove and re-install them, but you could spend a whole lot more time taping and trying to polish around them if you don’t.


Be sure to thoroughly clean the vehicle to remove any and all dirt, debris, bugs, leaves, etc. All of this gets in the way of polishing, and if there’s any dirt or debris left on the surface, it can get caught in the pad while polishing and you could risk doing more damage than good.
Not only do we need to remove all the potentially abrasive dirt and debris from the car, but we also need to make sure that the surface is free from any previous wax, sealants, grease, tar, etc. I know that the grease and tar examples are obvious, but do you know why it’s important to remove wax and sealants before polishing? It’s because some of these products can run interference with the the polish and pad. Just think of it as a barrier that rests between the paint that you want to polish, and the polishing media itself. There are some products out there (silicones in particular) that will make the polishing process extremely difficult, if not impossible.
There are a few tools, products, and processes that will help you in your quest to completely free sealants and waxes from the paint. For your wash solution, I would recommend one of the many that offer mixing ratios specificially for this purpose. Products like Chemical Guys Citrus Wash & Clear, or their newer Citrus Wash come to mind. By mixing at these stronger ratios, the wash solution will work to break down previous waxes and sealants. You can also dial in a higher ratio on your Gilmour Foam Gun, and let it dwell on the surface for a while before washing. Once you’ve soaked the car and allowed it to dwell, do your normal wash process with your buckets also filled with a stronger ratio, and use your sheepskin wash mitt.


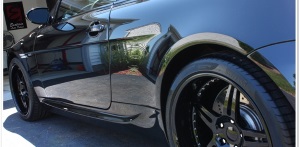
So how do you know whether the vehicle still has a good layer of a wax and/or sealant? Well the easiest way to tell is spray the surface with your hose, and see if the water beads. The tighter the beading, the better the protection is (in most cases). If there’s no beading whatsoever, then shame on you for not keeping a good layer of protection on your car. 🙂
If you look at this picture, you’ll notice how the water is beading nicely, indicating a coat of wax or sealant on the surface that needs to come off.


Another good product for this application is P21S Total Auto Wash. The way I use it to strip wax is to put it in a spray bottle full strength, and pre-soak the area I’m getting ready to wash. As for dwell time, I’ll typically spray all of the horizontal surfaces first, then wash those areas, then spray down one side of the car then wash it, and so on until I’m finished with the entire car.
Caution: Be careful when applying any APC to either painted surfaces, or exterior trim (rubber, plastic, metal) pieces. Despite the fact that many products like TAW are usully very safe, there are still variables out there that could cause irreparable staining. Be especially careful around older vehicles. Always follow the manufacturer’s instructions. When in doubt, simply go from a strong wash to claying to be safe.
In this photo, I sprayed a small section with P21S TAW, let it sit for a few moments, and then washed off that area with a strong solution of CG Wash & Clear. After I rinsed it off, you can see that the water is still beading in the areas that weren’t washed, but the area that I did spray and wash is completely free from wax (no beading).

Claying
Now that we have the car squeaky clean and free from waxes and sealants, it’s time to move on to the next stage of paint decontamination which is claying. If you’re read through my tutorial on how to use a clay bar (another shameless plug of a previous article!), you understand how clay works to remove all of the embedded contaminants from the surface. This is all the stuff that sticks to your paint, but won’t come off in the normal washing process. While I’m washing the vehicle I’ll typically run my hands across the paint in a variety of areas to check for a gritty feeling. This will give me a good indication of how much claying will be required.
The claying process is very important, and it needs to be done with care as well. If your clay gets abrasive debris caught in it, and you’re not regularly kneading the clay to expose a fresh surface, then you can potentially scratch the surface pretty badly. If you follow my tutorial however, you should be good to go.
Use a fresh clay bar (fine grade clay is all that is needed most of the time), and a good quality clay lube like Dodo Juice Born Slippy to ensure a clean surface completely free of potentially abrasive contaminants prior to polishing.

This photo will give you an idea of the level of contaminants that the claying process can remove.

If the finish of the car required a lot of claying, or if you used a quick detailer as a clay lube which left a “slick” surface, then I would recommend washing the vehicle one more time to remove any of the residue. At the very least, wipe down each panel with isopropyl alcohol.
Taping
OK, now we’re ready for polishing right? Well actually no, we are not. We prepped the surface by thoroughly cleaning and claying it; now we need to tape it to protect delicate materials and edges that could potentially get damaged if they come in contact with the buffer (especially if we’re using a rotary).
When we’re looking at places to tape, we want to protect sharp items that could get caught by the buffer pad (emblems), rubber that could get damaged or stained (window seals), places where uneven body panels/seams meet, or simply items that stick out and can easily get hit by a buffer (door handles, underneath sides of mirrors, etc).
For most of the work I do I use 3/4″ tape, and 1/4″ for the edge of protective film (3M Clear Bra or Venture Shield). Just make sure that the surfaces are completely dry because the tape will come off and leave the area unprotected.
Here are a few examples of areas that require taping prior to polishing:
Vinyl graphics that are on top of the clear coat

Rubber window and door seals

Protruding edges (the entire edge would get taped here. I only have it partially taped for photo purposes)

On this photo, I am protecting a rubber window trim, window felt (vertical tape), and you can also see where I have a vertical surface protected for when I’m polishing the horizontal edge just below it.


And on this one, there is a small seam that I have taped up with 1/4″ tape just to prevent a buildup of polish. A little bit of tape can prevent a lot of cleanup afterwards! We’ve all seen cars with compound caked in the seams, and I can say that it’s no fun to clean up after it’s hardened.


Taping is all about common sense really. If you think that there’s even a slight possibility that a part of the car could easily be damaged or stained, then tape it off.
Well we’ve gone through a lot of information, so let’s do a quick review of what we need to do to prep a car for polishing:
- Thoroughly wash the car using a strong ratio of wash solution to help strip any previous waxes and/or sealants. A clean, wax/sealant-free finish is required to get the most out of our polishing session.
- Clay the surface of the car to remove any embedded contaminants that doesn’t come off with normal washing.
- Tape up all rubber trim, uneven seams, protruding parts (door handles), emblems, and any other part of the car that could potentially get stained by polish or damaged by a buffer.
For convenience, I have put together a couple of Pre-Polish Prep Kits that include all the essentials required to get your vehicle ready for the polishing stage.
Now that we’ve accomplished all of these steps, we’re ready to start polishing to bring the finish to a whole new level. Unfortunately however, that needs to wait for another article. Stay tuned…

Buy Products From This Article
Purchase the products used in this article individually or in one convenient package here!