

I am often asked what process and products should be used on a vehicle to remove surface defects and produce a glossy finish. Whether I am inspecting a car for a potential customer, or answering a question for an amateur/enthusiast, the answer is always similar … “I’ll need to do a test spot to be certain”.
A test spot will allow you to evaluate many things such as the severity of the surface defects and how the paint reacts to correction. It is important to remember to always use the least aggressive method possible to achieve your desired results. As the following photo shows, OEM clear coat is a thin, and valuable part of the paint system. Learning to use the least aggressive method of correction will help to preserve the clear coat on the vehicle.
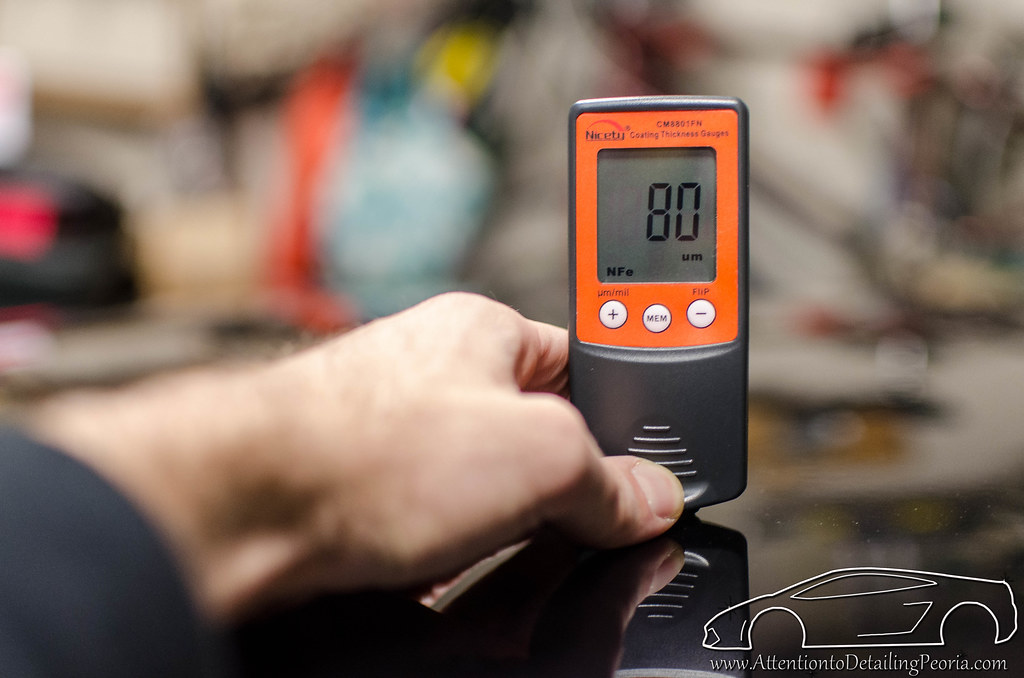

Photo: Electronic Paint Thickness Gauge (i.e. Defelsko) shows the paint thickness of a new Audi SUV. Note: This measurement is total thickness, including primer, base coat, and clear coat, therefore clear coat is only a fraction of this measurement. To give you a point of reference, a sheet of standard computer paper is slightly thicker than the reading shown above (~95 microns according to an online source).
Performing the Test Spot
Before proceeding with any paint correction, be sure you have properly washed and decontaminated the exterior surfaces. You may be surprised at what can be hiding under a layer of glaze, wax, and/or contamination. Once the surface is completely clean, it is important to inspect the paint with proper lighting. This will give you an idea of the condition of the paint before you begin your testing.
If you are working on a vehicle for the first time, it is always a good idea to begin with something very tame, like a light polish and a polishing pad (Example: Meguiar’s M205 on a White Lake Country Polishing Pad). Vehicles that have softer paint often do not need any more than this to achieve some pretty great results. Once you gain experience with many vehicle makes, models, and colors, you may be able to start making more educated guesses regarding the proper product and pad combination that will be needed to achieve your desired results based on the initial condition of the paint.

Photo: The previous image shows light marring, however due to the perceived hardness of the paint, a medium polish was required to remove even these very faint scratches.
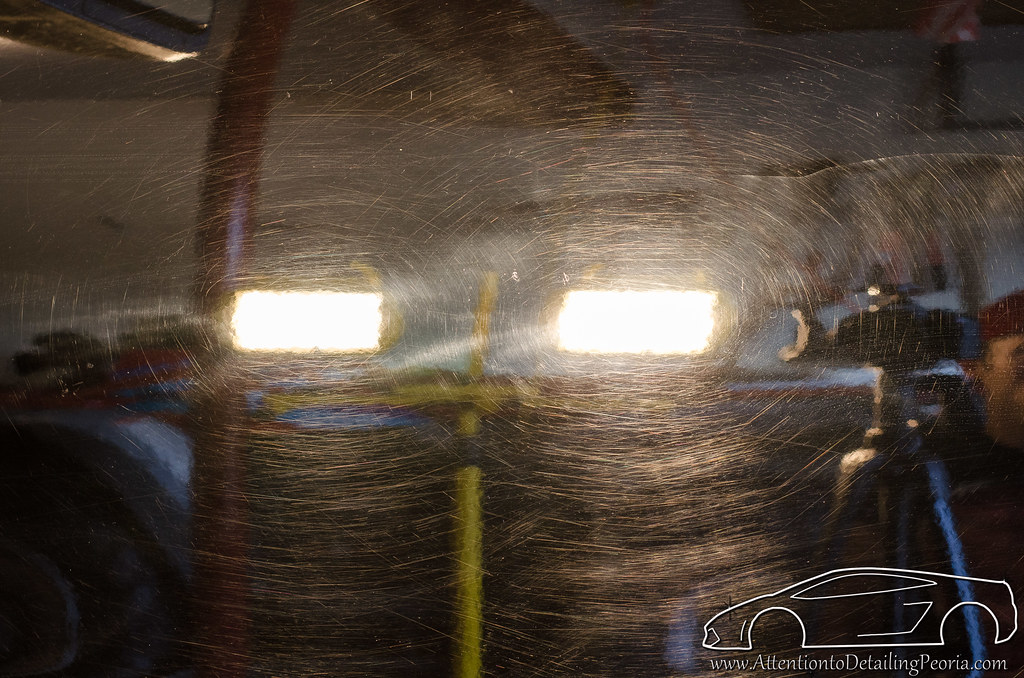
Photo: The previous image shows some heavily neglected paint, however since the paint was quite soft, a Lake Country Orange Light Cutting Pad and cutting compound was able to remove the vast majority of defects. It was then refined with a final polishing step.
I tend to do my test spot (or spots) on a large, flat surface like the hood. I like to tape off a small square (approximately 2×2′) and then polish the area with my first test product and pad combo. The tape lines give me a very easy way to compare my test spot to the original paint. Once I have polished the section, I will remove the tape and examine my results very carefully with proper lighting.
Evaluating Your Test Spot
It is important to examine your test spot to determine if you need to change your working variables to alter your results.
Things to look for:
- Remaining Swirls – If you notice there are still a significant amount of swirls or other lighter defects remaining after your test spot, it is often a fair assumption that you were not being aggressive enough with your initial test. You may need to change your product, pad, technique, or some combination of these variables to improve your results.
- Random Isolated Deeper Scratch (RIDS) – If the swirls and other light to moderate defects have been removed, but heavier defects remain, you have a decision to make. Do you want to go more aggressive (i.e. remove more paint) in order to remove the heavier defects, or did your initial test produce your desired results? For many daily driven vehicles, it is often OK to leave the deeper defects alone as you do not want to remove more clear coat than you need to, however this is ultimately up to the customer. Remember to use good judgement in these situations. Don’t chase deep defects if your paint readings are particularly low. It simply isn’t worth the risk in my opinion.
- Micro Marring / Haze – If you notice micro marring, you have either been too aggressive with your test spot, or you simply need to follow up with a finishing polish to refine the area. If you were only dealing with minor defects, you should hope to be able to finish without marring and therefore no need for a second polishing step. If this is the case, perform another test spot with a less aggressive method and examine your results to see if you can achieve a similar level of correction without producing any marring. If you were dealing with more neglected paint that required compounding to achieve the desired level of correction, it is common to see marring afterwards that needs to be refined. In this case, you simply want to ensure you were able to remove the original defects with your cutting process, and you will then want to do another test spot with a finishing product to ensure you can effectively refine the haze left from the compound.


Photo: The image above shows a test spot that removed the vast majority of light to moderate defects (swirls), while also finishing down without marring. This is the key to a one-step correction.
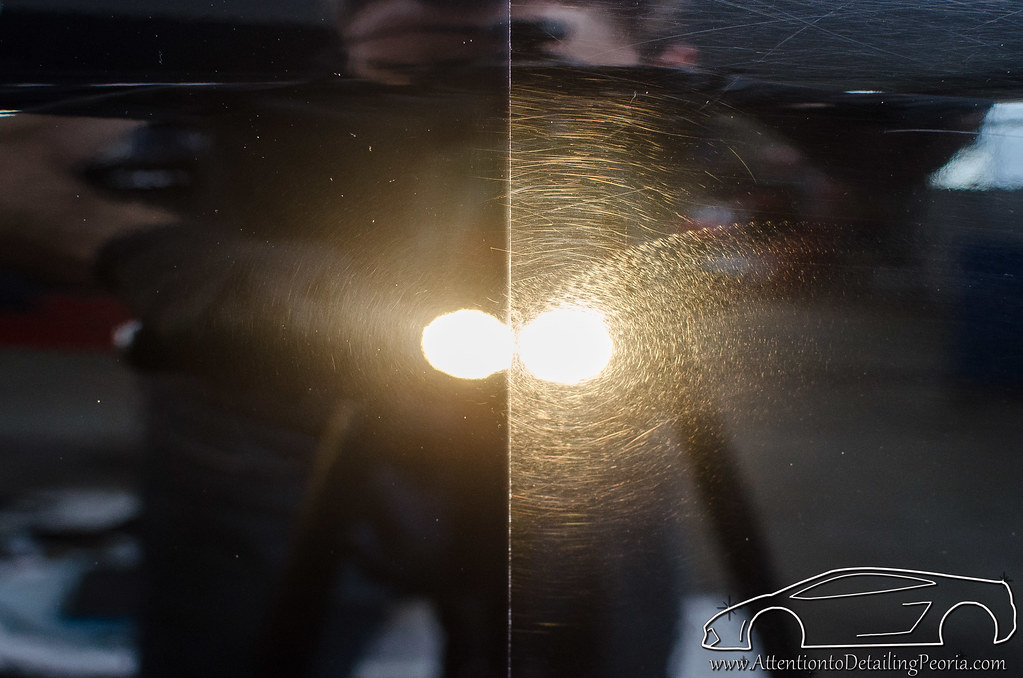
Photo: The previous photo shows heavily neglected paint that required heavy cutting. As expected, this process left a considerable amount of haze/marring. This needs to be refined with a final polishing step to produce a flawless finish.
Altering Your Correction Process
- Product & Pad Combo – The combination of product and pad is the first key in a successful paint correction process. It is worth noting that the aggressiveness of a product is dependent upon the pad you are using with that product. For instance, you can use a light polish with a cutting pad to get more cut, and you can use a cutting compound with a finishing pad for less cut. Once you begin to realize that there is no “right product/pad combo” you can learn to fine tune your product/pad combo to produce the best cut and finish possible.
- Machine Speed – Adjusting your machine speed will also yield different results. In general, faster speeds are often used for heavier correction and slower speeds are used for fine polishing. Speed can also be changed throughout your working cycle. You may start with a faster speed for more cut and finish with a slower speed to promote a better finish, don’t be afraid to experiment!
- Pressure – Pressure is another variable that must be accounted for when determining the best method of correction. Typically, more pressure yields more cut and less pressure yields less cut. Keep in mind that you do not need to maintain constant pressure throughout the polishing cycle. You may find that you need to start with heavy to moderate pressure to produce the desired cutting power towards the beginning of your working cycle, and then gradually reduce pressure to produce a better finish.
- Arm Speed – Slow arm speed is key to most paint correction processes. This is a component of the technique that is often overlooked or forgotten about by amateurs. You must allow enough time for the abrasives in the compound or polish to work against the paint. If you are moving too quickly, you will not achieve the desired results.
Overview
A test spot is a critical point in the correction process. This test, or series of tests, allows you to develop a plan of attack that will produce consistent results throughout the entire vehicle. Many paints and polishes react differently, so there is no guaranteed formula for success. Experience will help speed up your selection process, but there is nothing wrong with taking your time to determine the best possible correction process. In general, you should aim to produce the desired level of correction in no more than two steps. The products available today allow for heavy cutting power (when needed) with an overall good finish that should be easily refined with a single polishing step. There are always exceptions to this, as every situation is different, but for the vast majority of situations, a two-step process is going to yield fantastic results.
As always, thanks for reading!