
The owner of this beauty is a regular customer of mine. I worked on his two M3’s last fall. His BMW’s are their daily drivers so they don’t put too many miles on the Chevy!
He took delivery of the Z06 in the fall, and we planned on detailing it before he put it away for the winter, but unfortunately the weather changed too quickly and we never got the chance. The car now has 1400 miles on the clock.
When he bought the car the plan was to hit the occasional autocross, and drive it to its potential as opposed to letting it become a garage queen! He’s already had a lot of suspension work performed on the car (it sits very low!), and he has a tremendous amount of clear bra installed to protect the finish from the cones he figures that he’ll be bouncing off of while on the track.
When he dropped it off, he told me I should take it for a drive before I washed it. I respectfully declined, so he said that he’d have me ride shotgun during an autocross event. Now that’s an offer that I think I’ll gladly accept.
With the suspension work done on this, he IS going to scrape! This car is low…


First up was the interior. The inside was never prepped when the bought it, so it actually needed a good amount of cleaning. There was a heavy layer of dust everywhere.


I wiped down the console and instrument panel, and then put a protective coat of Optimum Protectant Plus on all of the other interior surfaces. The owner doesn’t like a shiny interior, so the OPP was the perfect choice. It provides UV protection, and leaves the finish looking new, not “dressed”. The way to apply OPP is to first spray it onto a towel, and then wipe it onto the surface.

For the new leather, we wanted to start it off right with some conditioning without leaving a greasy or shiny finish. For new surfaces, or as maintenance between deep cleaning and conditioning, I like to use Leatherique Prestine Clean. Most people think of it just as the cleaner-part of the Leatherique twins, but PC also has conditioners and makes a great all-in-one for leather, vinyl, and rubber (try it on door and window seals…works great!).
Spray it directly on the surface:

Completely work it into the surface with your hands:

Here I am working the Prestine Clean into the driver’s seat:

I like to let it sit on the surface for about 15 minutes, and then wipe it down with a damp towel.
For the inside of the windows, the DI Easy Reach Mini Mop is a must-have tool (especially on heavily slanted windows like these). Ever tried cleaning the bottom of the front or rear windshields?

Interior is now all cleaned up:


Next up is the exterior.
The Z06 puts out a lot of brake dust in a short period of time, but fortunately the newer style of wheels allow for easier cleaning.

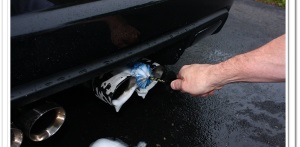
Exhaust tips weren’t bad…a quick cleanup and polish will get these into shape.

The wheels were cleaned with P21S Wheel Gel and a large E-Z Detail brush, and the tires and wheel wells were cleaned with P21S Total Auto Wash.
I’ve found yet another area that the new mini E-Z Detail brush is perfect for:

As always, I start the exterior off with a foam bath of Chemical Guys Citrus Wash & Clear at paint prep ratio to strip off waxes or sealants. The owner said that he hadn’t waxed it, but I thought there was a good chance that the dealer had applied something before it was delivered.


I then pulled the car in and clayed with Chemical Guys clay using Dodo Juice Born Slippy clay lube, and found the surface to be pretty clean. Once claying was complete, I dried it off and proceeded with my paint inspection.
Remember when I said that I thought the dealer may have applied something to the surface? Unfortunately I was correct, and what they applied was a filling glaze to hide what they had done to the car. It’s yet another example of (most) dealers having no clue about proper polishing techniques with a rotary polisher. This is a real shame.

Here’s a close up of the hood. It looked like this on all of the horizontal surfaces.

The original plan of attack on this car was a simple, one-step polish just to make the car look better, and to add some protection. Since he is ready to start going to autocrosses, he didn’t want the car to be “perfect”.
Those familiar with the clear coat on the Corvette know that it is granite-hard and seeing damage like this they would realize that a simple one-step polish wouldn’t accomplish much. I knew that I needed to break out the heavy artillery on this car, which completely threw out the original plan. I guess my original plan for 10 hours or less was just thrown out the window!
The best plan of attack is always to start with the least aggressive method to preserve clear coat and then work your way up as needed.
I started out with my Makita rotary, white LC pad, and Menzerna 106FA polish. I worked on a test section on the hood, and when I was done and wiped it down I thought I was seeing things. It appeared that the swirls and holograms were gone. I wiped the section down with straight isopropyl alcohol no less than 3 times to make sure that it wasn’t filling. After the wipe downs, it still looked clean. I continued to work the rest of the hood and the LF fender with this same combination, did many alcohol wipe downs and inspections, and found the surface to be corrected…with 106FF and a white pad. To have this level of correction on a Corvette with such a light combination is what we in the detailing business call rare!
In this photo, you can see that the left side of the hood (top of the photo) is corrected, where you can still see the holograms in the un-corrected side on the right.

And now after only a few minutes the hood is corrected. The area below the tape line is clear bra.

So the determination is that the clear coat on this Z06 is soft…really soft. I know that the ’09 ZR1 Vette comes with soft paint, and this ’08 was made right at the end of that production cycle in July of ’08. Perhaps they finished off the ’08 with the same paint as they would be using in the ’09 ZR1 (at least that’s my theory).
Needless to say, I was really happy at this point because I realized I wasn’t in for a marathon session. Whew! This was a prime example of why you start with the least aggressive method for the job…because no matter how many of a particular car you may work on, you never know when one is going to throw you a curve ball.
With my new discovery of the soft Z06 paint, I quickly made my way around the car with 106/white combo.
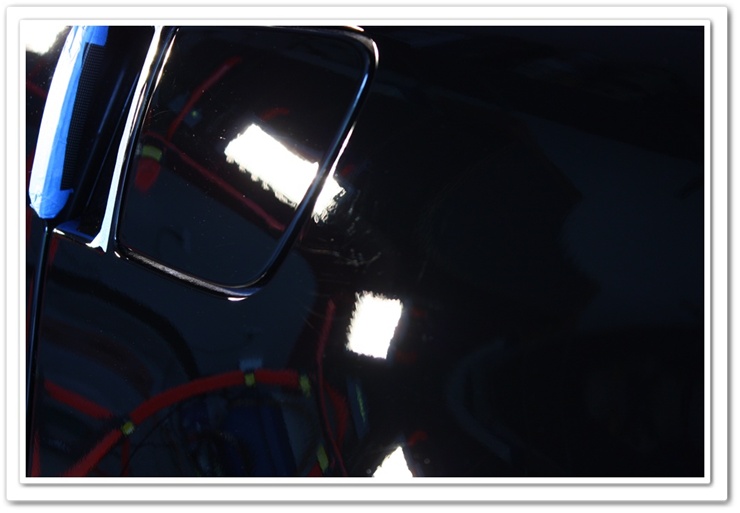
Here you can see that I’ve already finished up the hood…hence the great reflection.

This is the fender that I just polished in the photo above:

Working down the left side of the car, I came across these heavy defects on the fuel lid and just behind it. On a normal Vette, this may require sanding to get rid of.

Just to test how soft this paint was, I proceeded to polish it with the same combination of 106/white. After just 1 pass, this is the amount of correction I was able to achieve.
Amazing!
It didn’t completely correct it, but these were pretty heavy defects. I simply wanted to show how much correction I could get out of such a light combination. I went back with Super Intensive Polish and an orange pad, and it completely cleaned it up.
With all of the small, tight areas I used a 4″ white pad.

Fast forward through the rest of the polishing stage…
My OCD got the better of me, and I wanted to see what a final pass with a fine polish would do. I grabbed Menzerna PO85RD with a red LC pad, and found that it really amped up the gloss level on this soft black paint.

The polishing process is complete, so now it’s time for the finishing touches (many hours worth, actually).
Here’s the obligatory Z06 engine shot. The owner doesn’t like engine covers, and has them removed on all of his vehicles.

The car was autographed by the Corvette designer/legend David McLellan.

The first of two coats of Opti-seal:

Don’t forget to seal the door jambs:

Some specifics:
- Exterior plastic trim was treated with 303 Aerospace Protectant
- Exhaust tips were polished with Optimum Metal Polish
- Glass cleaned with Stoner’s Invisible Glass
- Tires dressed with Optimum Opti-Bond
- Wheels sealed with Optimum Opti-seal
- Painted surfaces sealed with Optimum Opti-seal (x2)
- Waxed with Optimum Car Wax
Are you ready for some after shots? You all know me well enough by now and should therefore already expect a ton of photos. A car this fine deserves plenty, so I actually took some extra ones as well. So go get yourself a drink, come back, and enjoy…
These first photos were after just one coat of Opti-seal


Remember how the hood looked after I washed it? Go ahead…scroll back up and compare.

This one was one of my favorites:


I knew that the Z06 had large back wheels, but these are HUGE.

I opened the garage door for the next few shots but forgot to change the white balance on the camera (hence the odd coloring). Regardless, these are some pretty insane reflection shots.


I’ve just put on the 2nd coat of Opti-seal, and have waxed it with Optimum Car Wax. Here I am doing the final wipe down to make sure there are no streaks. Do you like the Michael Jackson-like white microfiber gloves? I’m thinking about wearing these out in public to see if they catch on…

Now the rest of the photos are after the 2nd coat of OS and a coat of OCW.


Also one of my favorite shots!

In the end, I ended up with about a 95% correction rate. There were still a few RIDS (random isolated deep scratches) remaining, but I figured I’d wait on them until the fall when he’s finished beating up the car at autocross events.


HEY…stop scrolling so fast! There are plenty of good shots yet to come. I realize I get carried away with the camera, but slow down and savor the photos…this is a really cool car!


Gloss, wetness, depth…this shot has it all!

Thanks as always for checking out my work, dealing with my weak attempt at humor, and (slowly) scrolling through all of my photos.
If you have any additional comments or questions, please submit your reply in the comment box below.