
Overview
Wheels, tires and wheel well cleaning is one of the most popular detailing processes that I get asked about. Most people understand that clean wheels and properly dressed tires and wheel wells make a huge impact on the overall looks of the vehicle, but they don’t know how to get them looking that good, or how to keep them maintained after they do. I’ve spent 12-14 hours detailing vehicles and polishing the paint to perfection, only to have the owner of the car first notice how good the wheels look. “Oh my, look how nice the wheels are! How do I keep them looking that way?”
If your wheels have been neglected and they look almost black from the build up of break dust and grime all over them, you’ll need to put in a bit of work in order to bring them back to life, but after that it will just be a matter of simple maintenance during your normal washing process to keep them looking in top shape.
The majority of the build up on your wheels (especially on the inside) is from brake dust. This is a by-product of the braking process, and if left un-treated over a period of time, the corrosive qualities of it can permanently damage the finish of the wheels. You will also notice that your front wheels look worse than the back because most of your braking power is at the front, and typically you have larger brakes up there which will also generate more dust.
So regular cleaning and maintenance of your wheels not only makes them look much better, but it will prevent damage and keep them in great shape for many years to come.
Here are a few examples of wheels that have gone too long between proper cleaning (if any!).


Items Needed
First let’s tackle those wheels that have been neglected for a while. The process isn’t much different from regular maintenance cleaning, and most of the tools required are the same.
One thing to keep in mind for wheel cleaning is that you always want to start the car washing process with the wheels first. The reason we do this is because the wheels are typically the dirtiest parts of the car, and we don’t want to risk overspray from the wheels getting all over a clean painted surface.
Make sure that you have a dedicated bucket and wash media strictly for wheels! Never use your wheel washing materials on painted surfaces. Ever! There are too many abrasive contaminants on the wheels, and if you were to use it on the paint afterwards, you’ll most likely damage the finish (that’s one way swirls are caused, but we’ll get to that in another article).
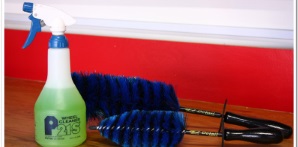
Tools and products you’ll need:
- A dedicated bucket, ideally with a Grit Guard Insert
- Automotive shampoo (you can use the same brand as you use for the rest of the vehicle)
- E-Z Detail Large brush (a must have!)
- E-Z Detail Mini brush for calipers and hard to reach areas (not a necessity, but it will make your life easier, especially if you have large brakes and a tight clearance between your calipers and rims)
- A dedicated wheel wash mitt
- A mild wheel cleaner like P21S Wheel Gel or Chemical Guys Sticky Gel Citrus Wheel Cleaner
- A tar remover such as Stoner Tarminator. Chances are good that you have tar and rubber built up on your rims (inside and out) that is hiding underneath all of the brake dust.
- A cleaner for your tires and wheel wells. You can use a milder cleaner like P21S Total Auto Wash or a more aggressive one like Optimum Power Clean.
- If you really want to kick it up a notch, then you could also polish your wheels as well. Most wheels are clearcoated just like painted surfaces, so I’d recommend a product like Klasse All-In-One (multi-purpose product for many uses on the car and in the home) or Optimum Poli-Seal. If you have bare metal wheels, then you could use a product like Optimum Metal Polish or Chemical Guys MetalWax.
- For long lasting protection, you could apply a durable sealant to the wheels to make maintenance cleanings much easier. I would recommend either Optimum Opti-Seal or Poorboy’s Wheel Sealant.
- Tire dressing. Using a water based dressing will nourish the rubber, and it won’t sling or feel tacky like most silicone based dressings. For a nice matte finish I prefer Optimum Opti-Bond tire gel, or for a shinier finish I like Blackfire’s Long Lasting Tire Gel
- Wheel well dressing. The plastic in the wheel well area usually looks bad, so you should dress them up with the appropriate product. I haven’t found a product I like better for this application than Chemical Guys Fade 2 Black. It’s easy to use, it looks great, and it also works great in the engine bay.
How-To Detail Your Wheels, Tires and Wheel Wells
Now that you have all of your supplies together, it’s time to get to work!
First put all of your brushes and wash mitt in a bucket, add your auto shampoo, and fill it up.
Now you want to use a strong stream of water to rinse off the wheels, wheel wells, and tires to get as much dirt and debris off as possible. In order to help with time management, I always work on one side of the car (two wheels) at a time. After rinsing, take your P21S Wheel Gel and coat the wheels inside and out (remember, we’re doing a front and a back right now on one side). Let that dwell for a while to allow it to loosen the grime and brake dust. While it is dwelling, take your tire/wheel well cleaner and spray onto the appropriate areas. You can usually clean these areas right away using your brush (or sponge, or whatever fits in best with the area).

Here you can see that I’ve sprayed the P21S Wheel Gel onto the wheels, and I am letting it dwell to break down all of the grime, brake dust, and other contaminants.

Now you’re ready to clean the inside of the wheels. Here’s a helpful hint: Take your E-Z Detail brush, and bend it at a 90 degree angle so you can access the back of the spokes.


Use the brush to scrub the entire inner area of the wheel including the back of the spokes.
Here’s another important safety tip: After you have cleaned the wheel, always rinse out the brush (or sponge or rag) with the hose before putting it back into the bucket. You do not want to introduce dirt into your clean bucket. When you’re finished with all of your wheels, your wash bucket should be as clean inside as when you started.
If you have tighter areas to get to, use your Mini E-Z Detail brush to clean them. This is a great tool for cleaning the brake calipers too.

Now that the insides of the wheels are clean, use your wash mitt to thoroughly clean the face of the rims. Be sure to get the lug nuts and valve stem as well.
Once you’ve rinsed everything off, take a closer look at the wheels to see if they require additional steps. If you’ve got tar and rubber, use the Stoner’s Tarminator to remove it. If you’ve got other heavy deposits on the wheels, you may need to use detailer’s clay and a proper lubricant to remove them from the surfaces.
Next you will want to wash and dry your vehicle. Once you’ve finished cleaning and drying the vehicle, you can now do your finishing touches. If you’ve got water spots or a dull finish, now would be the time to polish the wheels (by hand is fine if you don’t have a machine for the job). Just be sure not to use a metal polish if you have clearcoated wheels. If you’re not sure, then just use a regular clearcoat-safe polish and you can’t go wrong. It’s nice to use products like Klasse All-In-One or Optimum Poli-Seal at this time because you can also use it on other metal trim or badges on the vehicle at the same time.
If you have a sealant like Optimum Opti-Seal or Poorboy’s Wheel Sealant, apply it now as directed to give your wheels a finished look, and to provide months of protection.
Dress your wheel wells with Chemical Guys Fade 2 Black. It’s a very simple aerosol spray, and a little goes a long way. Just be careful not to get overspray on the painted surfaces to avoid any residue on your freshly cleaned paint.
Finally you can apply your tire dressing of choice. Use a thin application and spread it evenly. If it’s been a while, you may need to apply multiple coats. Don’t forget to move the car a bit afterwards and apply dressing to the edge of the tires that were on the ground that you couldn’t reach before. If you don’t do this, you’ll have about a 3″ strip of non-treated tire!
Now your wheels, tires, and wheel wells are clean, protected, and dressed professionally. As a part of your regular car washing routine you can use the same basic methods as above, but you won’t necessarily need to use the wheel gel, polish, or sealant. Your regular car shampoo (in your wheel cleaning bucket) along with your E-Z Detail brush should clean it right up.
Wheel cleaning is easy (although a bit messy at times), but with a little practice you’ll be able to do it relatively quickly. Your vehicle will also have a much nicer and more professional appearance.
Finished Wheel Photos


Check out the Esoteric Wheel Care Kit to tackle your wheels, tires and wheel wells like a top pro detailer too!
Buy Products From This Article
Purchase the products used in this article individually or in one convenient package here!