
DJ Mayo of Reflections Detailing and Todd Cooperider of Esoteric Auto Detail team up on a 36-hour paint correction detail on a stunning Rolls Royce Phantom.
A short while back I was in a bit of a bind…I had much more major paint correction work to do in a short period of time than I could handle myself. First up was a massive Rolls Royce Phantom, then a Maserati Quattroporte, and finally a Ferrari 360 Spider. All 3 jobs required a tremendous amount of work, and they needed to be completed within a week’s time. Knowing that I couldn’t fit 80 hours worth of detailing myself into just a week, I called up my buddy DJ Mayo of Reflections Detailing and asked him to make the 400+ mile trip from Virginia to Ohio to help me out.
DJ and I have worked on cars together before, and I knew that I could count on him to make this marathon week happen without any issues. In the detailing world it’s rare to find two detailers with very similar styles, ability, techniques, passion, and attention to details that can work together in a seemless manner, but DJ and I really complement one another when doing this level of work. We put in long hard days, we have fun trying to out-do each other, and in the end we produce amazing results (if I don’t say so myself!).
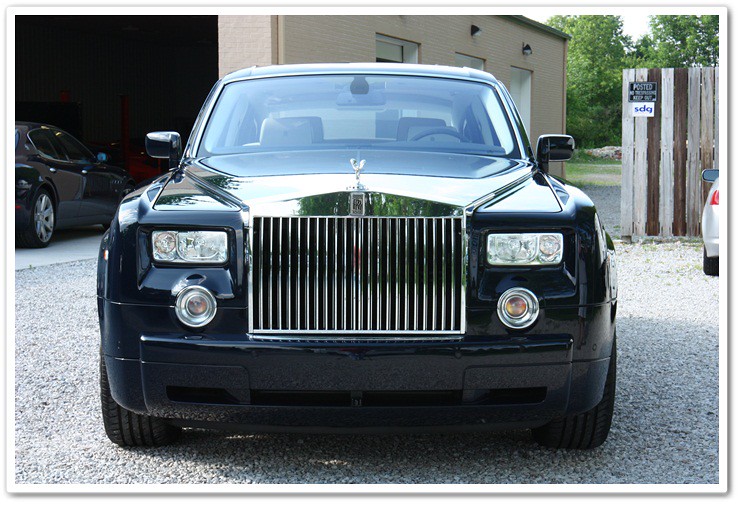
OK, so let’s take a closer look at the Rolls Royce Phantom. Perhaps the most distinguishable feature of this car is its sheer size. While it might not be the absolute king of large cars, it has to at least make the podium! At over 19 feet long, more than 5 feet tall, and 6.5 feet wide, this beast has a tremendous amount of surface area to work with. Weighing in at a hefty 5800 pounds, the 453hp V-12 motor still propels this freightliner to an impressive 0-60mph time in around 5.7 seconds. Anything under a 6-second 0-60 time is good, but when you look at this car in person to see just how big it is, those times become that much more stunning.
The hand-crafted, built to order Phantom is a marvel of luxury and refinement, and everything about it exudes quality. The touch, the feel, and the action of all of the controls of this car is at or above the level of any vehicle I’ve experienced before. The entire time DJ and I were working on it, we were in total agreement that it would make the ultimate road trip vehicle!
Paint assessment:
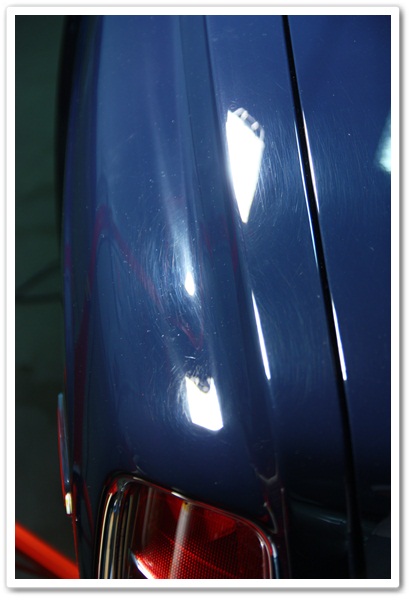
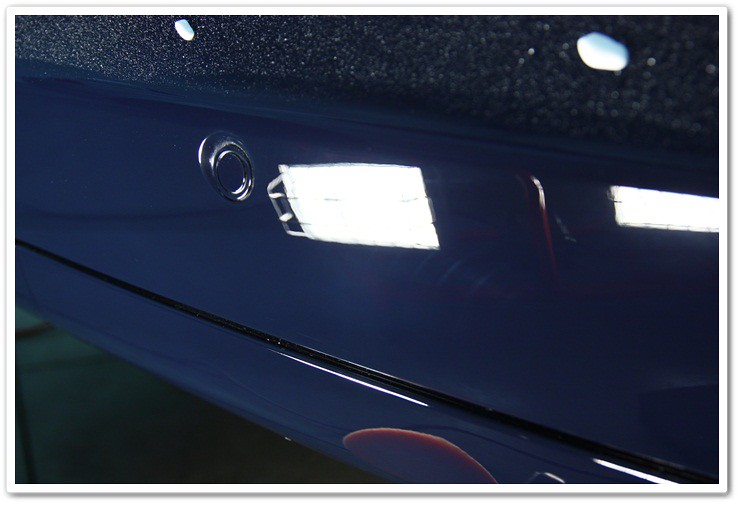
Upon initial inspection of the Phantom, I noticed that it had a moderate amount of swirls when viewed in the sunshine, and under close inspection with my Brinkmann LED light I could tell that it had been compounded at some point with heavy wool pads, and not finished down properly. This was most likely done at the factory as they wetsand the paint to get rid of orange peel and to promote the highest level of reflection in the paint. Wool is good for restoring gloss after the sanding process, but if the proper refinement steps aren’t taken afterwards, you will be left with deep, circular defects that can become very difficult to remove. Unfortunately this is pretty common with high-end, hand built vehicles. While these vehicles look good when they’re new (or used for that matter), the finish can be taken to entirely new levels once a true paint correction specialist has taken the time to refine it.
Here is a photo of the “before” condition of the paint when viewed in intense lighting:

Just given the amount of surface area we had to cover, we knew that we had our work cut out for us…
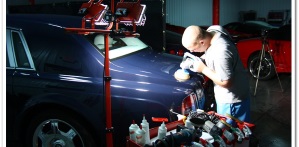
The Detail Begins…
Knowing that we had 3 long jobs lined up for the week, we decided to tackle the Phantom first since it would be the biggest job of them all. We might as well get the unpleasant part out of the way first!
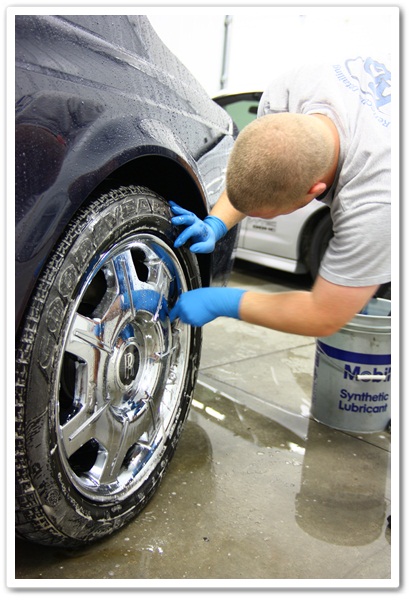
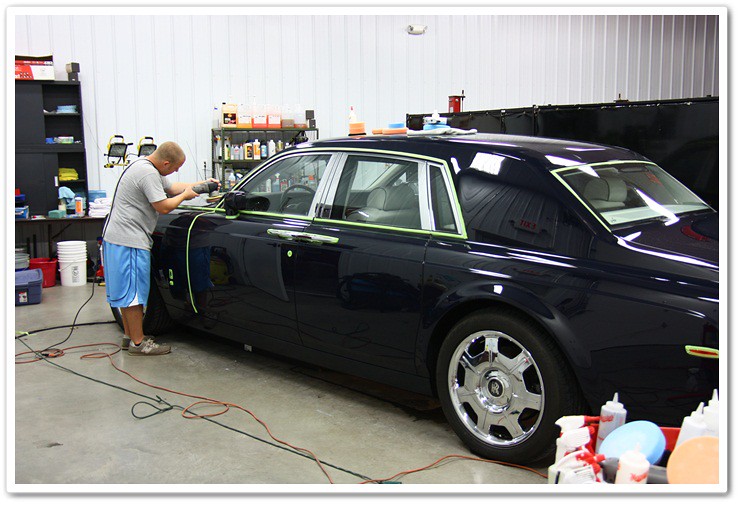
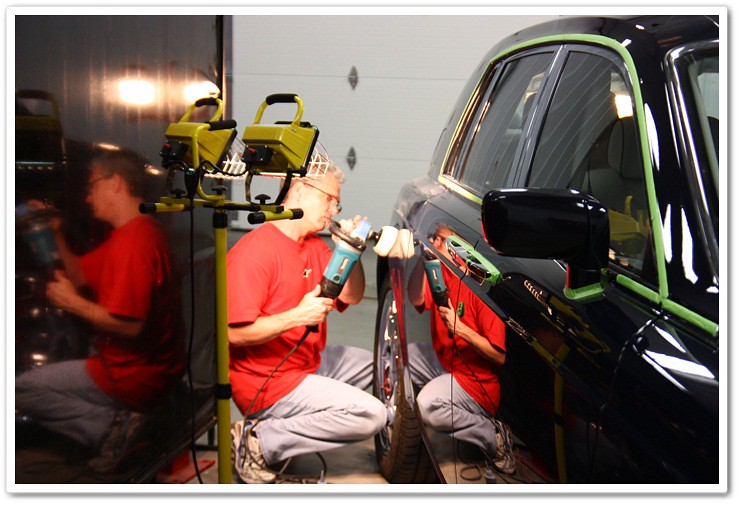
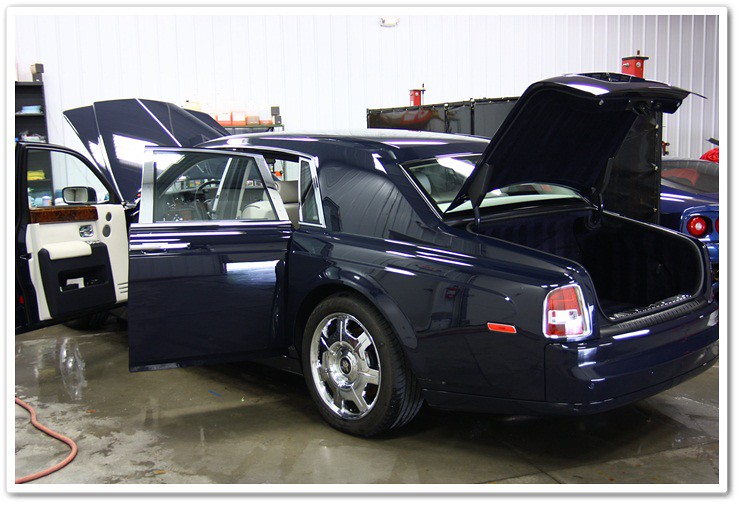
We quickly realized that the car was too big for the lift, and quite frankly it worked out for the best because the last thing we needed was for this behemoth to be any higher off of the ground. So we pulled it in to straddle the lift, and got busy. While I started with the pre-polishing prep process (washing, claying, taping), DJ worked on the 21″ wheels with the safe and effective P21S Wheel Gel and an EZ Detail Brush.
The painted surfaces were stripped of any remnants of previous waxes or sealants to aid in the polishing process, and then we proceeded to test combinations of compounds, polishes, and pads to determine the best course of action on this particular car. It’s always a smart idea to take a small section of the car to figure out a system to avoid any problems, issues, or wasted time later in the process.
Under our halogen lights, DJ first tried Menzerna Super Intensive Polish and an Orange Light Cutting Pad on the Makita Rotary to see if that would do the trick. Upon initial inspection it looked like a winner, but after looking more closely in the Brinkmann LED lights, we realized it wasn’t getting the level of cut that we needed. So our first impression was that the paint was relatively hard and therefore would require a more aggressive combination. As you can see from the work cart, we have a selection of bufers, polishes, and pads ready for our test section.

Rolls Royce Paint Proves to be a Challenge!
Sometimes when performing paint correction you run into paints that simply don’t want to cooperate. While you have incredibly easy cars/paint like Porsche on one end of the spectrum, you end up with paints like on our Rolls Royce that can give you nightmares! And sometimes you get cars where you find that your approach, tools, techniques, and products that work well at the start of the car aren’t cutting it at the end of the car. The difference in highly skilled professional detailers from those who don’t produce as good of results is in the ability to diagnose the needs of the paint, select the proper tools and techniques for that particular car on that particular day, and the ability to adapt and change during the course of the detail to meet the needs of the paint. Knowing when to change the approach and techniques to maintain a high level of paint refinement is absolutely critical at this level of detailing.
While DJ was developing a system on the trunk lid of the car, he was finding that some of the traditional methods and combinations simply weren’t working. Since he is a true pro at what he does, and he is so passionate about producing the best finish you can get, he soldiered on for hours in search of the right combination…the Holy Grail so to speak (it’s a British car afterall, so I’m allowed to throw in a Monty Python reference!). In fun I was giving him a hard time about spending so much time on just the the trunk lid, but he gave it right back to me claiming that it would be the best looking trunk lid anybody has ever seen!
So once we had a bit of a system dialed in, I proceeded to compound one side of the car for quite a few hours (all the while DJ was STILL working on the trunk lid!). Meguiar’s M105 Ultimate Cut Compound paired with a Cyan cutting pad on the Makita rotary proved to be the winning combination for this step in the refinement process. As you can see from the photos below, just the compounding stage alone made a significant difference in the overall look of the paint.
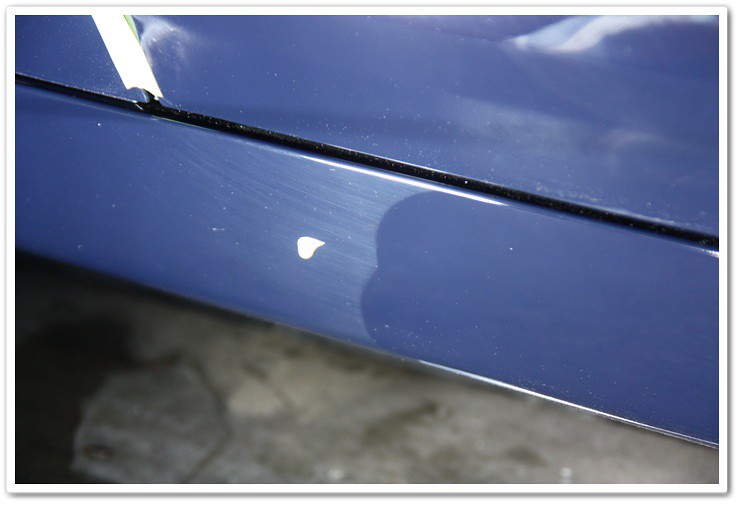
Here on the lower rocker panel, you can see the darker blue color to the right where I have compounded, and to the left you can see the amount of haze from the swirls that prevent the true color from showing through.
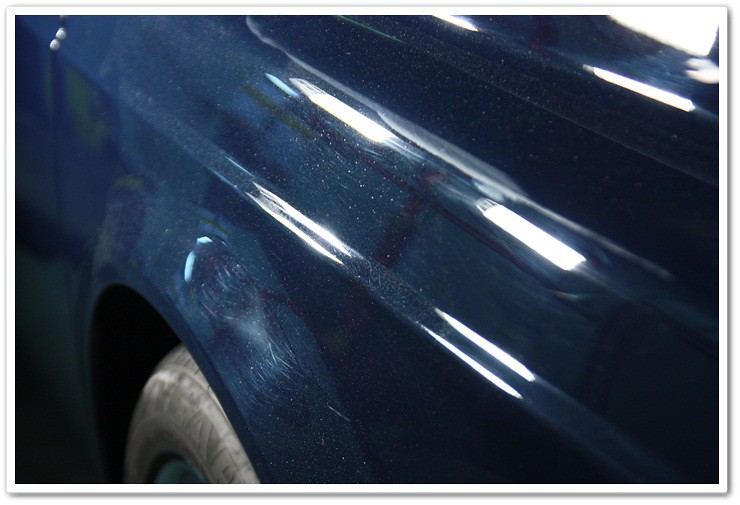
Here’s another “before” example of the left rear quarter panel prior to compounding:
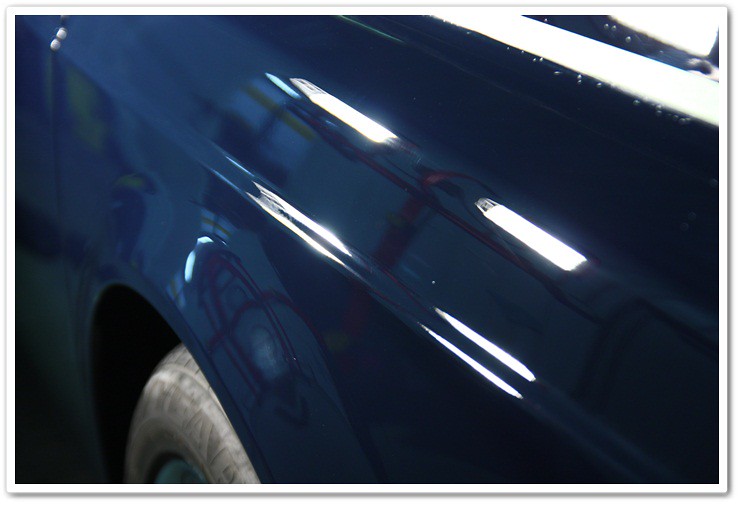
And here it is after compounding, yet before we went back with finish polishing to further refine the paint. Already you can see a huge difference in the clarity now that the swirls, buffer marks, and general haze has been permanently removed.
Since everybody loves the immediate before and after photos, I’ve included a couple more of them. This was the rear bumper:
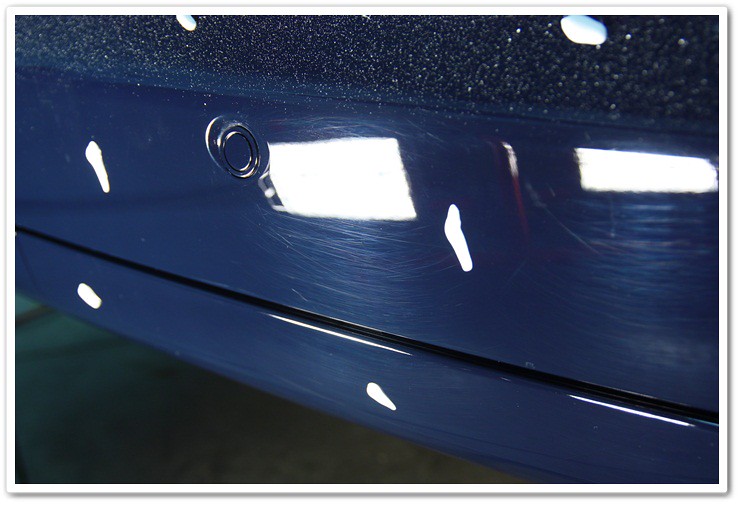
And after compounding:
Now that we had a bit of our compounding stage complete, we stopped to have lunch and to give our eyes a break. During the compounding stage, it requires a tremendous amount of focus when you’re literally chasing down thousands of small scratches and inspecting and re-inspecting each square inch to ensure that all defects are removed. If you work continuously, you may lose focus and get sloppy. Take a break…
Upon return from lunch we once again grabbed out Brinkmann LED inspection lights to look over the areas we had just worked on. To our dismay, we found that some of the defects had “returned”. A few things can cause this to happen. One of them can be from a compound or polish filling in the defects instead of correcting them. This can happen when they’re not properly used, or if it’s simply a product that has a lot of fillers in it. We had been using Isopropyl Alcohol to wipe down the surface for inspection and knew it wasn’t a problem of filling. Another cause of this is when you heat up the panel / paint and it actually expands. When this happens it appears that the defects are gone since some of them have “closed up” because of the heated expansion of material. Once it has had ample time to cool however (over lunch break), you can find that not all of the defects are actually gone.
At this point you can panic, or you can just go back and methodically re-work those areas, and those on the entire car until you know that it is fully corrected. Yes, it requires more time and patience, but it can make the difference between a good detail, and a great detail. DJ and I chose the route of the great detail and continued to check our work and refine the finish until it was truly and fully corrected. You don’t run into paints like this very often, but when you do it can be frustrating if you allow it to be. So take the advice from the words on the cover of The Hitchhiker’s Guide to the Galaxy and “DON’T PANIC!” (yet another obscure British movie reference…I’m full of worthless trivia such as this!).
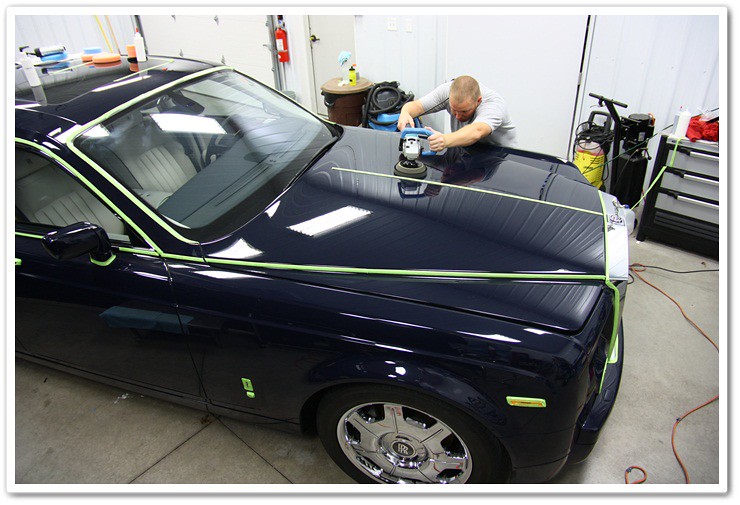
OK then, back to the detail. I’ve repeated myself in saying how big this car is, but here are a few photos to illustrate that point. No, DJ isn’t 4’11″…this car is really, really big!
And this one is one of my absolute favorites! Look how much DJ has to strain and reach just to polish the hood of this beast. It was difficult to get this shot because I was laughing so hard at the sight I was seeing! 🙂
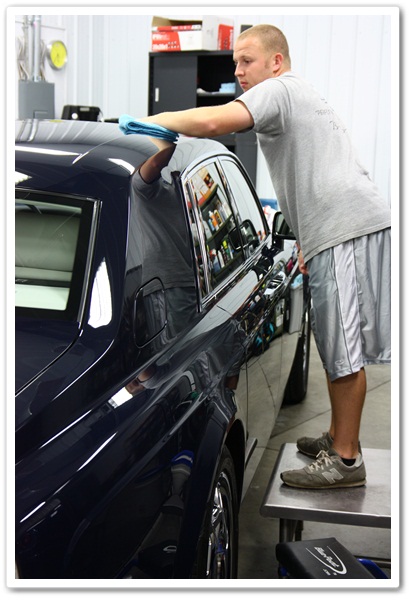
Since I knew how much of a challenge it had been for DJ to work on the hood of the car, and considering I’m such a nice guy and great friend to him, I decided to put him in charge of the roof as well. One of these days he’s going to get me back for this one…
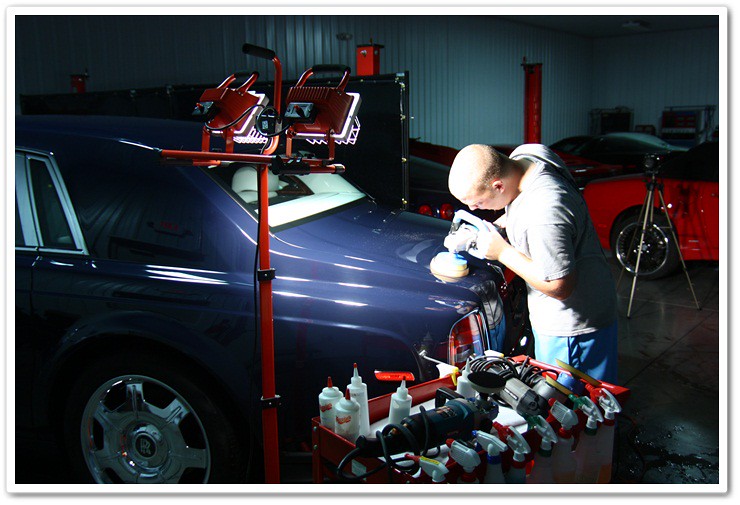
While using a small, 4″ spot pad on a car this size won’t get you very far, it was a necessary evil considering the curvature and body lines in some of the areas. Here I am working the finishing stage with a white polishing pad and Menzerna 106FA polish.
Once our compounding and polishing stages were complete, we took great lengths to get all of the residue and dust out of the cracks and crevices. Here DJ is using compressed air (with proper ear protection) to clean the areas that can’t be reached by hand.

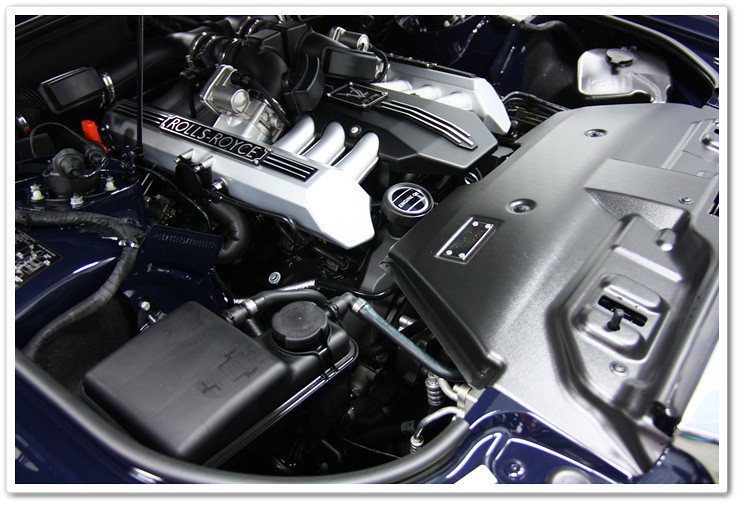
The next step in the process was to detail the dirty engine bay. Usually we will clean this during the washing stage of the car, but to be quite honest with you, I don’t recall while we waited to do it afterwards!

It was a tag-team effort using P21S Total Auto Wash during the cleaning step, and 303 Aerospace Protectant for the finishing step.

Afterwards, it looked brand new once again.
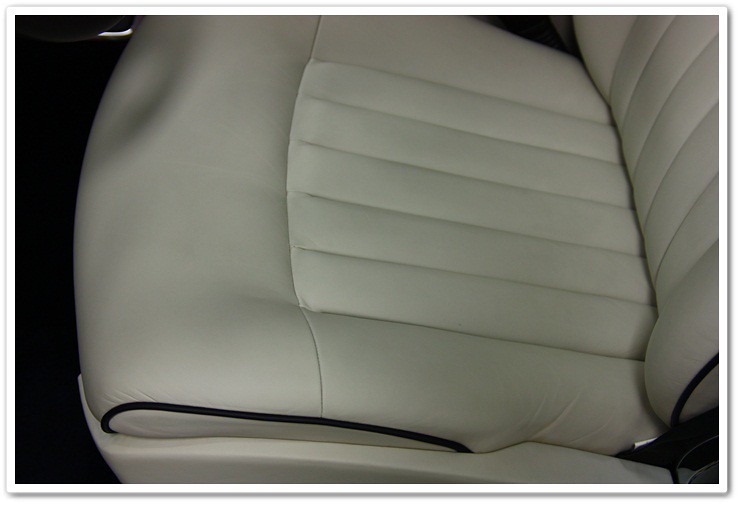
Now we’re moving on to the cavernous interior. The luxurious white leather (12 cow hides to make this car!) was a bit soiled, so I used Leatherique Prestine Clean to tidy it up. By itself, the Prestine Clean does a great job as a leather cleaner, conditioner, and protectant. Highly recommended…
Before:

After:
The rest of the interior was tidied up, and all hard surfaces were cleaned and protected with Meguiar’s Quik Interior Detailer.

We’re getting close to the end here, so it was time to prep the vehicle further for the application of a durable sealant. Since we used so many different kinds of polishes on this car, we decided to re-wash it afterwards to ensure that all of the polishing residue was fully removed from the surface to ensure a good bond. For this step we used Chemical Guys Citrus Wash & Clear at paint prep ratio to strip the surface.
Once it was finished with the second wash, we used Chemical Guys EZ Creme Glaze to give it that extra bit of gloss, and then topped that with Blackfire Wet Diamond paint sealant for protection from the elements.
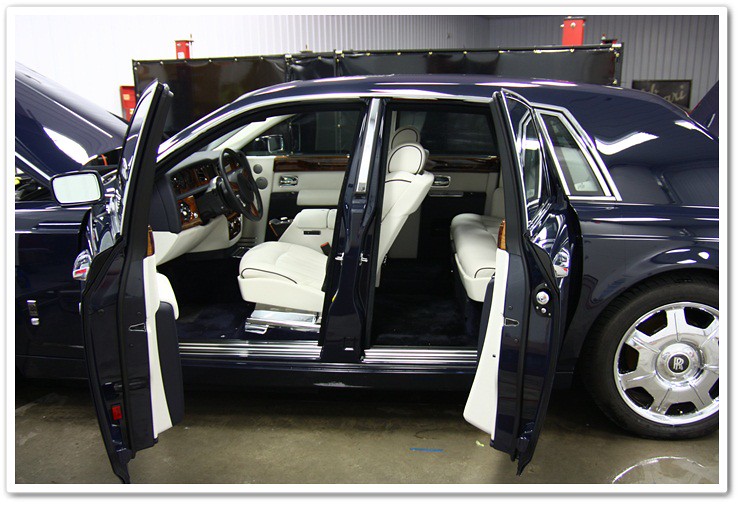
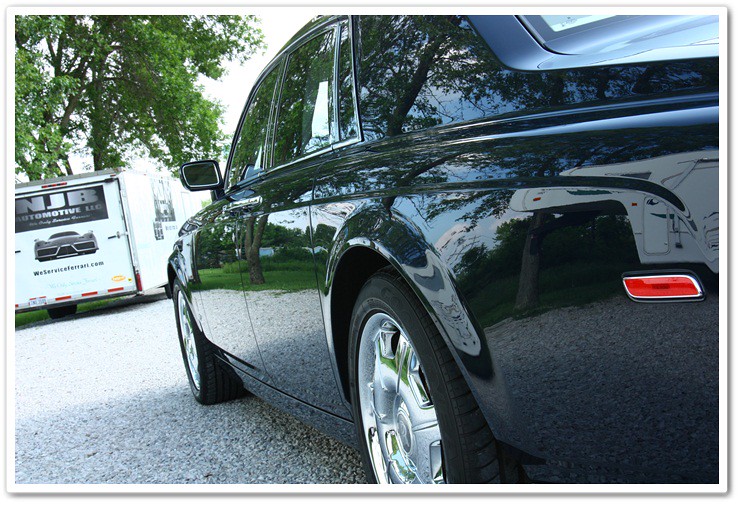
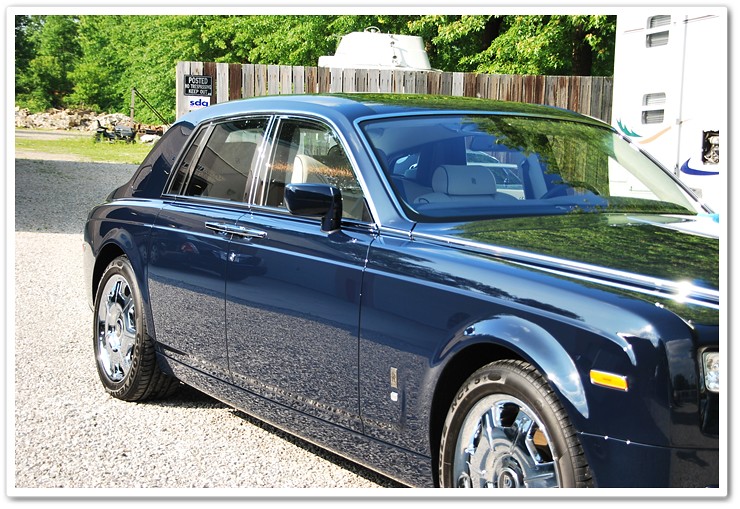
After 36 hours of compounding and refining the paint to remove at the very least 95% of all defects, performing a complete engine detail, and thoroughly detailing out the interior of the Phantom, we were ready to take a bunch of photos to show off the renewed beauty of this car. We know that it came from the Rolls Royce factory with defects leftover from the wetsanding and aggressive compounding processes there, so at the completion of our extensive detail, this car looked better than when it was brand new. Both inside the walls of the shop, and outside in the sunshine, the Phantom was nothing short of stunning! We only wish that it was being delivered to a Rolls Royce gathering afterwards because other owners of this elite brand would have been absolutely amazed at the level of refinement that this paint was taken too.
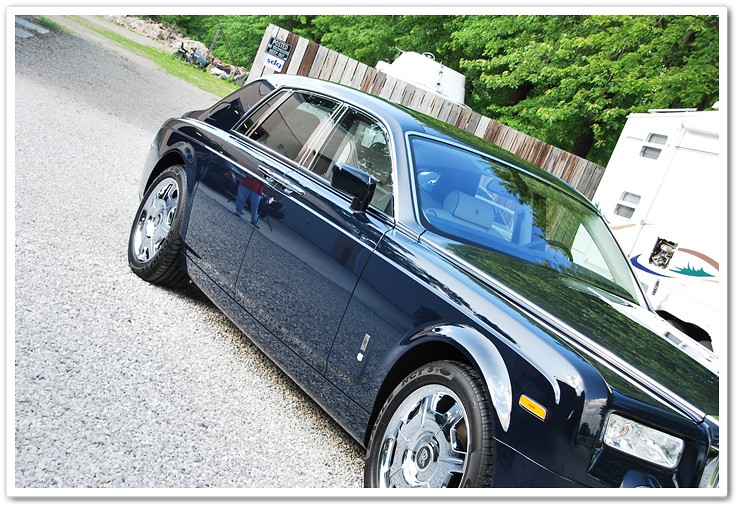
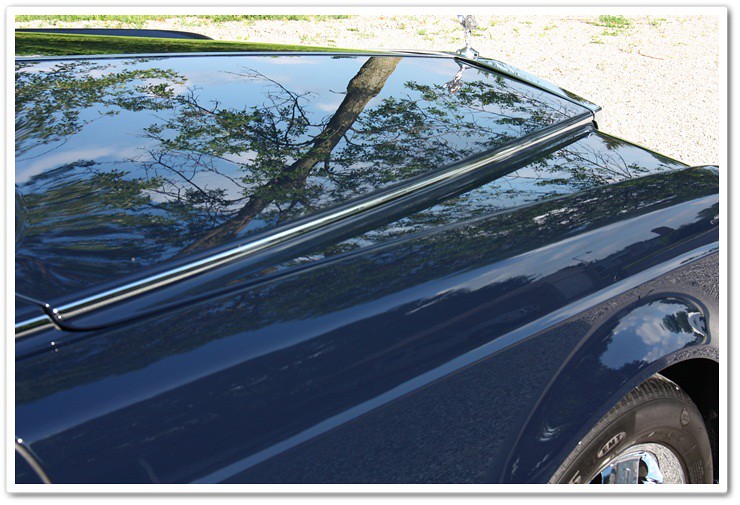
Final Images:
Anyways, here are some after shots for you all to enjoy:

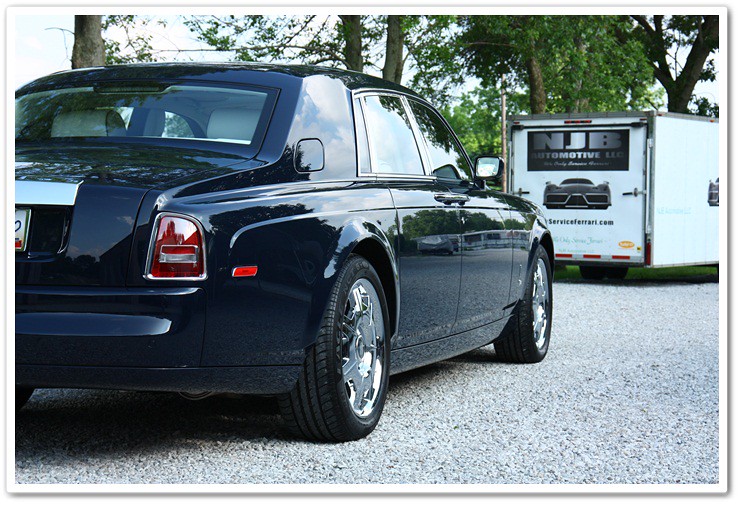
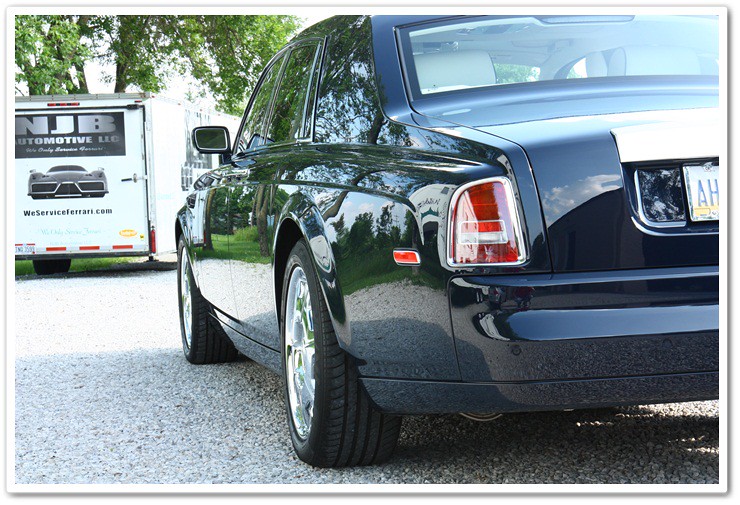
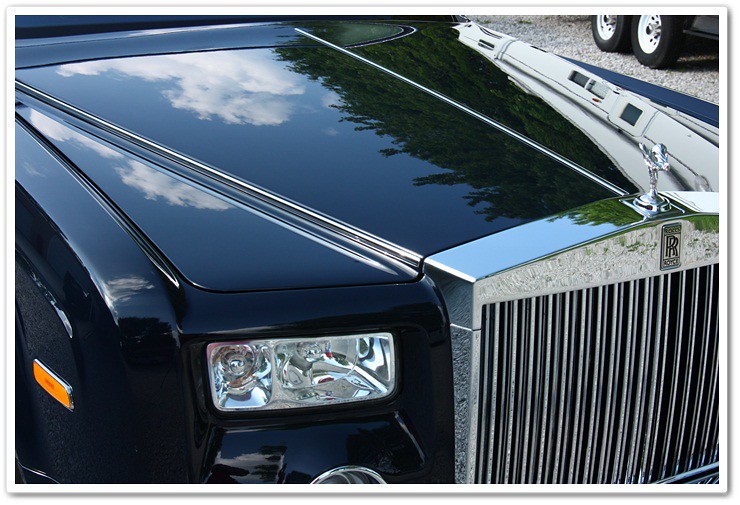
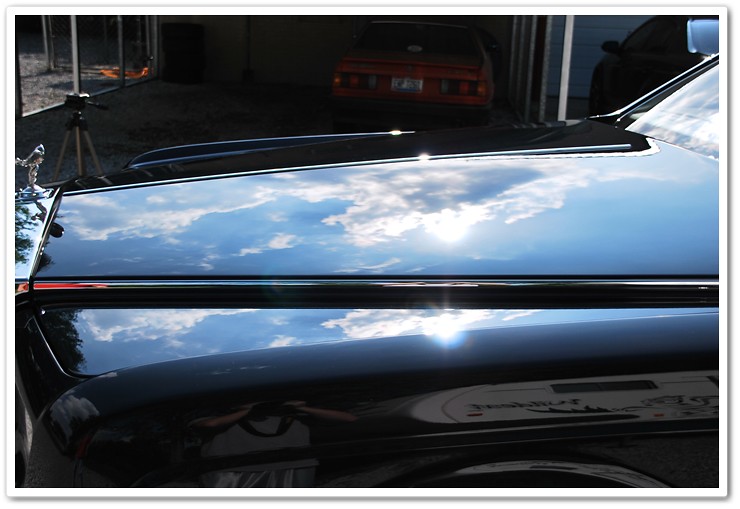
Highly refined paint = stunning clarity in reflections!
All this needs is a diplomat flag…


We had dual cameras in action on this one! I’m taking a photo of DJ taking a photo of the Phantom…
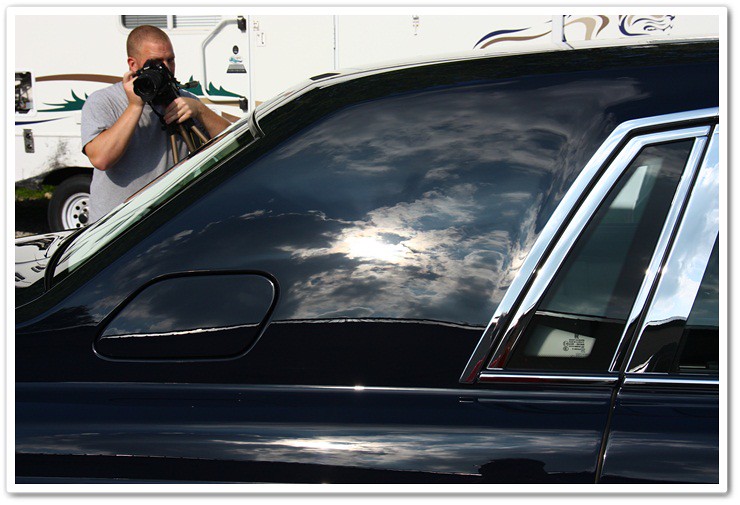
The other side of the photo above…here’s what DJ saw out of his viewfinder
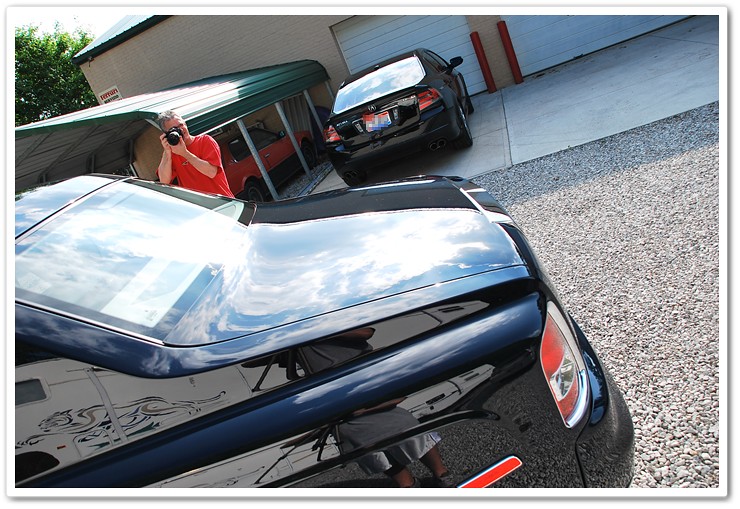
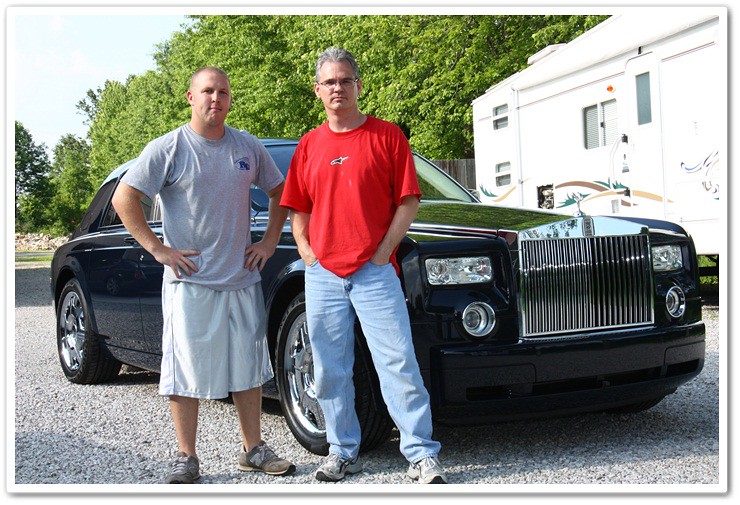
And the stars of the show…DJ Mayo, Todd Cooperider, Rolls Royce Phantom, and a broken down 5th wheel trailer in the background! 🙂
Thanks to DJ for driving all the way up to Ohio for a week to work with me on the Phantom, Maserati, and Ferrari…and thanks to everybody for taking the time to read through our article!
Up next:
26-hour Maserati Quattroporte detail:

And a 25-hour Ferrari 360 Spider detail:
