
We’ve all seen car headlights that have turned into a foggy haze. Not only does it look bad, but it’s also unsafe because it can’t produce as much light. Sure you could buy a new headlight, but for modern cars you can plan on paying a couple hundred dollars for a replacement.
I’m going to take you through a few simple steps to restore a headlight. Depending on the condition, you can probably get it back to 90+% of new.
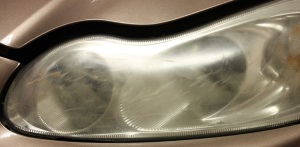
This example had some pretty serious damage to it. I could tell that it had been hit by something as it had pretty deep gouges all across the light. Given the condition, I knew I was going for “better” as opposed to like-new.


For this condition, you’re going to need at least several steps of wetsanding followed by several steps of machine polishing. You also want to tape all around the headlight to protect any seals/trim as well as painted finishes. If the lens has only a mild haze to it, then you should be able to clean it up with just the polishing steps without having to wetsand.
Here I am starting with 1500 grit sandpaper. I started off just like I would with any wetsanding project…go in one direction first, and then alternate directions as you move up through the different levels of paper (cross hatching). Here I started with horizontal passes. I know, I know…my tape job was less than stellar on this one!


Next I stepped up to 2000 grit sandpaper, and I switched to vertical passes:

After about 4 different grits of paper, I switched to the Makita rotary to take out the sanding haze and to polish out the finish. I first used a 4″ Purple Foamed Wool pad with Megs 105 compound (alternatives would be Menzerna Power Gloss, Optimum Hyper Compound, or Poorboy’s SSR3), and then used an orange pad with Menzerna Super Intensive Polish, and finally finished it up with 106FF and a white pad.

Once again…before:
After:


Since this light was hit with some force, it had micro-fractures all through the lens that was well below the surface and obviously couldn’t be corrected. When it was done, it looked probably 75%-80% of a new one.
One thing to remember is that headlights typically get to this point after they’ve lost their UV protection (some are/were made better than others). Once you polish it out, you’ll need to give it a light polish every now and then to prevent the haziness from returning. This simple maintenance step can even be done by hand.
Don’t be afraid to give it a try. It’s quick, it’s simple, and it can make a big difference in the overall look of the vehicle!
Buy Products From This Article
Purchase the products used in this article individually or in one convenient package here!