
Building My Dream Garage (Part 1)
by Chad RaskovichMy hope for this multi-part article is that it gives AAP blog readers ideas about setting up their own current garage, and more importantly, I hope it helps those looking to have a garage built or for those looking to build one themselves.
How it All Began
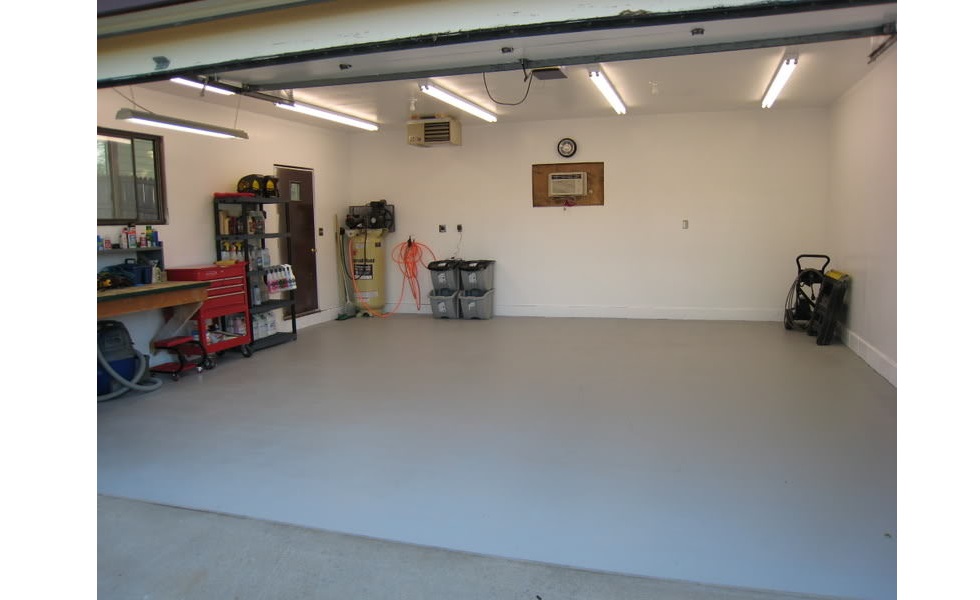
Rewinding way back to the fall of 2003, while still single, I was at the point in my life where I was ready to buy my first home. After a lengthy search I eventually found a nice home in a suburban neighborhood, a little out of the way, but the right size, in great shape, and most importantly, with a 2 stall attached garage as well as a 25′ x 25′ detached garage out back. Jumping forward a few years to 2006, I finished the inside of the detached garage, which then became my space for the occasional high end detail job (see image below). This garage served me very well for several years until I got married in 2010. My wife also owned a home but in a more desirable location, closer to the city and on a large wooded lot. After considering the options between my house with a longer commute and on a busy corner and hers with a single-stall tuck-under garage but future add-on potential, I opted to sell my home to one of my best friends and former roommates. Since he was a single guy at the time and didn’t need all that space, my friend and I arranged a deal whereby I could continue working out of the back garage a few weekends a month until my wife and I built a new garage onto our home. I don’t think either of us expected it to take almost 6 years for that day to come!!!
My Old Garage
Planning – Hurdles – Reality Check
In the spring of 2015 my wife and I began the process of planning our addition. Neither of us had ever undertaken a project even remotely similar so planning itself was a great learning opportunity. We spent countless hours looking at the lot and layout of the house, trying to decide what would work best for our needs (and wants). Naturally, our best ideas always came during a nice weekend dinner, accompanied by few cocktails and an ample supply of cocktail napkins for sketching out ideas, of course. Our initial plan was to add a garage on next to the house but over time it evolved to include a master suite add-on because the cost to expand the project to include the bedroom gave us both a service room for the garage, an extra half-bath, a nice bedroom and the ability to bring in several of the key trades, such as excavation and foundation contractors, at one time to efficiently use our budget. We came up with an idea based on the lot layout and current floorplan.
With some ideas in mind we set out to obtain quotes from multiple contractors, just like we learned in our research. We quickly learned that there are better and worse times to start a project because several contractors bid higher or didn’t respond at all during their busiest times. Of the multiple bids we received not only were they high, some were actually more than double the original cost we estimated. Reviewing our contractor quotes was shocking, disheartening, and a bit of a reality check. We had a budget, but we also needed to keep our neighborhood in mind and not over-improve. We realized that we needed to scale the design back a bit and to do as much work as we could ourselves, even though it would take longer to complete the project. Making these choices allowed us cut down on costs, keeping in mind we are both hands-on, DIY types and are fortunate to have family members with some construction experience, although nobody in the trades.
With a more concrete estimate of the project cost in hand, we initiated discussions with the city about our plan. Our city planners have been incredible partners, providing plenty of advice and instruction and recommendations along the way; they are truly gems! We learned about restrictions on the size of the garage per the square footage of the home from our local code as well as a massive 15′ side lot setback for our neighborhood. A setback basically creates a no-build zone from the lot line inward and will vary depending on the municipality, size of the lot, zoning, or other factors. Adhering to a 15′ setback would require the garage width be scaled back by several feet. Thus, we needed a variance, which is just a fancy word for “exception” to the set back.
Architectural plans were required to proceed with the variance application, so we met with a great local architect to draw up the final plans. Of all the hurdles thus far, the variance was the most intimidating. To even apply for a variance, we needed a pricey land survey “with elevation”, a full packet of information, an explanation of why we needed the variance and what impact it might have on the neighborhood, and an in-person presentation to the planning committee to formally make the request and present our justification. Oh, and the committee only meets once a month and you need to be on the calendar a full month in advance. As an added stressor, letters are sent to neighbors in the area with details about your variance request and meeting time, so they have the right to appear at the meeting and object or ask questions. I’m not big on public speaking and the idea of standing in front of the committee, knowing it was being recorded and broadcast on local TV made me super nervous. Thankfully, my wife is a rock star speaker and she had already addressed any foreseeable questions and concerns in our initial letter, so it ended up as a very quick and straight-forward process.
Running Out of Time
By the time we jumped through all the hoops, received our variance approval, and had the building permits in hand, it was already the end of July! While this isn’t of concern for those in warmer, southern states, winter is unpredictable and often arrives early up here in Minnesota. We had a lot of work to do in a short amount of time.
One of our biggest hurdles was time. My wife and I work full time during the week and I detailed on the weekends, which meant most the work would have to be done after work during the week or by taking a vacation from our full time jobs. While waiting for the variance approval to arrive, we gathered several quotes for the work outside our comfort zone. Given the large amount of earth that needed to be moved we decided to contract out the excavation and, after a lot of consideration, the concrete work. While our final cost was very competitive, it was still much higher than estimated, due in part to the complexity of building a structure that is partially underground. We originally considered whether to tackle our own concrete work, but it became rapidly apparent that it was prudent to hire a professional, considering our limited knowledge and importance of a structurally sound foundation. After seeing how much work and precision went into the excavation and foundation, we both agreed that it was money well spent. Besides, we still planned to complete all the framing, plumbing, in-floor heat, and electrical work ourselves, which would save money.
With our variation approved we also ordered all the framing lumber, sheeting, trusses, and roofing material from a local building supply stores. We simply supplied the architect plans and they calculated quantities of everything for the project. My, were we surprised when the trusses were delivered…
Things We Found Helpful, Tips, Advice
Think about future use and things that will make your workspace effective and efficient – whether it’s built-ins, a floor drain, in-floor heat, number, and location of outlets etc. It’s easy to add (or even rough-in) a lot of features when you are building but costly and challenging to do so later. On this point – do some research to see what’s new and different in design and functionality right now but also ask peers and others what they wish they had or what functional issues they would like to address. Don’t be afraid to push your architect or designer to incorporate new ideas – just because they haven’t seen something before doesn’t mean it can’t or shouldn’t be done. They need to be your partner in the process. Also make sure you find a contractor/subcontractor with whom you are comfortable and can develop a good rapport.
Talk to the city/county/municipality and start to build a relationship if you can. The planners and inspectors in our city have been an invaluable resource for information and also advice – they can help you redirect before you make a decision that may need to be undone later because of an ordinance, etc. Also, be sure to do some research on codes and zoning ordinances, which are typically available online for free in many states or municipalities.
Plan your timeline carefully, the permit process can take some time and if you need to obtain a variance or redraft plans it can throw off your schedule by months. If you have a hard deadline to complete the project, you’ll want to make sure you are backing into the start of your planning process to ensure that you are able to meet the final goal. Also make sure you clearly understand your zoning laws, so you don’t build something that has to be torn down because you are over a boundary or didn’t obtain the proper permits.
Do a lot of reading, both in books and online, and even consider watching some YouTube videos, just make sure they’re reputable ones. Also, don’t be afraid to push your subcontractors – if they haven’t done something before and are putting up a lot of resistance to trying without a really rational explanation, look elsewhere. Also remember that extras cost more – so if you want your rebar spaced closer it will take more time and materials so expect that you’ll pay more (although it should be a reasonable surcharge). Also plan a contingency fund – random expenses have a tendency to crop up (we had to remove an old cistern that was buried underground and unknown before excavation started) and you may have to sacrifice features if you designed a budget with no cushion.
Barter – you have a valuable skill and might be surprised how willing people are to trade your work for a discount on their services.
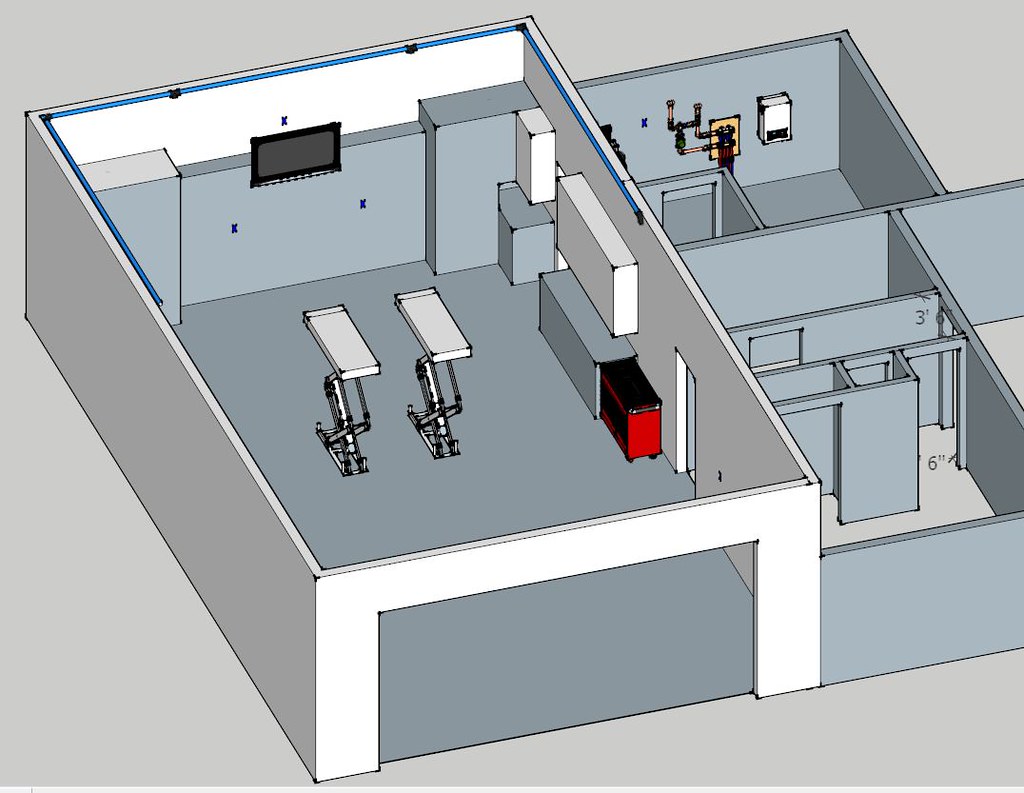
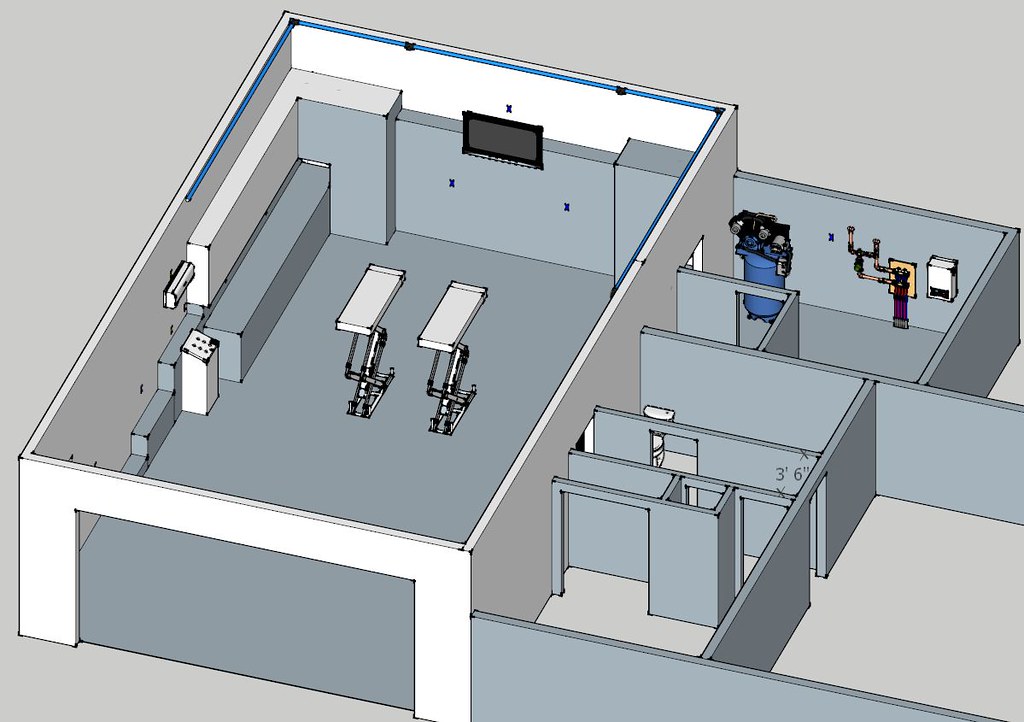
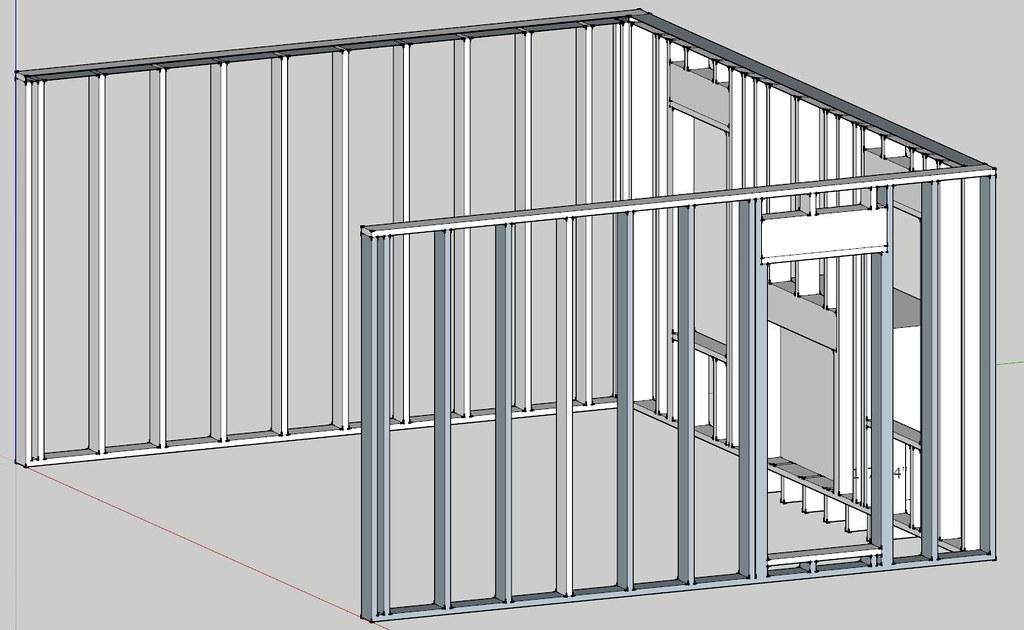
Consider utilizing CAD tools to design aspects of your project. I’m fortunate to work on CAD in my full time career; however, the best visual/design tool I used was a free online software program anyone can use, called Google SketchUp. In the images below, you can see how I drew up the floor plan in 3D. The program also had endless models to import when figuring out how to place the things I wanted (toolbox, cabinets, lift station, TV, outlets, etc.) for space planning, while also making my workflow more effective and efficient. Heck, I even used it to layout the framing of our walls and window placement for the bedroom addition. 🙂
Google SketchUp Images
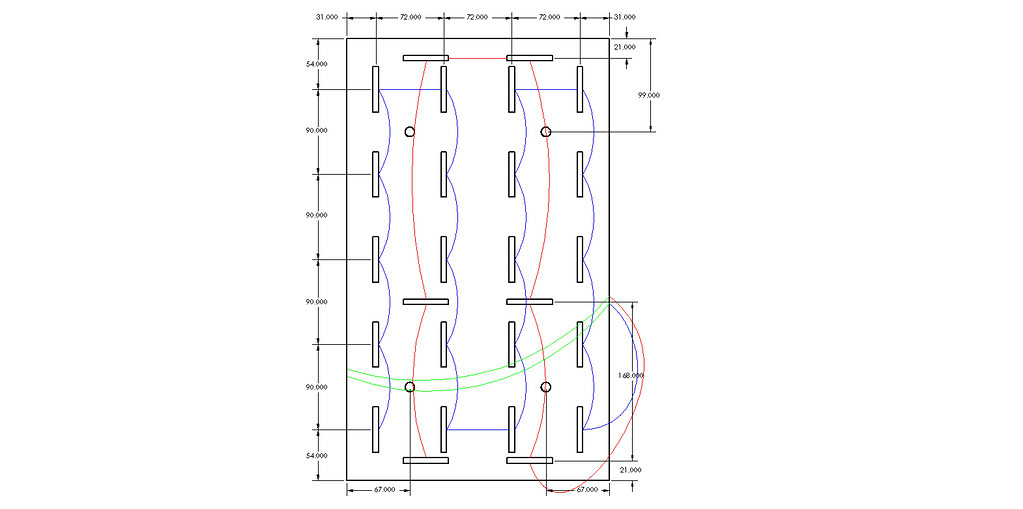
I also used CAD to layout the routing for the multiple PEX loops used on the in-floor heat. I also figured out where I wanted my overhead LED lights to be placed along with the wiring of them and even the in-ceiling speakers. You could probably do this in a number of software programs but SolidWorks was what I used.
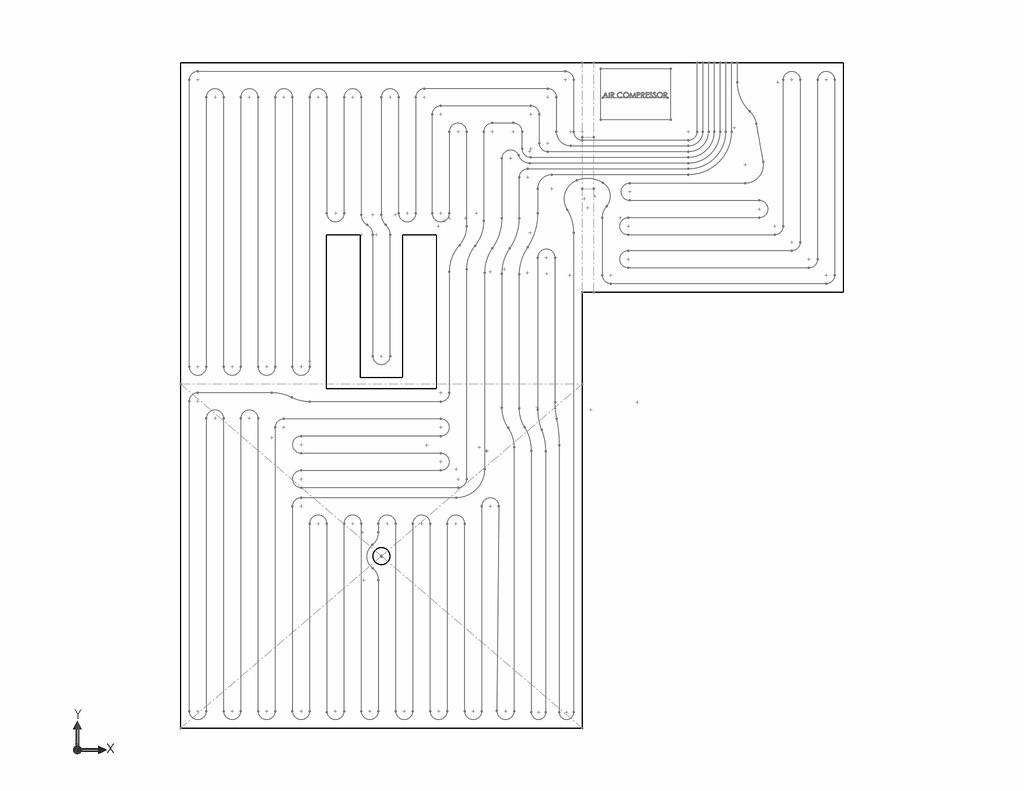
Layout of LED lighting, wiring, and in-ceiling speakers
Closing
I hope you’ve enjoyed the first article in this series so far. Be sure to check in for part 2 where we break ground and start the construction process. I hope to have it done soon, but with any DIY project, it can take longer than expected. As always, if you have any questions about the article please feel free to comment below!


Looks like its going to be one awesome shop Chad!
Thanks James!
Subscribed….lol. I’ve been waiting for this article series and I’m very excited to see how you finalized things and draw some inspiration!
So awesome! Can’t wait to see the rest of the articles 🙂
This is great. Enjoy Auto Detailing in your much deserved garage Chad!
I wish I had thought about radiant floor heating when we built our addition and expanded the garage (we took an existing garage bay and turned it into an entryway/laundry room and added another garage bay to replace it)
.
Hey chad. Awesome article, really helpfull and inspirefull at same time. I´ll keep in touch here form Brazil.
Hey Rasky,
My future project as a stand alone outside of our new house. Look forward to the progress…..
Thanks Everyone! I hope to have part two done soon and part 3 later this summer after I have the floor redone. 😉
Rasky
Chad, it looks to me like you’re planning very deliberately and therefore correctly. You’ve brought up a few items I hadn’t considered!
I have a question about the LED lighting, because I’m planning to replace my fluorescents. What Kelvin temperature is /color do you think works best for detailing – 4k or 5k?
Hi Dave,
In all honestly the overhead LED lights aren’t very good for inspecting defects in the paint. They show RIDS well but they aren’t very good for swirls and DA marring. That being said, I chose my overhead lights for general lighting and not for paint inspection. I have a handheld Fenix LED for paint inspection as well as sever ScanGrip Multimatch on stands for doing paint correction. 🙂
As far as color temp I think it comes down to user preference but I chose to go with 5k bulbs as 4k is a little too warm for my taste.
Hope this helps,
Rasky
Great article, and a great story! Especially the part on what you found useful. Those tips are usually the most useful to others! Thanks for sharing!
Wow! That’s awesome! I, too, build garages and your story is inspiring to some who are having second thoughts to push through garage build. Great story and tips. And I am impressed with how detailed you planned this out. Good for you!
Thanks for sharing your story. It is crazy what you can barter for. I actually work graphic design and I was able to exchange some design work for some brand new cabinets I wanted to hang up in my garage for some storage. Can’t wait to continue tackling my dream garage project.