
Leatherique Leather Care How-To
by Todd CooperiderOverview and Before Pictures
Here we have a ’99 Chrysler LHS that, quite frankly, has been a bit neglected for the past 10 years. The customers biggest concern was to bring the interior back to life. I don’t think that the leather had ever been cleaned, and it was showing a bit of wear. I saw this as a great opportunity to outline the processes of simple leather restoration.
Even in a short period of time, light colored leather in particular starts to get soiled from dirt, grime, perspiration, airborne contaminants, etc. Without the occasional cleaning, this will build up over time making it quite difficult to remove. Since this vehicle probably was never cleaned, I knew it was going to require a lot of effort.
Given this, I decided to use Leatherique as it has always performed very well with the more challenging leather restoration jobs. Two products are actually used were Rejuvenator Oil and Prestine Clean. The Leatherique system works backwards compared to what you’re normally used to. First you use the conditioner, and then you use the cleaner! Yes, it sounds counter-intuitive, but it works (well)!
For the before and after photos, I tried to use the exact same lighting and exposure setting so they are all accurate comparisons. I also do not use any post-processing either other than to re-size and add a border.
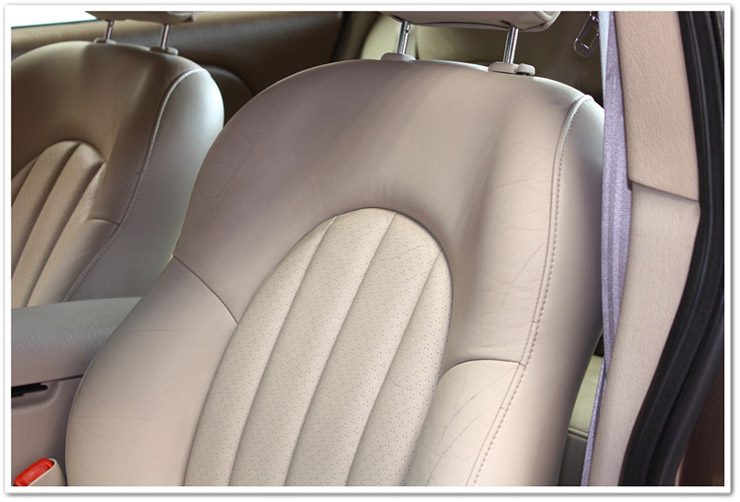
Here are a few before pictures showing the condition of the interior. As always, the driver’s seat was the worst.

Here you can see that the lumbar support is actually cracking.

Passenger seat:

Leatherique Rejuvenator Oil – Step 1
The first step in the process is to vacuum the surfaces to make sure all of the debris is picked up.

Here I have the Rejuvenator Oil and Prestine Clean ready to go. To make it easier, I utilize a spray nozzle on the Prestine Clean, and I put the Rejuvenator Oil in a small bowl and apply it with a foam brush. Leatherique recommends applying it with your hands so you can rub it in, but I find that I have much more control of the Oil when using the brush. After I have applied it with the brush however, I will then go back and massage it into the surface of the leather with my bare hands.

Here I am applying the Rejuvenator Oil. Be sure to get a thick coating everywhere, and work it into the stitching as well. After you’re done applying the product, you can further work it into the surface, folds, seams, and stitching either with your hands or with a leather brush.

You can see where the seating surface is completely coated.

The Rejuvenator Oil works with time and heat. The best way to allow the product to work is to roll up the windows, and let the car sit outside in the sunshine for the day to create a steam room effect. During this time it conditions the surface and brings all of the dirt, grime, salt, and other toxins to the top leaving a sticky or tacky finish before it’s removed. I prefer to let it sit for about a 24 hour period. If it’s cooler outside, you’ll need to leave it on longer. You could cover the seats with plastic wrap and heat it up with a hair dryer (or drive around with the heater and seat warmers on!)
Here’s a good tip. If you need the ability to pull the car in and out of the garage, then cut up a large plastic garbage bag and cover the seat. You won’t have the worry of getting the Oil all over yourself, and the plastic won’t remove it from the leather. Afterwards I wipe down the plastic, fold it up, and store it in the cabinet for future use.

Fast forward now to 24 hours later…
Leatherique Prestine Clean – Step 2
Now that you’re done with the first step, it’s time to clean the surface off with Prestine Clean. You’ll need to have a bucket of warm water, a soft brush and towel, and a spray nozzle for the next stage as the Prestine Clean isn’t thick like the Rejuvenator Oil.
First, spray the Prestine Clean directly on the leather surface.

Now you want to use your leather brush and work the product in. Pay particular attention to the creases, seams, and stitching. You’ll quickly see the grime being removed. If you don’t have a leather brush, you can simply use a microfiber towel.

Now that you’ve worked that particular area, wet your towel in the bucket, wring it out, and then wipe down the leather to reveal a remarkable new look. I like to wipe it down, rinse out the towel, and then wipe it once again with the same towel. Next grab a dry towel, and lightly buff the surface. After I’ve done this, I’ll then move on to the next section and spray, scrub, wipe and buff. In this picture the surface has already been wiped down…look at the difference in the color of the leather in comparison to the photo above!

Since this process removes so much dirt and grime, you’ll probably want to refresh your bucket with clean water halfway through the cleaning to make sure you’re not re-introducing dirt (or use a two-bucket method).
In this photo, the passenger seat has been finished, but not the driver’s seat…notice the difference in color on this one as well.

Leatherique: Before and After Photos
Passenger seat before:
Passenger seat after:

Driver seat before:
Driver seat after:

Driver seat before:
Driver seat after:
For convenience, DI has both a Leatherique 16oz kit and a Leatherique 32oz kit available in cost savings packages.
Buy Products From This Article
Purchase the products used in this article individually or in one convenient package here!


Hey Todd,
great write up! Where can you purchase foam and leather brushes? Thanks!
Thanks Mike!
The foam brushes are available at just about any home supply stores in the paint section. As for the leather brush, you can do a search for them online, and you can probably find them locally as well in any leather specialty store.
Hi Todd,
Very good write up. Like Mike S asked, from where can be purchased the leather brush? You use only Leatherique for leather seats?
Sincerely,
Stelian
Thanks Stelian!
Wherever there’s leather inside the car, I’ll use Leatherique. Ferraris in particular have leather everywhere inside them, and I make sure that all surfaces are covered.
Hi Todd,
Im new to automotive detail scene. Im looking to add a leather treatment product to my detail arsenal. I’ve been leaning towards the leatherique stuff but ive been reading that leatherique should not be used on treated or “plastic covered” leather as they call it. I read a lot of ur threads on club rsx and i see that u use leatherique on most of ur detail jobs. What is ur opinion on using leatherique on “treated” leather??
Thanks!!
Rudy G.
Rudy,
All automotive leather utilizes some form of coating or another depending mostly on when it was made.
Yes I use Leatherique on most cars, new and old, and I do because IT WORKS! I use products based on their consistently proven results, and that is exactly what I get with Leatherique.
Once you use the product the way it was intended, and achieve the results, you will never look back! 🙂
Hi Todd. Short question. I have always taken a special care of the leather in my cars. I usually use conditioner (a good one) every 2 weeks or so, specially in the driver’s seat. After 2 years with my current car, some areas look dry. Im ready to try leatherique BUT, I wanted to ask how can I maintain the leather in between leatherique treatments. Can I just use a good conditioner? How often can I use leatherique?
Andrew,
Between full treatments you should just use the Prestine Clean for your maintenance. It makes a great all-in-one (cleaner, conditioner, protectant).
In most cases you should be fine with just a couple of full treatments per year. If the seats are very dry though, or they have a lot of buildup of oily conditioners, you may want to do a couple of treatments back to back.
Thanks,
Todd
Todd,
Just bought the products and I’m ready to do the full treatment on my Acura TL. After doing the full treatment what product do you recommend to use in order to protect it against UV rays, sun exposure, etc? and how often the application of said product be done in a yearly basis (live in Southern California)?
thanks much in advance for your response and advice.
-Kelvin-
Kelvin,
The Prestine Clean utilies UV protectants, so there’s no actual need for an additional product. You could use something like 303 Aerospace Protectant afterwards if you like, but it will change the look and feel slightly from that of the Leatherique.
Even on convertibles I just use the Leatherique twins on all of the leather surfaces, and then I recommend a monthly quick wipedown with Prestine Clean. Just spray it onto your rag this time, and then wipe it onto the leather surfaces. So use the complete system twice per year, and the Prestine Clean monthly.
I hope this helps.
Todd
Todd,
Are there any instances where a second application of Rejuvenator Oil is applied before the Pristine Clean step? My leather is in very good shape considering the car is 9 years old, however, I know that it’s never received a treatment like Leatherique. I used the Oil today and was wondering if I should apply a second coat in the morning, and do the Pristine Clean step on Sunday.
I’ve applied a second coat before on exceptionally dry/hard leather. While it may not be needed in your case, it definitely wouldn’t hurt. Keep in mind too that it will continue to condition and soften the leather for several weeks after the application.
Thanks for pointing out that it continues to do it’s magic after the application…… I never even considered that! I’ll plan on doing another application in the early fall, while it’s still warm here in SoCal.
Todd,
Great write up and thanks for the link to it. It looks like the links for the 16oz kit and 32oz kit are actually the same thing though.
Chris
Thanks Chris! And good catch on the link…fixed!
Hi Todd,
I’m about to order some detailing products from DI and am looking for something for my leather Lexus LS430 air-conditioned seats. I just used some Meguiar’s cleaner but it was plugging up the small perforations in the leather. Lexus sells special leather cleaner/conditioner but I was wondering if Leatherique is suitable for A/C seats or should I look for something else; or go to Lexus?
Thanks,
Ron
Ron,
Leatherique would actually work very well for that as the perforations allow for even better penetration of the product into the leather. I have similar seats in my Acura (minus the A/C), and Leatherique works extremely well.
I hope this helps.
Thanks,
Todd
Hi Todd,
I have a 2005 Nissan Maxima SL with black leather interior, that I have had for about 3 months. I am starting to notice how dry the seats are looking. So I recently bought a couple different brands of leather cleaner/conditioner, such as Meguiars and then Turtle Wax ICE. None of them seem to work since my black leather seats still continue to look dry. Is Leatherique a good solution to my problem even though I have black leather?
Thanks in advance,
Winston
Winston,
It really depends on what your ultimate goal is here. With Leatherique, the finished product has a natural matte finish to it as leather is intended to look (which really shows up on black). While they may “look” dry because of the matte finish, the important part is whether they feel dry. Many times, products that add a gloss to leather may actually just be sitting on the surface and clogging the pores.
So if you use Leatherique on your Maxima seats they will soften up, but they may end up looking even more matte than they do now because they will strip any shiny residue leftover from previous cleaners/conditioners.
I hope this helps.
Todd
Hey Todd:
As always…great work! Do you have any pix of before and after shots with the Leatherique system used on leather wrapped wheels, shifter knobs and door pulls? Since these areas probably see some of the most use/grime from constant handling. I’m curious to see in detail how Leatherique restores those high use/wear areas.
TIA!
Cheers
Kevin
Kevin,
I don’t think that I have any before and after images of those areas, sorry. Having used Leatherique in those areas, I can say that it does a tremendous job there as well.
Todd
Todd,
I’ve been using the Leatherique twins for years and they do a great job. I now have a 95 BMW M3 and need to refinish the Dove Grey seats. The leather is off the seats and has been treated on both sides with rejuvinator oil (the back side really soaks it up!). Next step is the ‘stripping’ and then the dye (all Leatherique). I’ve heard that a spray gun is the best way to apply the dye but haven’t been able to find out what type of gun is best. Do you have any idea? Do you feel a gun is the best way to go?
Thanks,
Rick
Rick,
I know that Leatherique recommends the wipe-dye method as opposed to using a spray gun with their leather re-dye kits. I personally haven’t used a spray gun for this, so unfortunately I don’t have a recommendation for you.
Thanks,
Todd
Todd, thanks for the usual excellent advice and counsel! I used Leatherique tonight on my BMW’s seats just as you suggested, though I didn’t have any rejuvenator. They were not too dirty, so maybe before the car was sold to me in March the detailer cleaned the seats. The process worked well, and I am pleased with the results. Now, I’ll buy some rej and do the whole treatment next time. My seats are black leather. I am spending a fortune on product, but being a car nut, it’s OK! In my experience, when you take good care of your car, it pays off in countless ways. You are a mensch!
Thank you Brian! Leatherique is the “real deal” kind of product, and when used as directed will provide tremendous results. It’s well worth the investment in proper products to take care of a much bigger investment we have in our cars.
Take care,
Todd
Todd,
Excellent article. I am looking forward to using the product, however what results should I expect for the some of the leather in my Lexus SC400 where it is beginning to scale or crackle from sun exposure. Will leatherique smooth this out over time? Would a double coat be recommended?
Thanks so much!
If it’s that dry, you may want to consider doing several applications. Perhaps you could spread it out over a couple of weeks time. While it won’t “fix” your problem areas, it will significantly help to preserve it and prevent it from deteriorating any further. The softening effect will continue to take place for a few weeks after you use Leatherique…
What do you do if you accidentally use the cleaner before the oil? Do you just wipe it down and use the oil and let it sit overnight?
John,
Yep…just start from scratch in the proper order (Rejuvenator Oil –> Prestine Clean). Having used the Prestine Clean first won’t interfere with the process.
Does water harm the surface of the leather since water has a tendency to dry the leather?
Rich,
A little bit of water won’t harm anything, however a lot (leaving windows down in the rain) will dry it out. So if you were using just a damp cloth to wipe down your seats, it would be fine. Leather is water resistant…just not waterproof.
This is certainly pretty valuable post. Thank you for all your determination to offer these kinds of helpful tips here.
[…] https://www.detailedimage.com/Ask-a-P…r-care-how-to/ This is a super blog. I did this to my 996tt and then to some leather interior furniture. I had great results. Tom __________________ 2003 996TT Proto K24/18g, EVOMS Headers with Tial 44 External WG, EVOMS DVs, USP 3.5 IC's, AP 78mm Plenum, 58# injectors with Bosch 044 fuel pump, Greddy EBC, GT2 Clutch conversion, Sachs / Clutchmasters stage 4 Clutch. SpeedTech 70mm. JIC/Cross Coilovers with GT3 sways, GT3 Ducts. MaShaw GT2 Front, Misha GT2 Rear and TechArt side skirts. Champion RG5.Tuned by EPL. […]
I bought the large sizes of both products to clean the dove grey seats in my BMW and it was worth every penny. I was concerned in particular that the driver’s seat would not come out well with any product because I was attempting to remove the dark color left by repeatedly sitting in the light colored seat with a black leather jacket. This had caused discoloration and a bit of a sheen. To my surprise and amazement, the seat came out just like new! I love the matte finish, which really enhanced the pebbled texture of the leather. Living in the South, I battle red clay and am now wondering if you could recommend a good carpet cleaner for my dove grey carpet in my beloved car. Thank you!
Hi Lori,
The before and after Leatherique images that I have on my website are from BMW Dove Grey seats! I’m glad that your results matched what I have consistently found with this product. That red clay can really be a problem. You may want to try some 303 Spot Remover and you should consider some kind of protectant as well such as 303 Fabric Guard.
Todd,
I tried the twins on the seats, steering wheel and console/arm rest of my chevy SSR and was very happy with the results. The arm rest especially was dried out and developed a whitish fade to it (on black leather!). I was especially amazed at how good this came out. When I say its “restored like new”, I mean it.
This vehicle lives in NJ and sees less than 1000 miles per year. It is garaged when not in use; however, it is a convertible with heated seats that get some use on chilly nights. Considering this kind of usage, how often do you recommend treatment with the rejuvinating oil and prestine clean? I’m thinking once a year (i.e. fall for the full treatment before cold winter storage) and once every month or two as needed with prestine clean. What do you think?
Rob
Rob,
This sounds like a pretty good plan given the amount of driving time that it gets. If it was driven more, I would recommend several full applications per year, especially since it’s a convertible. I always recommend full treatments to my convertible clients, and you’ll be amazed at how much dirt and grime comes out of the leather since it’s exposed to the elements much more than a regular car.
After reading the posts on this site I decided to try the Leatherique Rejuvenator Oil and Prestine Clean on my 2005 Cadillac XLR. I left the Rejuvenator Oil on for 3 days while parked at the airport in the hot sun, and it left a horrible sticky clear film on the driver’s seat. I haven’t been able to remove the film using the Prestine Clean…ugh! So, be warned that leaving the Rejuvenator Oil on too long can mess up your seats. I took it to an upholstery shop and they recommended to replace the damaged leather panel = $150 (ugh!).
Mark,
If it left this residue just on one part of the leather, then I have to believe that it simply uncovered something that has been done or applied to that seat in the past. Cheap spray-dye jobs to make a car look good before resale can be problematic. If at some point there had been a bit of cheap commercial products applied to the seats then there could be a build up of wax, silicones, petroleum distillates, and heavy gunk that comes to the surface once Rejuvenator soaks into the hide and brings it to the top. I worked on a very rare car with a value of over $600K at one point, and found a milky white residue on the black leather seats after using the Leatherique system. This wasn’t a problem with Leatherique, this was a problem with the oily products that had been applied to it at some point during its life. All it took was another application of Rejuvenator to remedy this.
So just based on the fact that only a panel was affected, it points to a problem with something in the past, and Leatherique only uncovered the issue. I would try another light coat of Rejuvenator and would be surprised if that didn’t solve your problem.
Todd:
Thank you for this wonderful sharing of your methods and experience. I appreciate it very very much. Just finished the NSX today (it was outside in the sun for three days of 95F after I applied the oil) and there was a lot of leather to cover. Rubbing the oil in and then cleaning with prestine clean was a total workout for me :-). I had to keep two wrung out towels on hand as scrubbing against the grit gaurd and wringing it each time was a total pita. Results are great! Thanks again.
Yet another happy Leatherique user! I’m glad to hear that you’re happy with the results, and that your NSX now has a few years removed from the interior. Thanks for reading…
Todd – Although it would probably work better in the heat of summer here in NY, I just applied it on my 2005 Mini Cooper S with black leather seats. The seats weren’t in bad condition at all but I figured it could only make them even better. I’m not motivated enough at this moment to do the hair dryer thing. Was it pointless or should I still benefit by leaving this on for 24 hours in my garage before Prestine Clean? Thanks for your time.
Despite the fact that you don’t have the heat working in your favor, you will still benefit from the application of Leatherique and allowing it to sit on the leather surfaces for 24 hours before finishing it with Prestine Clean. It’s good to condition the leather before going through the harsh and extreme temperature swings that nothern winters bring.
Will the leatherique work on suede and other type of leather surfaces? I have a Ford King Ranch edition with the Chaparral Leather (saddle leather)surfaces that look pretty bad and wanted to know if this would work on those kind of surfaces as well? Thanks.
You definitely don’t want to use a leather product like this on suede. It would however, be a great product for the chaparral leather in your Ford.
Great write up! I am glad to see that I am actually using this product right.
I would like to offer one more bit of advice. Since the oil itself works best when the interior of the car is hot, I went out and purchased a small space heater. Once I have applied the oil, I put the space heater inside the car with a small bowl of water (to make sure it doesn’t dry everything out too much) and I rotate the position of the heater about every hour or so. Just remember to turn the heater off before you close up shop or go to bed for the night.
This makes the whole process more time efficient and you can work on another car or the exterior while the leather absorbs the oil, and since it’s all getting heated at the same time, the end result is even better.
[…] showing the capabilities and results of the product: G35Driver member results and experience Leatherique How-To __________________ DetailedImage.com – Your source for auto detailing supplies | 10offG35 – 10% […]
[…] recommend Leatherique: Leatherique Rejuvenator OilLeatherique Prestine CleanHere's a how-to guide: Ask-a-Pro: Leatherique-leather-care-how-to __________________ '06 OB 6MT Sedan: JDM clear corners | Z-Tube with drop-in K&N | Custom […]
Hey Todd
Nice write up. Couple of questions. Have you ever found where these two products working together did not clean as well as you’d hope? I usually use a steamer to clean leather and was wondering if maybe I could forego the steamer since these products work so well. Your thoughts please. Also how much product of each would you say you used on the seats in the pics.
Thanks for your time.
Derek
Derek,
First of all, I’ve always gotten the results I was looking for when using Leatherique. You really can’t compare using a steamer to using Leatherique. The steamer simply cleans surface grime. Leatherique deep cleans, conditions, and protects. If you were offering these as detailing services, the Leatherique would be an upgrade service at an additional cost from steaming since it requires more time, and since you have the cost of the Leatherique involved. I probably had 2~4oz per seat of Rejuvenator involved in these heavily soiled seats, and far less than that of Prestine Clean.
How long does the smaller bottle last? I am going to do the driver and passenger seats and am wondering how many times I can clean both seats.
Matt,
You should be able to get about 3 +/- full applications out of the 16oz bottle…
Are you supposed to do the back seat?
While the front seats (driver in particular) will typically be the dirtiest, you should do all of the leather just to keep it conditioned.
[…] look brand new again (or near it)? — Thanks Adam Yessir! heres a write up you can follow https://www.detailedimage.com/Ask-a-P…r-care-how-to/ Btw we can get wholesale prices for it __________________ *Team Outcast*// ARC for […]
[…] couple of rounds of the Leatherique treatment. Check out this how-to article at DetailedImage.com: Ask-a-Pro — Leatherique Leather Care How-To. That article tells you everything you need for the Leatherique process. IMO, it's the best […]
Dear Todd,
When I started reading this thread, I thought you were a customer. As I continued reading, it seems as though you’re the manufacturer of this product or linked to it. What’s the story?
Thomas,
I am a professional detailer / writer. Please read my author page that can be found by clicking on my name at the top of this article (or click HERE).
It sounds like you’re new here to the Ask A Pro Blog, so you might also want to read up on exactly what we do here.
Hey Todd,
I just bought some relatively new reupholstered Coach leather seats for my car and will be taking care of them! The Leatherique seems to be for restoring leather. What positive effects would I see on doing this to new leather?
What kind of protection do you recommend to use? Is Poorboy’s World Natural Look good to use? (I already own that product)
You also stated that the Rejuvenator Oil will bring out oils and gunk from previously used products. Would using protectants such as the Poorboy’s cause issues when using the oil? The previous owner used Meguiars Leather Cleaner/Conditioner on the seats as a side note.
Thanks!
Sheldon
Sheldon,
The Leatherique system is just as much for preservation and protection as it is for restoration. I use it on brand new seats to start them off properly and for the protection properties that are in Prestine Clean, I use it on maintained seats to preserve them, and I use it to restore neglected leather as well.
I don’t use Natural Look, so I can’t compare the protective properties of that versus Prestine Clean. For me, I use Prestine Clean by itself as an all-in-one leather maintenance product.
If your seats have any kind of buildup from previously used products, the Rejuvenator Oil will safely and gently strip these leaving you with a fresh, clean surface. Then use Prestine Clean afterwards to complete the process of deep cleaning, conditioning, and protecting your leather.
Thanks for the reply. So you’re saying no need for UV protection products and just use the Prestine Clean for that purpose as well?
Hello Todd,
I’ve used the twins to great effect as well. One thing i’d recommend to others is go for the larger sizes, you’ll eventually be buying it again. I have one question. Have you heard of anyone using this product on leather seats or couches in the house?
thanks,
Mark
Mark,
Yes, Leatherique can be used on leather home furniture as well.
[…] During the process I was using beta polishing pads for the compounding stage, as well as a yet to be released paint sealant / gloss enhancer when I was finished with the paint correction. The goal was to achieve a safe level of around 85% correction / restoration and to bring back the depth, gloss and original Rosso Corsa red color, but once the job was complete I was happy to have exceeded that level. I invested about 20 hours into the job which also included an interior detail and leather preservation using Leatherique. […]
Hello Todd,
I have a 2001 325ci with red interior. so my question towards these leatherique products is that will these products work with the red interior? i have used leatherique before but only the rejuvenator oil and it worked ok, but i never really looked to much into it as now i know that it needs to be wiped down after! i will be purchasing the 2 bottles if all works out.
great description by the way.
-nick
Nick,
Yes, it will work on your red leather. Just be careful and don’t scrub too aggressively because I’ve seen a lot of cars with colored leather that have been re-dyed at some point in their life, and if it hasn’t been done properly it could potentially remove some of that dye. When you get a bottle of the Prestine Clean to complement the Rejuvenator that you already have, you will be using it (PC) for your regular maintenance cleanings.
[…] Prestine Clean – 16 oz | Detailed Image Leatherique Rejuvenator Oil – 16 oz | Detailed Image Leatherique Leather Care How-To – Detailed Image __________________ Detailing Crew Member […]
hi Todd, I have a 1993 le miata with red leather interior and red vinyl pieces throughout,( arm rests, door cards) etc… I bought the whole leatherique kit today and a custom made red dye matched to the color of my seats, can I use the colored dye on the vinyl parts to match the newly dyed seats? and after dying the seats what would I use on top of the new dye to seal it? thank you, Jeff
Jeff,
You should contact Leatherique directly on the dye question. George there will be happy to get you going in the right direction. And there’s no need to “seal” the seats afterwards, but you could use Prestine Clean to add UV protection.
I hope this helps.
Todd
Hi Todd,
Great info.. I have a 2002 Ferrari 360 F1 with Stradale Black Leather Seats and Red Stitching. I just purchased a bottle of Leatherique Prestine Clean and wanted to know if it will stain/fade the stitching on my seats and dash. Do you recommend this product over the Lexol products?
I was also wondering if you could recommend a high end detailer in the Dallas, Texas area. I have been using a service, but their quality is inconsistent and I usually have to point out a few minor issues when picking up the car.
Thank You,
Myles
Myles,
Prestine Clean will be a great leather maintenance product for your 360. I work almost exclusively on Ferrari these days, and Leatherique is the only leather care product I use on them…because it works! I’ve never had any problems with staining or fading on any contrast stitching with it. It may darken the stitching at first while it is wet, but will go back to normal once it fully dries. You can also see an article I did specifically on Prestine Clean.
I will contact you directly about detailers in Dallas.
Thanks,
Todd
Awesome, Thanks!
Hello again Todd I decided that my le seats were too thrashed and I just got a tan leather perfect passenger seat and now I’m looking for a drivers seat, how difficult is it going to be to go from tan leather to a custom formula 1993 le red from leatherique? Thanks again, Jeff
Jeff,
I don’t think it will be that difficult to change colors, and if I remember correctly, the Leatherique leather dye was originally designed just for that purpose…changing color!
Hi Todd,
I recently picked up a 1990 BMW 325 with black leather seats that are hard like cardboard. I’m curious if the leatherique system will be able to bring these seats back and soften them up. They’re in good contition overall with no cracks or scratches otherwise. Based on the comments I’ve read here and elsewhere it would most likely take 2 or more applications of the oil to get the job done. Should I use prestine clean between applications of the oil or just go all out with back to back applicaitons of the oil and then use prestine clean? Thanks, Josh
Josh,
I’d say that there’s a good chance that they have gotten wet at some point, and hardened up accordingly. Most likely it will take several applications to soften them up. I would probably apply the RO, and then re-apply 2 or 3 times (without removing product) over a 24 hour period before using the Prestine Clean step. And since the RO will continue to soften the material over a couple week period, I would completely re-do the process 2-3 weeks after the first one if you feel it needs more. This should help them out considerably.
Thanks Todd.
I’m curious as to how Leatherique compares to the Leather Masters products as well as Britemax’s Leathermax products. Do you have any experience with either of those products as well? All have gotten good reviews so I would think they are reasonably comparable. Thanks again!
Josh,
I haven’t used Leather Masters, and I’ve never heard of Britemax. I know that LM has received great reviews. Based on how it’s used though, I’m not sure it could do as good of a job of deep conditioning…which is the most important benefit that’s needed in your particular case.
Leather masters is a great product. I’ve used a few leather product and have been waiting to follow this writeup, just for the right car. After I recieved the product i tested a few panels but havent got a customer to really sell or test it on. Well the 73 L82 is in my shop with the seats covered in bags. I turned the heat up in the shop overnight to help the process. Its more of a restorative repaint detail. It was painted ten years ago, and never finished properly. So, I have a lot of work to keep my mind occupied for the next 8-10 hours when i can finish it off. Excited. My s2000 is next. What products do you use for conditioning on new vehicles. A lot of the vehicles I see are newer and I have experemented with some creams and LM stuff(because of reviews and trust in overall product) , but what have you used? I havent had any problems but, don’t want to fall routine to a product unless i honestly beleive in it. Its the key I think. On newer vehicles, I see short term good results but hard to really tell how well it preserves for the future or long term
David,
I use Leatherique products for brand new vehicles as well. I recommend starting the car out right by doing a full treatment from the beginning. After that, maintenance cleaning/treatments with just Prestine Clean would be in order. Prestine Clean by itself is a tremendous all-in-one leather / rubber / vinyl product, and have written a separate review on it.
Thanks, I didn’t see that review and appreciate the link. The seats turned out amazing and honestly Im really surprised with the outcome. The texture and overall look has changed and seem like its near impossible for leather that old to feel that new. I figured from reading that I would like the product and I was anticipating those types of results but I was still beyond myself when I was done.
Another believer in Leatherique…I thought you would be happy with the results! Thanks for checking back in and letting us know how it worked out for you.
[…] Back in January I received a call from one of my out of state collectors about doing some work on most of his cars, so I made the trip to assess their needs, and to meet up with a completely separate 458 Italia owner in the same city. When all was said and done, we figured that we would need 4 or 5 days to perform 3 major paint corrections, 3 minor polish jobs, and 4 leather preservation applications. […]
Hi Todd,
Thank you for the write up on Leatherique. The last few days I have been doing research on the best conditioner and cleaner for my new 2012 Honda Civic EX-L. Leatherique popped up on a few forums. I finally decided to purchase it once I read your reviews. I’m no expert conditioning and cleaning leather in a vehicle, but I must start now if I want to maintain my leather seats. Is the Rejuvenator Oil and Prestine Clean safe for the leather in my car? Also, do you recommend a full treatment for my brand new car?
Thank you for your time.
Well, you’ve come to the right place! To answer your questions…yes, it is safe for your car, and yes I do recommend starting a brand new car off with a proper treatment. I do it on all of my brand new cars, and my clients’ as well.
Just take your time and get a feel for the system the first time out, and it will get easier when you re-apply in the fall. You’ll want to use the Prestine Clean by itself for your regular maintenance cleanings throughout the year.
Thanks.
Todd, you said you use your bare hands, so no gloves, right? Don’t you feel that leatherique is a little harsh for your own skin? I’ve used the set a couple of times, both times my hands felt a little raw/dry after I was done (didn’t use any gloves)… So I had to apply lotion to my own hands afterwards
Actually I find just the opposite…my hands are always very soft feeling after I’ve done a Leatherique process!
Todd,
I have a 2003 Mustang Cobra with the Alcantara seta inserts fromnt and rear. How would I be apply this product carefully and not get it on the Alcantara? Woiuld there be another leather product that you recommend for special situations as this?
Eric,
Instead of using a foam brush, you could use a terry cloth applicator pad (or similar) so that you could apply a much thinner layer of RO near the Alcantara. I would keep it thin anywhere near it so that it doesn’t run onto the Alcantara.
I hope this helps.
Thanks,
Todd
the saddle bags on my harley have gotten dry,hard,and are shrinking will this product condition it enough to strech it back out and keep it conditioned and how about water proofing
Vicky,
I spent over 20 years working in the motorcycle industry, and in my experience the vast majority of the saddlebag manufacturers use a synthetic material, and not actual leather. They do this because it is much more resistant to weather and the elements than leather is. You may want to check with the saddlebag manufacturer to see if they have a specific product they recommend for maintenance and preservation of that particular material.
Excellently prepared write-up, if all people supplied the same articles as you, websites would have been a much better place.
thanks for getting back to me so fast. these are cow hide leather will your product restore them or do you recomend something else? i was considering soaking them so that i can streach them back out if you feel your product will do the trick can it be used on wet leather? i was told to use hide feeder but really havent had much luck searching for it under that name im really at a loss the only thing i know for sure is that they need help
The problem with water and leather is that they don’t necessarily mix well. Typically when true leather gets wet, it will harden up quite a bit (which is why most saddlebag manufacturers switched to synthetic materials). It’s also very difficult to make leather waterproof, which is important to have when dealing with motorcycles. Leatherique will most definitely help to restore your leather and make them soft once again, but they won’t offer any kind of waterproofing.
Todd, I have the Leatherique Rejuvinator Oil that I have put on some mid-1960’s leather car seats that are very worn and relatively dry, but I don’t have the pristine clean yet. Am I ok soaking the seats for several days with several applications of rejuv oil until I get the pristine clean? Do I not want to let the rejuv oil completely dry out on the seat, or does it matter?
Is there anything other than pristine clean I can use to clean off the oil/dirt/etc.. that comes to the surface until I get the Pristine clean?
Todd,
There shouldn’t be any issues of allowing the RO to soak for several days…I have done it many times. Within just a few hours you should notice some areas already looking dry, while others still have a wet look to them. That’s typically an indication of where the seats are soaking in the most product. On very dry and old leather, I will do multiple applications of the RO as I see the product soaking into the leather. One word of caution though…if these seats have had (cheap) re-dye work at any point in their lives, then there’s a good chance that some of it may come off during your removal process. This isn’t a Leatherique issue…it’s a poor re-dye issue. But from the sounds of the leather you’re working on, they could probably stand a good re-dye afterwards anyways. At this point it sounds like you’re dealing with leather preservation, and doing this process several times a year would be a good idea just to keep them from deteriorating any more. Just wait for the arrival of your Prestine Clean for removal…don’t try any alternative products. I hope this helps.
Todd, very helpful. Thank you.
As a follow up, do you recommend Leatherique’s redye and repair process/products, especially for my old Connolly black auto seat leather situation, or something else for redye? Any feedback on rip repair kits/processes would be helpful as well. At this point it appears my seats are very original condition without repair or redye (cracks and rips included). Not sure if you get in to the repair aspect of leather seats, but any feedback or advice is helpful. I am in ‘preservation’ mode with these seats vs. restoration, as the car is a survivor type of vehicle. I do not mind seeing the surface cracking, which there is quite a lot of, but I want to bring the appearance and usability up a couple levels so they are presentable with the rest of the car, maintain originality, and do not deteriorate further.
Thanks.
Todd,
You should get in touch with George at Leatherique…he’ll guide you through the repair and re-dye process. They have very good stuff for that! Tell him I sent you…
[…] he says with the paint brush. Your method works well too I assume using your hand to applicate. https://www.detailedimage.com/Ask-a-P…r-care-how-to/ __________________ upRev […]
[…] I don't know exactly what to do with the leather, but most would try Leatherique on the seats (https://www.detailedimage.com/Ask-a-P…r-care-how-to/) __________________ 2006 Mercedes-Benz S500 2008 BMW 750Li Individual Previous Cars 2000 […]
I would like to know if this product would work on my leather couch, and how without being able to use heat?
Thanks
Tammy,
Provided it’s real leather, then yes. Heat helps, but is not absolutely necessary. Most of the cars that I do are inside an air conditioned studio, and they come out fine. Just give it plenty of time to dwell on the surface (overnight), and then do the removal stage and you should be good to go.
[…] have you actually compared it to? Here is another link that shows what Leatherique can actually do: Leatherique Leather Care How-To – Detailed Image Please produce, pics of what Lexol can do?? Somebody? […]
I just bought a new 2011 Audi S5. It has that dry matted Black Nappa Leather. Side bolsters look like they would get worn easily. Should I use leatherique to protect from premature cracking and protecting.
David,
Starting even brand new leather off on a regular maintenance and preservation routine is always a good idea!
Hi Todd,
My 2007 BMW 328i has black leather seats that are in pretty good shape. I would like to try the Leatherique combo on my seats, but I’m curious about how the Rejuvinator Oil will penetrate the leather. As I understand it, BMW seats have some kind of urethane coating (so I’ve read on BimmerPost).
Have you experienced any issues with Leatherique products on BMW seats? Have you been satisfied with the results on BMW seats?
Thanks in advance for your insights.
Albert,
Leather is water resistant…not water proof. I use it on all leathers, new and old with great results. Even with new cars, it’s great to get into a regular routine with Leatherique to keep your leather seats clean, conditioned, and protected from UV rays. While it won’t make a “night and day difference” on brand new leather, it will keep it preserved and looking its best well into the future.
I have a ’01 BMW 330ci. I purchased the Leatherique products, and plan to use them, but I had a question. Several parts of the interior have leather stitched in right next to vinyl panels. Other parts, like the dash, appear to be leather, but I am not sure. Is this 2 step treatment harmful or not reccomended for use on vinyl? If I am not sure, would it hurt to apply it to a surface that may or may not be leather? Will it mark or damage any plastic parts that are in close proximity to the leather panels, should some of the product run on to the plastic? Thanks in advance for your response! BTW – great article and advice!
Matthew,
If you know which panels are leather and which are vinyl, just apply the RO to the leather parts, and then when you do the second stage use the PC on both areas. As for the dash, I would just use the PC stage. When I’m applying near plastic (which is pretty much all of the time), I’ll come back and wipe off any residue from the plastic areas before I allow the RO to set. It shouldn’t hurt the plastic, but I prefer to take the cautious approach myself.
Thanks!
Thank you for yet another informative review Todd. Seems to have raised a lot of interest over a long time.
I am really interested in the Leatherique (LTRQ) treatment following your belief and so many testaments. I have some questions regarding my after market Connolly leather in my convertible.
1) Have you used LTRQ on Connolly leather? If so what is your feedback?
2) I have maintained my leather using the Connolly system (soap and feed) on semiannual (full treatment) and bimonthly (soap only) applications. Any thoughts on how LTRQ might behave vs these products? My current treatment is done ‘by the book’ in terms of qty and way applied.
Thank you in advance for your time and feedback. I hope I am able to locate a vendor for dispatch in GR with reasonable shipping costs as well.
Kind regards
K
Kostas,
Yes I have used the Leatherique system on Connolly leather…same great results as with any other type of leather in my experience. I haven’t used the Connolly system, so I can’t make direct comparisons on the two products.
For a convertible, I would use the Leatherique system twice per year, and then just the Prestine Clean on an as-needed basis for regular cleaning (Prestine Clean is a great all-in-one).
I hope this helps.
Hi Todd,
I managed to get my hands on LT and I applied earlied this week (both steps).
100% satisfaction just like you say all this time. Feels good when something lives up to expectations. Moist and ‘fresh’ leather again and much easier application than the Connoly system.
Kind regards.
K
Many thanks for the response Todd. Certainly helps.
Todd,
I followed your outlined procedure and used the combo on the black Dakota leather seats in my 2007 328i. The results are fantastic! I thought the seats looked new before I applied the Rejuvinator Oil and Prestine Clean. But in fact the process removed dirt that I didn’t even realize was there. Now the seats look really brand new, and feel supple. The combo is amazing. Thanks very much for this blog and your assistance. -Albert
Albert,
I’m glad to hear that you were as pleased with the results as pretty much everybody else is when they use it! Thanks for checking back in with us.
I have a quick question. I am sorry if you have answered it already. How long can I leave the oil on the seats? Is 48 hr the most you can leave it or is anything after that not worth it? Thanks
It’s not going to soak in any more after 24 or 48 hours. On really dry leather, you can usually tell after just a few hours where it has soaked up all of the R.O. In these cases, I’ll usually come back and apply a little more R.O. in those areas where it’s really apparent that it has soaked up. I hope this helps.
Yes it does thank you.
Todd –
this is the best step-by-step guide I have found on the whole Internet! My question is when I’m finished with the process the seats feel kind of dry. The surface is not shiny which I believe is a good thing but I was hoping to improve the elasticity of the leather a bit. Do I need to repeat the process to make sure the RO is absorbed fully or am I too light on the final step involving the cleaner? I have ’06 BMW 325 in black leather. Thank you!
Peter,
Thanks and I’m glad you found the tutorial to be helpful!
Yes, when you complete the process the leather should have a matte finish to it. As for it feeling “dry”, that may just be the grain of leather used which has a big impact on the overall feel of it. Some automotive leather has a nice, supple feel while others have a bit more of a tight, rough feel even after using Leatherique. Provided that you used a liberal amount of RO and allowed it to sit on the surface for plenty of time (I typically give it 24 hours), then the leather should have been fully conditioned. Keep in mind that the surface can continue to soften up over the next week or two. If at that time you feel that it could use more, then do a second application making sure that you use plenty of RO, then massage it in with your hands, and give it overnight to dwell before doing your final process with PC.
I just had the Leatherique Treatment performed on the seats of my 2004 Infiniti G35x by Todd… AMAZING.. the driver seat outer bolster was hard and glossy and was starting to show the telltale signs of aged leather.. lots of creasing and potential cracking if not treated soon… after the treatment, the seats had a nice soft matte looking finish, very pliant to the touch.. very soft and comfortable to sit in… and had that nice “new leather” scent restored… feel good, look good..and smell good!
simply amazing Todd!! Thank you sir!!
Thanks for chiming in Rick, and I’m glad to hear that you were so happy with the results. Your car was definitely a good candidate for the Leatherique process, and it most definitely made a big difference in both the look and feel of the leather.
hi i had a q…if i were to apply just the Oil but then instead of the Clean, can i use something else instead ..like Auto Glym or Meguiars leather cleaner??thanks
That’s not something I would recommend. Prestine Clean was designed specifically to work together and remove the tacky residue left behind by RO, and to leave a pure, clean finish. If you use an off-brand leather cleaner as a substitute, you may not fully remove the residue, and you’ll be putting the waxes and oils back on the seats that you just worked to remove.
Todd,
I am planning on ordering my leatherique kit, including the dye for my black leather seats in my 2007 Acura TL. The seats that you used the oil and cleaner on look great, but there are still cracks and in my case, some faded areas. Would you recommend using the dye? And if so , how would you recommend me going about and doing that?
If you have cracks and noticeable wear in the leather, then you should consider repairing and redying them, or hiring a specialist that it can do it for you. The Leatherique repair and redye kits are available directly from Leatherique, and they can help you with product recommendations and instructions for use. Thanks.
I used the twins on my leather his weekend. I though my leather was pretty clean because I regularly used “quality” cleaners and conditioners. I was wrong. The water bucket was filthy.
I’m glad you achieved such stellar results with the Leatherique products Greg, and it doesn’t surprise me. I too have worked on black seats where people “thought” they had taken good care of them, only to find that the rinse bucket afterwards was black with dirt, oils, grime, etc. It’s truly a fantastic product(s) that works as advertised!
I have factory white seats with black perforated inserts and the white didn’t even appear to be too bad before either.
Hey Todd, thank you for the detailed demo. You’ve confirmed everything good I’ve heard about Leatherique products.
I’m wondering, however, if these two Leatherique products will do as well on vinyl as they would on leather? And by “vinyl”, I am specifically referring to Mercedes’ MB-TEX seats and door panels, for which I have tried several products and yet nothing seems to give it the matte clean look that I like… It simply looks “dull” and with my seats being black in color “dull” can look… well, faded and old, and yet this car is a 2008.
I do realize the value of a good product but if it is not going to work for my particular situation, it’ll be like throwing money away…
Thanks in advance!
Omar
For that I’d probably try 1Z Cockpit Premium to maintain a natural look, or you can use 303 Aerospace Protectant if you want to add a richness to the look.
Thank you Todd, I’ll give those a try!
Intresting results. would like to try
great article…. about to use the kit on an 89 325i vert….. I am about to go out of town for a week and was planning on leaving the Rejuvenator Oil on while I was gone… So it would be on for a week while the car sits in an unconditioned attached garage…. Is it alright to leave it on for a week? thanks
I don’t think it would be an issue to leave it on that long. It won’t condition it “more” because it’s been on longer, but it shouldn’t harm anything either.
I have creases in my truck from where I sit. Will these products get the creases out? I noticed on the car above it cleaned it very well but the creases are pretty much still there. Is there anything to get the creases out? Thank you!!
Casey,
Leather is a natural product, and will have / get creases and such in it that will not come out…just a nature of the beast so to speak. The Leatherique system will deeply penetrate and plump up the fibers, therefore helping to reduce fine creases, but it will not get rid of the bigger ones. There are no products out there that will cure this or prevent it from happening. But by keeping them properly conditioned, you will be able to keep them looking much better for longer.
[…] detailediamge.com see leatherique tood cooperide…https://www.detailedimage.com/Ask-a-P…r-care-how-to/ __________________ Stay Marring-free, My Friend! (<—Signature added by unknown […]
As it is winter now, I’d like to get a comment on how do these products work in sub zero (celsius) degrees? It’s not too cold at the moment ranging maybe from -5 C to +5 C, but is the key leaving the RO for a longer period of time on the leather? For example apply RO to the seats and then cover the drivers seat with plastic bag so I’m able to use the car and whenever driving use the seat heater? Do this for 2-3 days and then proceed with the cleaning process? And I won’t be rubbing the dirt that came out from the leather back to the seat while driving?
Thank you for the great article and happy new year! 🙂
As I don’t know how RO would react in freezing temperatures, I wouldn’t recommend trying it that way. Doing it in a heated garage overnight would be great, but if you don’t have that option I would simply wait until the weather breaks before doing the treatment. In the meantime, you could simply apply Prestine Clean as a one-step maintenance application.
[…] the leather feeling more natural upon completion. Check out this guide with before and after pics – https://www.detailedimage.com/Ask-a-P…r-care-how-to/. Let me know if you have any questions! Greg @ DI __________________ DetailedImage.com – […]
Thanks for your write-up. It’s been really helpful. However, I do have one question. After the Rejuvenator Oil has been “baking” on the leather, do I need to wipe it off before I spray on the Prestine Clean directly on the seats? Or do I just spray the Prestine Clean directly onto the RO covered seats? Thank you!
The Prestine Clean is designed to remove RO, so just spray it right on top of the RO residue. Thanks.
Hi Todd. I applied Leatherique RO yesterday. Reapplied RO after 3 hours as the first application got absorbed. Waited 26 hours. Cleaned with spraying PC and then wiped with luke warm MF towel and then buffed it with a completely clean MF towel. I just finished 2 hours ago and now letting it air out in the shade.
Heres my problem/question: I now can see that the unused rear seats in the BMW are clean as new but the fronts show much more wear than before. They look a little cleaner but the wear looks bad. I also wanted to ask why is it so sticky/tacky? I cleaned the seats again with a warm MF towel and then buffed it but still sticky. The steering wheel is not sticky at all and is black whereas the leather on the seats is white/grey. I don’t know what to do now, might call Leatherique tomorrow for some resolution but I thought to ask you since you have detailing skills at a top level. So why still so tacky? What can I do about it? How can I repair the bad areas(drivers seat bolster, bottom of drivers seat? Middle console armrest?) ? The wear is not excessive but the dye is worn and can see dark faded lines?
Thanks
Chances are you still have residue leftover from your first phase of the cleaning. Test with a small section…apply more of the PC and let it sit on the surface for a few minutes. Wipe it down with a damp cloth, then rinse out your cloth, then wipe it down with the clean damp cloth again. Then do a light buff with a dry cloth. This will typically do the trick. If so, proceed with this same process on the rest of the seat(s) until any tacky residue is gone.
As for the worn look, the only thing you can do is re-dye those seats. Leatherique-direct can get you taken care of with a re-dye kit if you choose to go that route. I hope this helps.
I enthusiastically endorse Leatherique! I just received the Rejuvenator and Pristine Clean to re3do my ’97 BMW. These are exceptionally great products! The people at Leatherique are true leather experts and will take time to discuss their products and how to work them. Additionally they will actually color match your dye if you send them a swatch of the interior (maybe clip something from bottom of rear seat). Leatherique is the rare company that offers both a great product selection and superb customer service. What Todd and others here have stated is true – your leather car seats will look amazing, and feel supple, after using these products!
[…] Originally Posted by mleun481 thanks, everyone. I originally tried zaino leather cleaner and when that didn't work, I went with Lexol. After those two, I figured I should check and see what others are using before I spend any more time and money trying to tackle this. Here's a more complete review of Rejuvenator Oil and Prestine Clean by Todd Cooperider: Leatherique Leather Care How-To – Detailed Image […]
Just did this to the passenger seat of my ’07 BMW. I was always hesitant due to people mentioning that the seats are coated, but that wasn’t an issue. The seat looks fantastic and I can’t wait to get around to doing the driver side. Make sure you use Prestine Clean with it. P.S. Also, tried this with my soccer cleats and my sister’s shoes which all turned out great as well.
[…] the day came and the car was dropped off to receive a full paint reconditioning plus a Complete Leatherique Treatment. Throughout the process the owner and I kept in contact and spoke about how to properly maintain […]
Todd,
I used your technique in this article but thought it odd that I would finish with a damp cloth. I called and asked Leatherique about the steps and they told me to use Pristine Clean ( after RO0 if cleaning was required but to just wipe off with, or without Prestine, but do not use a damp cloth to wipe down. Are you aware that Leatherique doesn’t recommend a damp cloth wipe at the end. I did it the way you described the first few times with great results but found Leatherique’s directions seem more understandable (no damp cloth).
Thanks
Jeff
Hi Todd,
i just bought my kit and was looking for step by step use of it and you have the best step by step guide out there. i just have a quick q i read that i can use pc on the vinyl and rubber surfaces to clean i just wanted to make sure if that is possible. i have a g35 ’06.
thanks
Awesome process. I own a 1999 Lincoln Continental and the driver seat was in roughly the same shape as that on your Chrysler LHS, shiny, oily, noticeably cracked. I had tried the mass-marketed products sold at stores with poor results. My shipment of Rejuvenater and Pristine Clean arrived and I applied the former yesterday afternoon, allowing it to dwell for about 24 hours. As it was a baking hot 95 degree day, I am sure I got maximum results. Having finished with the cleaning, I am truly amazed at how well the upholstery looks. Unbelievable! As you said, Todd, and as your photos indicate, the creases do not completely disappear, but they are barely noticeable.
I was always hesitant about a buying a vehicle with leather upholstery because it looks terrible after about 50-60K miles and difficult, if not impossible, to clean without hiring a professional.
OK i just applied RO on volvo s80 seats..took advantage of the weather and now letting it sit in sun till late evening. also How much to apply i guess just to get one coating eh? And what about with black seats . i have seen pictures on this site and they all ( i think) are with non-black seats. Is it necessary to use it in black seats as well? mine is not that dirty ( on other car) well they are black and therefore hard to see it. But have you done in black seats and seen much improvement? thanks
You’ll be surprised at just how much dirt and grime that you will remove from black seats…I use it all of the time.
[…] Letherique , Leatherique Leather Care How-To – Detailed Image , […]
Hey Todd,
I enjoy and use all your guide quite often! Thanks for the good job. I recently purchase the Leatherique Prestine Clean 32oz to take care of my 2012 TSX’s interior. I used one time and notice its cleaning properties. My questions is, would this product help me protect and condition the leather? I am really concern with the cresting and wrinkles showing up after just a few K miles, and want to take care or minimize them as much as possible. Thanks for your help!
I have another article just talking about Prestine Clean and how great of a one-step product it is as well (clean, condition, and protect). As for wrinkles and such, they will be minimized by regular maintenance, but there’s no way to completely avoid them.
Hi Todd, please help I need products to clean and condition my light brown leather couches. I’m in South Africa hope you can help
todd on recomendations from you about leatherique products I purchased a custom blend of colored dye for my seats and I found out george was sick and had some one else formulate a bad batch of this product and they will not respond to my emails about a replacement dye can you help?
Sorry to hear that Jeff, and not sure how much assistance I can be in this situation. The best email I have for them is lrpltd@bellsouth.net…
Hey Todd,
Do you think it is safe to leave the Rejuvinator oil on my seats for 4 days while I go on vacation? My car will be garaged. I could remove it the morning before I leave but I figured that I would just leave it as long as it wouldn’t harm anything.
Thanks for the help!
[…] Their tutorial on this stuff: https://www.detailedimage.com/Ask-a-P…r-care-how-to/ […]
Is it safe for the product to be on non leather surfaces? My Acura has areas that are leather and adjacent areas that are vinyl. Will I have a problem if the RO gets on those areas? Thanks
I just purchased this item a couple of weeks ago and just put it on my Infiniti m35s and the leather looks better than brand new and much softer and plush. I would highly recommend this product to anyone that needs their leather rejuvinated or just cleaned…..ABSOLUTELY AMAZING!!!
Hi Todd and fellow repliers, I picked this product up and was wondering how to apply it. I have a 2011 Lexus IS250 with white stitching on them. Im afraid that the stitching may get discolored by this product. Has anyone had expeirence with that type of seat before? Thanks!
Hello,I want to learn consumption rate of rejuvinator and prestine clean for middle size car leather?howmany ml for a car?
regards
Hi Todd, I have leather that is sun damaged. I was going to use Connelly, however, someone recommended using Leatherique first. The leather is not cracked, dirty in some spots, but is still supple. Any recommendation would be deeply appreciated. It is a light natural color. thank you.
[…] Below is a link to an application / process article I wrote a few years ago…hope this helps. Leatherique Leather Care How-To | Ask a Pro Blog __________________ Todd Cooperider Esoteric Auto Detail – Ferrari Specialists! 9801 Karmar Ct. […]
I am purchasing a new car that has man made leather. What would be the best sealant to protect it or should I have the dealer to it with Commodore coating? Thank you in advance for the advice.
Todd,
I have a 1998 Grand Cherokee 5.9 Limited and it has calf-grain leather all over the interior. Some of it has seen better days, but is overall in fantastic shape. Would the Leatherique duo work with well with my Jeep? The seats in these are pretty hard to find of good condition and I’d like to keep them or at least improve their condition as much as I can.
Thanks
Chris
Prestine Clean can be used for leather, vinyl, plastic, rubber. Can you also use Rejuvinator oil on this or is this oil just for leather?
I was horrified to find that the pale leather passenger seat in my Volvo now has a stain shaped, hard, smooth area with definite borders. Would water drying in a hot car cause something like that? The seat had a water spill on it that was wiped up right away, but the car stayed parked in the sun for the whole weekend… Would I be able to bring back some of the pliability using the Leatherique method?
Just wanted to throw a plug in for this stuff. In case anyone thinks there is “trick lighting” or special effects in the pictures in this how-to, put your mind at rest.
I’ve used this stuff on a few different vehicles, including one that had almost 200,000 miles and had tan leather. It works exactly as described. It works so well, that I was honestly kind of bummed when I bought my last car and didn’t get leather.
It really is THAT good!
It definitely brings back the dull look that new leather has as well as really cleaning out the creases, so that it doesn’t look as worn. The leather is a whole lot more conditioned after the first use.
Help. I did something really dumb. I left the roof open on my 2003 Audi TT and it decided to rain. I quickly dried the seats and thought I would be smart and let the sun dry the rest. Bad Move! I came back several hours later and found large portions of the seat as hard as a rock. I went ahead and did my research and purchased the Leatherique kit. Following the directions, I vacuumed the seats and applied the rejuvenator. I then put my car in the sun with the windows and roof closed. 24 hours later, I rechecked and found that most of the rejuventor was absorbed. However, the dry patches were still hard.
I reapplied another coat and am following the same procedure. Is this the correct way to proceed? How long should it take for the leather to soften up?
I am heartbroken since I have only had this car for six months and it only has 42K miles on it. I would hate to have to have the seat leather replaced.
[…] yea it's why i said the pad and work that shizz! it's like applying a leather rejuvenator. Leatherique Leather Care How-To | Ask a Pro Blog Reply With […]
[…] Leatherique rejuvenating oil and prestine clean are the only way to go. Smells great, just like a leather shop, and you can really tell that the leather is clean and supple. No greasy residue. It's expensive (about $70 for the 16 oz. kit), but it's the only product I'll use in my V. https://www.detailedimage.com/Ask-a-P…r-care-how-to/ […]
[…] Re: Anything better than Leatherique? Just found it mate : Leatherique Leather Care How-To | Ask a Pro Blog […]
The leather seats in my Ferrari 355 spider were recovered last year with OME Connley leather so I don’t need anything to restore them but what I am looking for is something to protect the leather from getting dirty in the first place. The local Porsche dealer has some product that they put on their seats (and charge extra for) to protect them from getting dirty. What would your recommend?
[…] […]
I own a motor home with leather seats however they are light in color. The bottoms have a skirt that is a man made leather?? They have dark scuffs from shoes that I don’t know how to remove the scuffs. Please help. Thanks! I plan on getting your product for the seats but don’t know what to do about the skirts. Hopefully, the seats are leather too. I will investigate that before ordering just to make sure they are real leather.
Hi there, I am experiencing a wear down to the base coat on the leather even though I just bought the car. I am trying my best to clean the leather every couple days with BMW leather cleaner, and using mothers conditioner, so that the dye transfer from wearing jeans doesn’t stick.
I have wear from a manager wearing a watch on the door panel;
then I have a little of my own wear I created in a small area while wiping the seat with a microfiber cloth.
I would like to know what products I should use and how to apply them?
I am wondering about touching up the leather with dye so it doesn’t show the marks and looks like nothing happened.
I would like to know how to clean my leather properly and what cloth or brush I should use?
What should I do about conditioning the leather?
The leather is also drooping a bit from people sitting on it. How can i make it nice and tight again, looking like new?
Is 303 a good protectant to use on seats after cleaning and conditioning?
For reference, I have a 2013 BMW 328xi, with premium Dakota leather, Venito beige colored interior
I am panicking that this wear is already apparent even though I clean the leather often. I am desperate to fix the small damage by using a Venito beige touch up dye if possible
and here are some pictures.
The areas effected are circled in red.
http://s230.photobucket.com/user/ChaosTides/library/BMW?sort=3&page=1
Thank you so much for your time!
[…] tutorial online with respect to application etc. and it seems helpful for others uses as well: https://www.detailedimage.com/Ask-a-P…r-care-how-to/ Any other recommendations with this product? Sent from AutoGuide.com Free App […]
[…] some info on Leatherique. I also use 303 Aerospace Cleaner for the leather seat on my Harley… https://www.detailedimage.com/Ask-a-P…r-care-how-to/ […]
I just bought a new car and after reading the reviews order the Prestine CLEAN and LEATHER REJUVENATOTR.
Since the car is new, it sounds like I can just use the CLEAN and then every few months do the REJUVENATOR and then CLEAN. Is that correct?
Hi Todd,
Great how to, thanks. What happens when the treatment makes your seats worse? I know that sounds like I did something wrong, but I followed the directions and let the rejuvenator sit for about 3 days. I drive an older Tahoe with seats that are not in the best of condition, there are a few cracks, but not tears. I put the leatherique on, and put the bags over the seats, then prestine cleaned them yesterday. The areas that were cracked, on one panel in particular, look worse than when I started (and I think Prestine clean took off some of the dye on that panel when I was wiping with the damp cloth).
So should I do another treatment? Use a different product perhaps for less supple leather (more like a saddle leather conditioner)? Use a leather repair kit then retreat it?
I’m somewhat disappointed that I’m not getting the results everyone else is, but I’m sure it’s either due to user error (which I’d like to think not) or simply the condition of the seats when I started or the type of leather/coating (I’d suspect one or both of these last two). I’d appreciate any suggestions you would have to try to improve these seats.
Thanks!
Thanks for your comment Tom!
I just did the rejuvenator oil on my leather yesterday evening around 5 pm. I didn’t have time to get it on during the day and cleaning my car took about an hour because I am OCD about the cleanliness. I have a new BMW that is not a year old yet. My car is parked in the garage with the rejuvenator oil on the seat and steering wheel. I am not at home so I do not want to leave it out in the sun and it is suppose to storm later. I won’t get a chance to remove it today because I will be at work, so is it okay for me to remove it in the morning? The oil will have sat on the leather for over 36 hours…?
Hey there, Todd, very excited to use the rejuvinator on my brand new ride. My concern is this:
My seats are leather trim with alcantara centers, still a lot of leather in the car. Clearly, having this oil absorbing to the centers is a horrible thing to happen, especially since the oil will spread more the hotter it gets in the car (in August LA and it’s gonna get hot in there). There is a lot of leather and I would love to treat them with this product. I would imagine you have dealt with this situation before… What was your process to protect the non-leather portions of the seats? Or if you haven’t what would you suggest? This stuff needs to sit on the leather for so long, I worry about any sort of seepage onto the alcantara. I’m guessing this rejuvinator is near impossible to get out of it, no? Did I jump the gun and not need this on brand new leather? It looks hard from the factory and am already getting creases on the driver seat.
I have a plan in mind involving painters tape directly on the alcantara, sealed packing tape on top of that, molded into the creases very well, I’m using plastic tape on top in fear of the oil absorbing through the painters tape, but using the painters tape as the base layer to not ruin the alcantara.. Then another layer of packing tape holding down sheets of clean plastic cut to the shape/size of the non-leather areas, using this method to fully cover the areas. Since the headrests are all leather, this would prevent dripping onto the centers. Would this be enough or am I getting too worried? It would be quite time consuming, so it is the reason why I ask.
Apologies if this question was already asked, I did try to read through all the comments, but there are 4 years worth of them.
C
PS: Love your work, have read a lot of your articles, you’re a master and I follow a lot of your methods!
Hello
I have pLeatherique oil bottle and I am planning to do my leather seats in BMW and I don’t have prestine clean. can I use Blackfire APC to remove Leatherique oil off the seats?
dear todd.im from Columbus,oh too,weather in ohio is BRUTAL as in winter haven,fl..I have a question,i have a new Harley low rider but im buying a new Sportster also for my security job,since vivid black doesn’t cost anything..im going to have a company shrink wrap it in Pittsburgh steeler yellow,or gold..this sportster is a LOW-T1200,it has vinyl bags on it,although I do have a set of Harleys hardbags for it also,but haven’t decided whether to put them on the dyna,both the same really,but HERES my question can the vinyl saddlebags already on the Sportster be SHRINKED WRAPPED same color as the bike??? thank you
Just used the rejuvenator oil on my black Audi 2008 A8 seats. The weather was not hot (60 degrees max) and the sun was not out much, but I still got great results leaving the oil on for about 12 hours. Then I wiped everything down with damp microfiber towels. After a couple of wipes, the seats seemed very clean. Using the pristine clean actually seemed to make the finish more glossy, so I stopped and just used the wet towels to get all the oil off.
If the seats have the finish (flat matte) that I want and seem clean to the touch, I’m I missing anything by skipping the Pristine Clean?
I love this product. However I would recommend NOT using the leather brush as is suggested in this how-to. I went ahead and used it and experienced some small amount of paint coming off my leather seats where some of the creases are on my seats in a car that is no more than five years old. I followed directions to the T. Just stick to using microfiber towels. This has happened two of 3 times I used the brush technique. The spots are small and hardly noticeable. I used a leather dye to cover them up. But my opinion is that the brush is too aggressive. And when I thought about it Leatherique does a good job of bringing the dirt to the surface to clean up easier making it unnecessary to use the brush.
[…] Source: Detailedimage […]
Thanks. Great how to!
[…] (Image credit to: Detailed Image) […]
Wow, I was looking for a more effective product to restore some of my clients beat up leather seats and came across this post. Looks like a lot of work, but the result is worth it. Probably would do in the summer only as time is money, but a great tutorial for a very effective product. Thanks for sharing!
Hi Todd, your article never ceases to amaze me. Everything just too helpful. I’ve heard that some are using baby oils in their car seats but only in leather type. Do you think this is a good idea? Thanks!
Definitely a great post, I look forward to using some of these tips in my process!
Afternoon Todd. I have 1955 Jaguar MKVII, with 24,750 miles on it. Is a survivor. Leather seats are dry from lack of use. (575 miles in 15yrs), I was wondering if I can apply rejuvenator over the period of a week 3 or for times. Or should i Prestine clean each time before applying more rejuvenator ?
I used the products on the grey leather seats in my 1997 BMW 528i. I scrubbed the driver’s seat with a shoe brush and kept seeing more dirt. I realized that it wasn’t dirt that I was rubbing, I was rubbing the grey color off the seat! I have had the seat re-dyed by a professional and it looks good. If I now use the Rejuvenator or Pristine Clean, and do not scrub the seat hard, is there a danger that I may remove the seat dye once again?
Thanks,
Larry
Larry – Leatherique is very mild and all natural, so this would not remove any dyes in your seats. Leatherette seats are very common and a true, real leather seat is hard to find in modern cars. There are some, but these seat types are few and far between. If you have any dye issues and your seats are leatherette, the coating over the top of the seats has been removed in some way.
The seats on my car are leather. The driver’s seat has been re-dyed. My question is: Will Leatherique remove dye (paint) from a leather seat that has been re- dyed?
Thanks,
Larry
Larry – I apologize for any confusion here. The Leatherique products are all natural and should not remove any dye. However, since the seats have been re-dyed there is a chance that even wiping them or using soap and water can remove dyes. I would check with the company that re-dyed the seats to make sure their dying process will stand up to cleaners.
Thanks Reece. i appreciate the information.
Larry
My 1992 Nissan 300azx has gray leather seats, and I am almost certain they have never gotten any maintenance in the car’s life. It was always garaged, but the leather is dry, and kind of hard to the touch. I have used Leatherique before, and decided to give it a try on these poor seats. The reguvenator just soaked in like a sponge, and I went back over these area with more material. I kept it up for three days, and then started the cleaning process with the Pristine. The leather is still stiff to the touch, but I was told that the process will continue to soften the leather over the next few weeks. At that point, I will go through the same process again, and hope that the leather will soften up. The water in the rinse bucket was really dirty, so there was much dirt and grime from the neglect. I hate the thought of having the seats re-covered, but may have to do that. The car is thirty years old and a ‘survivor’, so it should stay as original as possible.