Auto Detailing Guide - Wash & Dry
Why Should You Wash Your Car? (Return to Top)
Washing and drying is the foundation of any detail, whether it's simply maintaining your vehicle with a wash and dry or the start of a long detailing process. It's often overlooked that properly washing and drying your vehicle is the single most important step in any detailing process. This is due to the fact that most imperfections (swirls, scratches, water spots, etc.) are added to your paint during the washing and drying phase. With the proper tools, products and technique, you can easily minimize adding imperfections to your paint. There are various methods you can use to properly wash, which will be explained below in detail.
How Often Should You Wash Your Car? (Return to Top)
We recommend washing once every week or two.
Pre-wash Setup (Return to Top)
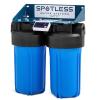
There's a few things you want to do to get setup prior to any wash using a hose as your source of water. Properly preparing everything before you start your wash process will help things go smoother, which can help cut down on the time it takes to wash your vehicle. Being able to properly wash quickly will cut down on the chances of water spots forming on your vehicle, which can require a lot of time and effort to remove. To further eliminate any possibility of adding water spots to your paint, you can invest in a water purifier system, which removes any minerals from your water making it nearly impossible for water spots to form.
Recommended Setup Procedure Prior to Washing
- Step 1: Attach your hose to your water source
- Optional Step: Set up your in-line water purifier for a mineral free wash
- Step 2: Unwind the hose and walk it around your vehicle and ensure you can easily spray and rinse every panel
- Step 3: Attach the shut-off valve to the end of your hose (make sure the valve is closed)
- Step 4: Turn on your water source
- Step 5: Attach your spray nozzle to the shut-off valve coupler
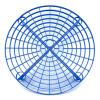
- Step 6: Place the Grit Guard insert or Dirt Lock into your designated rinse bucket
- Step 7: Turn your shut-off valve to open
- Step 8: Fill each bucket up about half way up with water
- Step 9: Soak your wash media in the clean rinse bucket until you are ready to wash
Product Recommendations


Pre-wash Degreasing (Return to Top)
When heavy contamination has built up over time, you may want to utilize a stronger cleaner than just your shampoo, such as a degreaser, to help break up and loosen dirt, tar, sap, bird droppings, and other stubborn forms of contamination. It's usually best to degrease prior to shampooing your vehicle, so that as you shampoo your vehicle, it ensures there is no degreaser remaining on your vehicle. It's important to note that most degreasers will usually remove protective layers of sealant or wax, so use as needed. It's important that you know you'll need to re-apply your coat(s) of protection.
Pre-wash Degreasing How-To
Note: Always read the directions of your product first and follow their recommendations when outlined. Also, check to make sure the product you are using is safe to use on the surface you plan on degreasing.
- Step 1: Choose your desired strength of the degreaser, many products can be diluted, while maintaining effectiveness
- Step 2: Starting with the lower portion of your vehicle working upwards, mist the degreaser onto your vehicle
- Step 3: Let the product dwell on your vehicle (usually 30 seconds - 5 minutes) as it works to break up and loosen the contamination from your vehicle
- Step 4: Choose a wash media to use and soak it in the clean water for a few seconds
- Step 5: Working in small areas, wipe the area you are degreasing with the wash media, using as little pressure as possible
- Step 6: Rinse the wash media in a separate rinse bucket, running your mitt or sponge over the Grit Guard insert or Dirt Lock to release as much contamination as possible
- Step 7: Repeat steps 2 through 6 until each area on your vehicle you degreased has been agitated with the wash media and water
- Step 8: When finished degreasing, clean out your two buckets and fill them up with fresh water
- Step 9: Proceed to wash and dry your vehicle
Product Recommendations

Traditional Two Bucket Wash (Return to Top)
Using the two bucket wash method is one of the safest ways to maintain your vehicle while minimizing the possibility of adding imperfections to the paint. It's very beneficial to master this technique as it can be used in conjunction with various other washing methods, such as washing with a foam gun and using a rinseless shampoo.
Traditional Two Bucket Wash How-To
- Step 1: Follow the Pre-wash Setup Procedure
- Step 2: Pour roughly an ounce (or as directed on the bottle) of shampoo into your non-rinse bucket
- Step 3: Spray the bucket with shampoo to generate some lather and suds
- Step 4: Take your wash mitt or sponge from the rinse bucket, and dunk it into the bucket full of suds
- Step 5: Starting from the top of your vehicle, gently glide your wash mitt / sponge across a section of your vehicle, using little to no added pressure
- Step 6: Clean your wash media in your rinse bucket, running your mitt or sponge over the Grit Guard insert or Dirt Lock to release as much contamination as possible
- Step 7: Repeat steps 4 through 6 until your entire vehicle has been washed
- Step 8: Thoroughly rinse off the suds from your vehicle
- Step 9: Turn the shut-off valve to the off position and remove your spray nozzle
- Step 10: Turn the shut-off valve back on and use the free flowing water to perform the sheeting method
- Step 11: Proceed to drying your vehicle
Product Recommendations
Incorporating a Foam Gun (Return to Top)
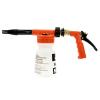
Using a Gilmour Foamaster II Foam Gun in conjunction with your two bucket wash method can further minimize adding imperfections to your paint, as well as add some fun to your wash process. The main benefit is that you can pre-soak your vehicle with shampoo without the need to touch your paint. This allows the surfactants in the shampoo to start lifting contamination from the surface of your vehicle, which can also speed up the wash process.
How-To Wash using a Gilmour Foamaster II Foam Gun
- Step 1: Follow the Pre-wash Setup Procedure, making sure you use the Gilmour nozzle that comes with the Foamaster II
- Step 2: Pour roughly an ounce (or as directed on the bottle) of shampoo into your non-rinse bucket
- Step 3: Spray the bucket with shampoo to generate some lather and suds
- Step 4: Pour the appropriate amount of shampoo into the foam gun reservoir and add water if desired (we like 4 - 6 ounces of shampoo with 4 - 6 ounces of water)
- Step 5: Adjust the dial to the appropriate dilution setting (we like Setting E for maximum suds)
- Step 6: Shake the foam gun tank to mix the shampoo and water, which helps generate more suds
- Step 7: Attach the foam gun tank to the foam gun nozzle
- Step 8: Starting from the top of your vehicle, cover your entire vehicle in suds with the foam gun
- Step 9: Take your wash mitt or sponge from the rinse bucket, and dunk it into the bucket full of suds
- Step 10: Starting from the top of your vehicle, gently glide your wash mitt / sponge across a section of your vehicle, using little to no added pressure
- Step 11: Clean your wash media in your rinse bucket, running your mitt or sponge over the Grit Guard insert or Dirt Lock to release as much contamination as possible
- Step 12: Repeat steps 7 through 9 until your entire vehicle has been washed
- Step 13: Remove the foam gun and thoroughly rinse off the suds from your vehicle
- Step 14: Turn the shut-off valve to the off position and remove your spray nozzle
- Step 15: Turn the shut-off valve back on and use the free flowing water to perform the sheeting method
- Step 16: Proceed to drying your vehicle
Note: There is no one right dilution ratio for a foam gun and any shampoo combination. We recommend you experiment with different ratios to see what you like best. If you provide a richer concentration expect more suds and a slicker surface while washing, but if you want a great value try diluting it more.
Product Recommendations
Sheeting Method (Return to Top)
The sheeting method is a simple process that allows you to dry most of your vehicle without ever needing to touch the paint with a drying towel. The main idea behind the sheeting method is to create a cascading effect where the water flowing onto the car combines with the water already on the surface, pulling it down off of the vehicle. Simple physics states that like particles stick together, which is why this method is so successful. When done properly, especially on a vehicle with a sealant or wax on it, you are left with only a few drops of water on each panel, which can easily be absorbed with your drying towel.
How-To Perform the Sheeting Technique
Note: This should be performed after you vehicle has been properly washed following the recommended steps. Also, make sure your hose is dispensing free flowing water prior to starting.
- Step 1: Starting from the top of your vehicle moving left to right, flood the roof until water is pouring off the edge
- Step 2: Quickly lower the hose a little to "catch" the water falling from the roof, this time moving right to left
- Step 3: Lower the hose again and continue in the opposite direction moving left to right
- Step 4: Continue this technique until you reach the lowest panels of your vehicle
- Step 5: Finish drying your vehicle
Drying Your Vehicle (Return to Top)
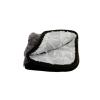
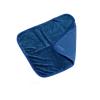
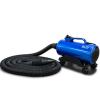
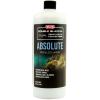
One of the most common mistakes people make when detailing is improperly drying their vehicle. This is often a major cause of adding imperfections to your paint. Before putting a towel to your paint, if you have access to a blower, we recommend blowing out panel gaps, trim pieces, lug nuts, between mirrors and glass, and lights. This helps prevent the continuous drip from these common areas which can be a pain when you are performing other detailing steps. For a drying towel, we highly recommend using a microfiber waffle weave drying towel for removing any water left behind (after performing the sheeting method of course). Waffle weave towels are textured so that it can help pull remaining contamination away from the surface rather than dragging it across the paint like a chamois (such as The Absorber or Shamwow). It's also much softer than a cotton bath towel, and can hold more than 5x it's weight in water.
How-To Properly Dry Your Vehicle
- Step 1: If you haven't already, be sure to perform the sheeting technique to remove a majority of the water
- Step 2: If you have access to a blower, blow out panel gaps, trim pieces, lug nuts, between mirrors and glass, and lights to stop any dripping
- Step 3: Starting from the top of your vehicle working down, blot dry (avoid dragging as much as possible) any remaining drops of water with your waffle weave drying towel.
Note: If you are performing a maintenance wash and don't plan on doing any steps afterwards, we recommend going over your paint with a quick detailer and a plush microfiber towel to remove any tiny droplets of water and to enhance your paints finish. If you are moving on to claying or Polish, a few tiny drops remaining on your vehicle are OK, as the next steps will remove them.
Product Recommendations
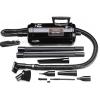

Metro Vacuums Blaster SideKick Blower
Rinseless Wash (Return to Top)
The latest in wash technology allows you to wash your car without the need of a hose for rinsing afterward. You still need water of course, but simply one or two buckets full will do. This allows you to wash your car in your garage, in an apartment complex or condo, or virtually anywhere you can fill up a couple gallons of water. Watch as Optimum No Rinse or a similar product encapsulates dirt and other contamination and lifts it from the surface for safe removal. Keep your car clean and save the environment at the same time with this paint safe, eco-friendly style of washing.
Rinseless Wash How-To
- Step 1: Insert your Grit Guard or Dirt Lock to the bottom of your bucket
- Step 2: Fill your bucket with 3 to 4 gallons of warm water
- Step 3: Pour in 1 oz. of Optimum No Rinse per 2 gallons of water in your bucket
- Step 4: Soak your wash media in the water and ONR solution
- Step 5: Wash the surface using little to no added pressure and allow the ONR to lift contamination off of the surface
- Step 6: Rinse your wash medium and glide it across the Grit Guard or Dirt Lock insert to help release as much contamination as possible
- Step 7: Repeat steps 4 - 6 until your entire vehicle has been washed
- Step 8: Blot dry using waffle weave drying towels
- Step 9: Follow up with your choice of quick detailer and a plush microfiber towel to ensure no streaking or water is left behind
Note: On heavily contaminated vehicles, we recommend pre-treating the panel you are working on with a mixture of ONR in a spray bottle, prior to washing. This will help lift the contamination prior to touching your vehicle, helping minimize adding any imperfections to the paint.
Product Recommendations
Waterless Wash (Return to Top)
This is the perfect step to use a day or two after a wash when there is simply a layer of light dust on your paint. Waterless wash options are simple, quick and effective. These products are like quick detailers, loaded with cleaners and surfactants to help remove light contamination without marring your finish. Our two most popular products are Poorboy's Spray & Wipe and Chemical Guys Go Green! Waterless Wash. They are best used with plush microfiber towels. Please know that this does not replace traditional washes. On heavily contaminated vehicles, you will add marring and swirls to the finish, waterless washes are designed to remove a layer of light dust safely.
Waterless Wash How-To
- Step 1: Mist the waterless wash product onto the surface you are trying to clean
- Step 2: Let product dwell for 30 seconds to a couple of minutes
- Step 3: Using a plush microfiber towel, gently wipe the surface clean
- Step 4: Using a second plush microfiber towel, buff away any streaks
- Step 5: Repeat steps 1 - 4 until the entire vehicle has been cleaned
Note: For added lubricity, you can mist the microfiber towel prior to wiping the dusty surface.
Product Recommendations
Oberk Rinseless Wash
Iron Removers (Return to Top)
Iron removers safely and effectively dissolve iron buildup on the paint or embedded in it. Using an iron remover reduces or eliminates the need for a clay bar. Clay bars can mar the paint and take a lot of time to use, so iron removers are very effective by comparison. Upon completion the paint should be cleaner, thus improving the results of your polishing and protecting steps.
- Step 1: After thoroughly washing the car with a soapy solution, rinse it well so nothing remains on the surface.
- Step 2: Either continually keep the car wet or dry completely before Step 3 so as to avoid water marks.
- Step 3: Spray the iron remover onto the paint surface and wheels then wait a bit, following the instructions of the product. (Some products may vary in wait times, but it's usually a few minutes or less. Most iron removers will show off the iron removal by turning a red or purple color, indicating it's reacting properly and working.)
- Step 4: After waiting the specified time period, rinse off the surface completely and inspect for any remaining iron deposits.
- Step 5: Repeat Step 3 as necessary. Usually on older cars, even when there doesn't look to be any contamination on the surface, spraying an iron remover a second time will show some left over spots.
- Step 6: After doing a final rinse, dry the car in shade as usual and proceed to the next step, whether it be clay bar, polishing or protecting.
Product Recommendations

Facts and Tips (Return to Top)
- Use as little pressure as possible with your wash medium
- Allow the shampoo to do most of the cleaning, not your force
- Using a foam gun to pre-soak your vehicle can help minimize adding imperfections
- It's always best practice to wash and dry in the shade, out of direct sunlight
- Always use two wash buckets, one with shampoo and water, and one with rinse water
- Using a Grit Guard insert or Dirt Lock helps release contamination from your wash mitt
- Use a separate wash media for your wheels and tires, heavy contaminated areas, and lightly contaminated areas
- Pre-treat heavily contaminated areas of your vehicle with a degreaser
- Rinse your wash media as frequently as possible (every panel or so)
- The more contaminated your vehicle is, the more often you should rinse your mitt or sponge
- It's good practice to wash weekly or every two weeks
- Using a shut off valve allows you to quickly remove a hose nozzle without getting wet or running to the water source
- You can use a second Grit Guard insert or Dirt Lock in each bucket with shampoo and water
- Some shampoos can be used to strip off previous coats of protection when used in high concentration
- Using a Grit Guard insert or Dirt Lock helps trap contamination on the bottom of the bucket
- Utilize the sheeting method to remove most of the water from your vehicle
- A waffle weave drying towel is the safest product to use to dry your vehicle
- Instead of wiping with your drying towel, blot the paint to minimize adding imperfections
- Using a blower can help remove water between panels, mirrors, gaps, lug nuts and other hard to reach areas
- Optimum No Rinse is an excellent wash option for people without access to a hose
Related Articles (Return to Top)
Here are a few articles related to Washing & Drying from our Ask-a-Pro Detailer Blog:
- How To Properly Wash and Dry a Car
- Wash and Wx in 60 Minutes Featuring Optimum No Rinse
- Spot Free Washing and Drying With CR Spotless
- My Wash Process for Maintenace Washings
- Winter Washing with Optimum No Rinse (ONR)
- How to Safely Wash You Car in the Winter
- Safely Removing Pollen Will Save Your Paint
- Product Review: Detailed Image Waffle Weave Drying Towel
- The Grit Guard 2x4 Wash Method
- Detailing Car Wash Methods Examined: Traditional Washing
- Car Cleaning - Car Soap Versus Dish Washing Detergent
- Drying Tips for Coated Vehicles
View all Washing & Drying articles
Related Videos (Return to Top)
Ask-a-Pro Blog author James Melfi goes through the proper wash process for washing your car.
What's Next? (Return to Top)
After you've properly washed your vehicle, the next step in the entire detailing process is to clay your paint to remove embedded contamination that was not removed during the wash. If this was simply a maintenance wash, consider adding a coat of sealant or wax, or even use a quick detailer to enhance the gloss and depth.