
Brinkmann MaxFire Dual LED vs Xenon Spotlight
by Ivan RajicI got the idea to write this article after recently speaking with a few detailers around the country and thinking about different light sources for paint inspection. My main intention is to compare the two Brinkmann spotlights that are carried by Detailed Image, which are the MaxFire Marine Dual LED Rechargeable Spotlight and the MaxFire Dual Xenon Swirl Finder Spotlight, and explain why both of them should be in any detailer’s arsenal of tools. For more thorough information in general on using light to find defects during paint correction work, I would highly recommend reading the article by Marc Harris and Jacob Bunyan on Using Handheld Lights for Paint Inspection: Brinkmann LED vs. Xenon. They touch on the subject of light more so than simply comparing these two lights, so it has great info on how and why we’re able to see the defects in paint and eventually correct them. In any case, onto my piece of writing here…
As I said above, I mainly wanted to compare the two lights by Brinkmann as I have been using both for a very long time and find a need to have both in order to cover every vehicle I receive for paint correction. I’d like to start off this comparison by quoting something from Marc and Jacob’s article:
The different types of light will highlight scratches in different ways. We’re not sure it has anything to do with the light’s wavelength, but the LED flashlights seem to work better for finding slighter scratches, like machine trails, holograms, marring, etc. The Xenon flashlight seems to be better suited at finding heavy swirls and Random Isolated Deep Scratches. The biggest difference between the two off the bat, is that the Xenon flashlight is easier to look at when inspecting due to its reduced light output (lower lumen rating) and its wider light spectrum. You’ll be able to look straight into the reflection of the light much easier under normal conditions (the best way to visually locate RIDS). The defects show up in more vivid color as the Xenon’s light shifts off the defect’s edges. The LED’s light, being more blue, shows less detail in its reveal of defects, and the color is much more intense to the eyes. All defects look more or less the same white-washed color. The LED’s output means you can’t hold it as perpendicular to the surface as the Xenon with the same comfort, but it does great to highlight trail-marks and holograms by reflecting it at a lower angle.
The reason I’m quoting this is because I wanted to elaborate on exactly what’s written in the paragraph above regarding the two lights. That said, here is the information and comparison from my experience with the two Brinkmanns.
Brinkmann MaxFire Dual Xenon Swirl Finder Spotlight
The xenon light is where it all started. I purchased this light years ago when I first started detailing work and it has been an important tool ever since. While I have tried many other lights, such as small flashlights (both xenon and LED) and larger work lights, I have yet to find something that can fully replace the Brinkmann light. Work lights are great for additional light when working in a darker setting and smaller flashlights are easier to carry around, but the size of the Brinkmann, rechargeable batteries and pistol grip make it THE light to have for inspecting paint condition. I have many times corrected a car in less than perfect lighting conditions, but having a Brinkmann spotlight made it easy to check my work and do a great job.
Brinkmann MaxFire Marine Dual LED Rechargeable Spotlight
The LED spotlight is what I have been using for a majority of the work since I came across it roughly 3-4 years ago. This LED version is the exact same size as the xenon so I immediately liked it for that reason, but soon after I started using it I liked it even better because it provides more light and shows most defects easier. Also, due to it being LED, the battery life is a lot better than the xenon. A full charge usually lasts me well over a week, whereas I normally have to recharge the xenon every few days. Here are a few photos to show the comparison between the two, which are mainly the visibly different bulbs and colors of certain parts. Aside from that, the two lights look and function exactly the same way. I guess it’s worth noting that the chargers are not interchangeable between the two, even though the charging ports and chargers look exactly the same, making it easy to confuse them.

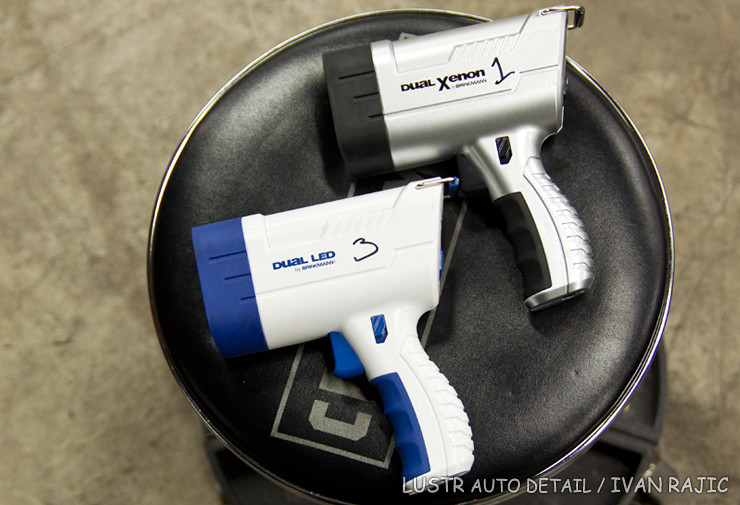
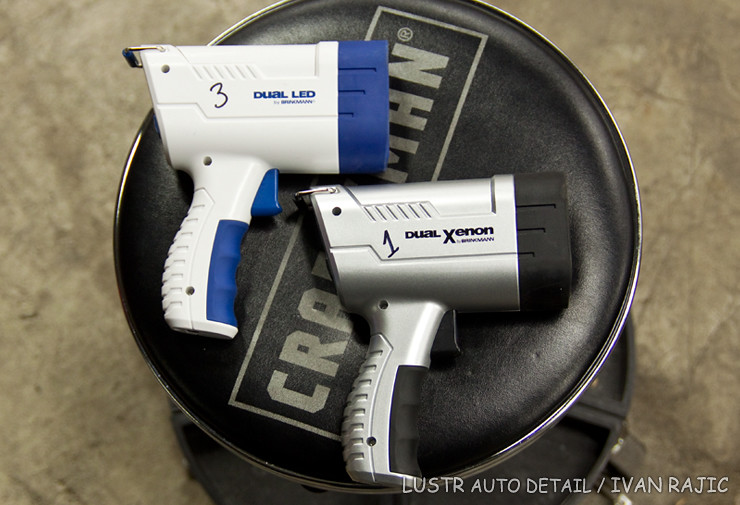
As you can see, I am meticulous enough to number all of the lights just to roughly see how long each lasts and what kind of abuse it gets put through :). Not clearly pictured is the charging port, which is located at the bottom of the handle. If dropped often enough, on hard enough of a surface and from high enough, you might have to improvise as I did and end up with the following…
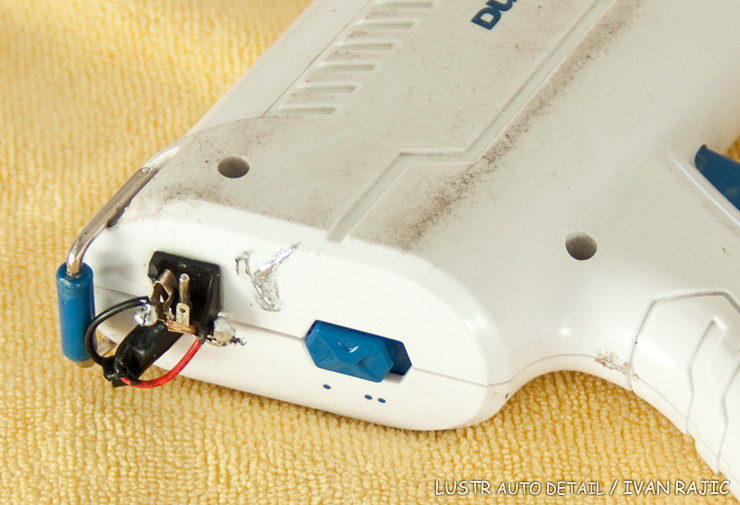
This is a partial look at my first LED Brinkmann, which is roughly 3 years old as I stated above. As you can tell, it’s been through quite a bit but still functions perfectly well. A drop from a ladder onto concrete caused the charging port to break, so I had to fix it up by drilling a hole for the wires, gluing the part to the back of the spotlight and then soldering the wires to the charger. I decided to use that spot because it was one where I was least likely to touch and damage my “fix”. And no, I don’t want to hear any comments about my soldering abilities :).
Well, onto the main part…
Xenon vs LED for paint inspection
This mainly consists of some photos with which I wanted to show why I have both lights and the purpose each light serves during paint inspection. The main point I wanted to convey is that the LED light serves a better purpose for me when inspecting any sort of paint except white and some greys. Reason being, not only is the LED Brinkmann stronger in terms of light output in the center beam, but all that light shoots out into a wider beam which helps spot some of the micro marring or swirling in areas outside the exact spot where the light is pointed. The xenon actually has a wider beam due to the nature of the light, but because it is so weak towards the circumference of the beam of light, it’s hardly noticeable at all on paint. On the other hand, as stated above, the LED may have a narrower beam of light, but it’s more usable because it is so strong. Before I start confusing even myself, I think it’s best I show the photos to explain exactly what I’m talking about.
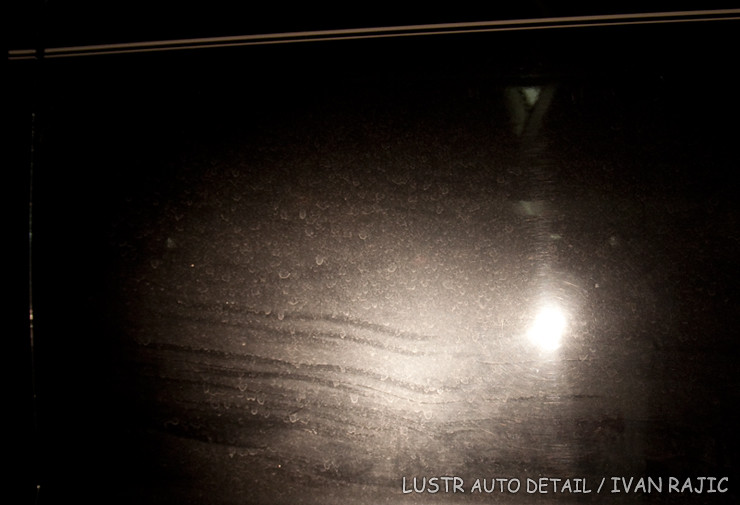
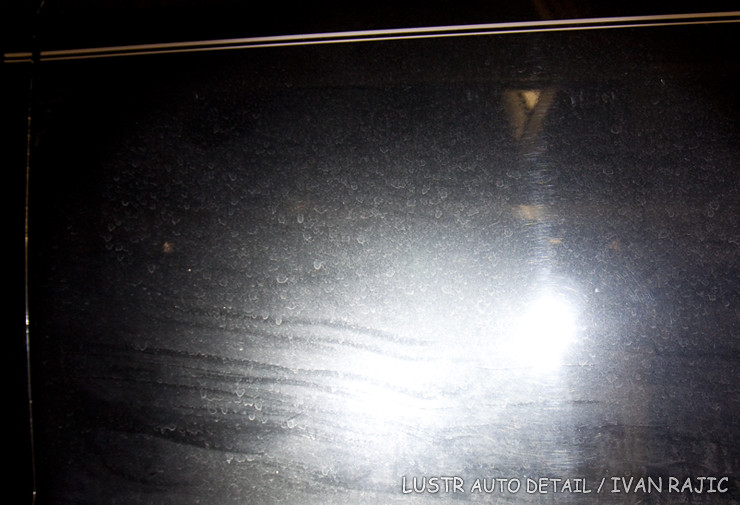
All the photos below were taken with the exact same light settings and from the same spot on a tripod, so it should allow for an easy show and tell on why the LED light serves a better purpose overall. I set the lights in the exact same spot on a work chair so all the photos should show a consistently pointed beam, which is off center so as to make everything easier to see. The first photo in all the pairs below will be the Xenon Spotlight, followed by the LED Spotlight.
This first pair of photos was taken with a shutter speed of 1/8, which was the fastest of the three taken for comparison on this black paint. Just to state for all those that get confused with shutter speeds as much as I do, the quicker the speed the less light the camera will see :). With that, onto the first pair…
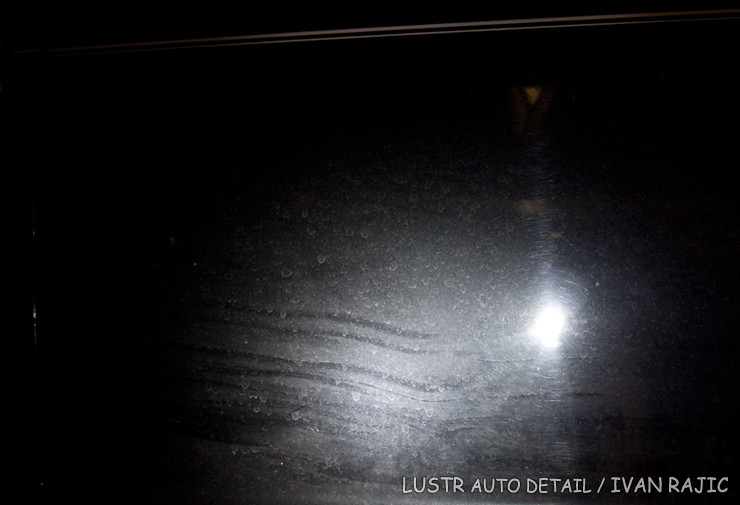
If you look at the center of the light reflection and follow the swirl marks up to the triangle straight above, you’ll notice how much more of those become apparent when using the LED light compared to the xenon. When looking closely at the xenon photo, the swirl marks are only visible until a little more than halfway going from the light to the triangle, whereas with the LED, you can make out light swirling all the way up at the triangle itself…
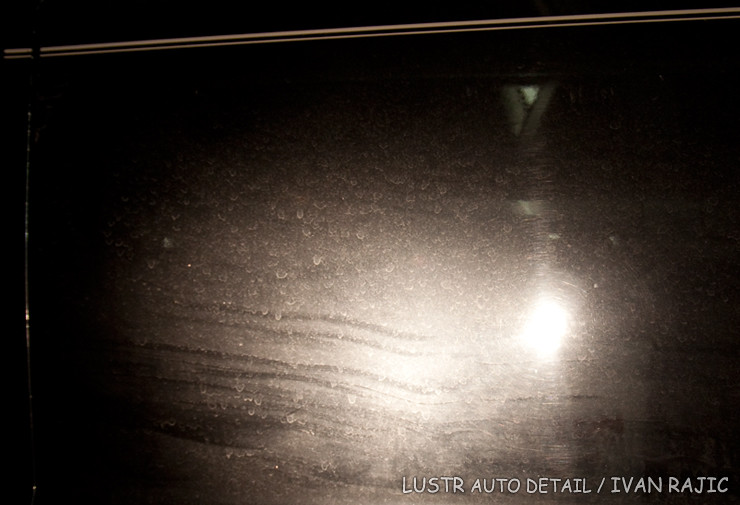
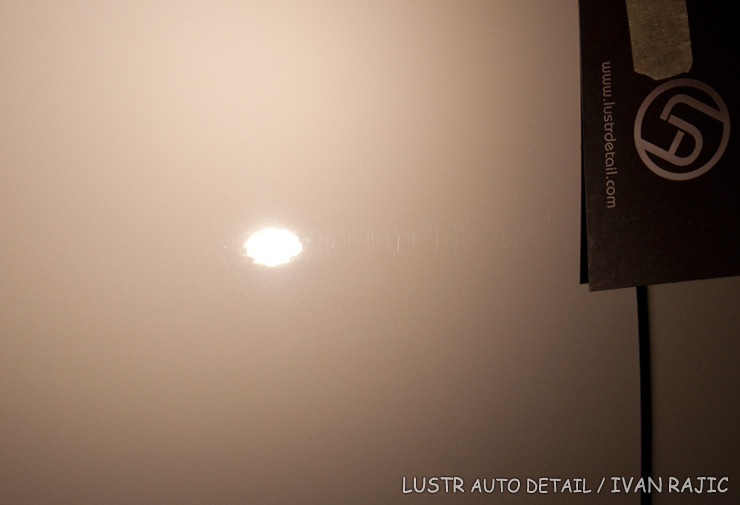
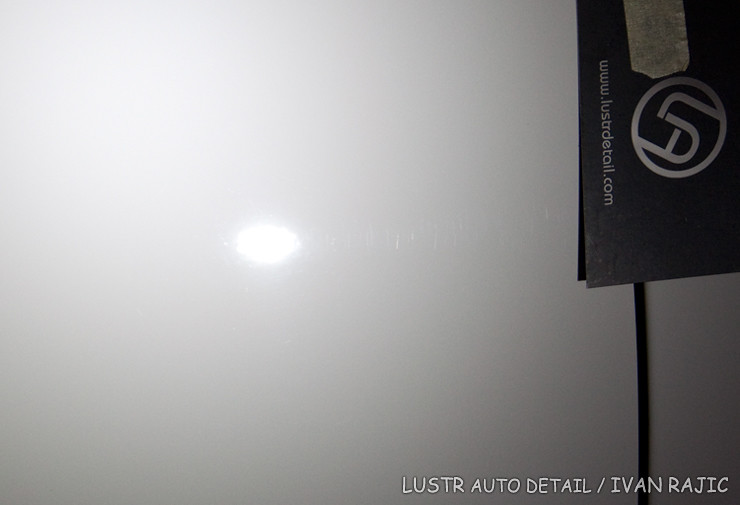
This next pair was taken at shutter speed of 1/3, so a bit more light will be visible in the photos.
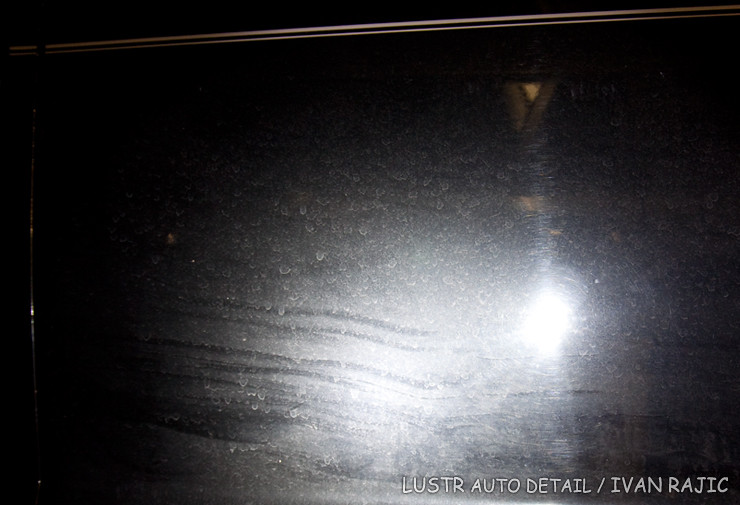
Regardless, it’s the same exact scenario as with the first pair of photos, except with more light showing. The xenon photo obviously shows more swirling than the xenon photo from the first pair at 1/8 shutter speed, but we still can’t make out any clear swirl marks at the triangle in the photo. However, the LED light now easily shows swirl marks around the triangle area and increases the visibility of the other swirl marks around the light reflection. On a side note, I have absolutely no idea what that triangle is and I didn’t plan for it to be in the photos, but was extremely happy when I saw it on my laptop as I knew it’ll be a great point of reference :).
This final pair of photos was taken at a shutter speed of 1/2.
Here we see the xenon light start to reveal swirl marks up around the triangle, but at the same time, the LED light has easily shown us the lighter swirl marks even above the triangle and up near the stripe on the door. So it’s fairly obvious how the LED light is just simply better at providing more direct light to allow us to easily see swirl marks regardless of whether we’re looking straight at the reflection of the light or further away from it. However, one thing worth noting here is how the reflection of the actual light has changed. As you can clearly see, the area right around the reflection is fairly washed out with light in the LED photo, but is still clear in the xenon section. You can even compare the LED photo from pair 2 above and the xenon photo from this pair 3 and see how they look extremely similar in light output and revealing swirl marks, showing how much more powerful the LED is because those two photos have a difference in shutter speed. Now this is easily fixed by moving the LED spotlight so that it points a bit more away from the center of the reflection, thus giving your eyes some relief from the amount of light they see and allowing you to see the actual swirls right around the light reflection. This is actually more important for the next and final section of this comparison, using the spotlights on white paint.
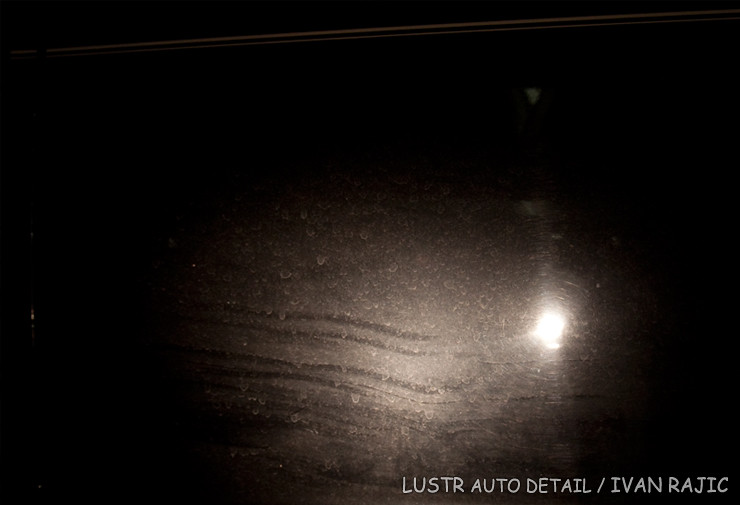
Speaking of white paint, here are some photos of white paint. By the way, the business card isn’t there for advertising purposes, rather a focusing tool on white paint :).
The first photo shows the reflection of the xenon spotlight on the door edge of a white Porsche Boxster. The second photo is the LED. These two photos were actually taken with different camera settings. In order to capture the swirl marks shown by the LED light, I took that photo with a shutter speed of 1/100, while the xenon photo was taken with 1/50. So, as you can imagine, if I took the LED photo at the same 1/50 as I did the xenon, the white paint would be almost completely washed out, making the swirl marks that much harder to see. Even with the quicker shutter speed, we can still easily see how the LED light washes out the white paint more and makes us look a bit harder to see the swirl marks. I didn’t do any color correction to the photos to show how different the light looks reflecting off the white paint. These two photos show why the xenon light is still one to have around and comes into play when working with lighter colors, especially white.
In Conclusion
As I said toward the beginning, both of these lights are great tools and must have to inspect all different types and colors of paint. The photos of black paint above showcase the MaxFire Marine Dual LED Rechargeable Spotlight because it provides more concentrated light, making not only the deeper swirl marks in direct reflection visible, but allowing us to see easier the lighter marring further away. Conversely, the photos of the white Porsche paint above show why the MaxFire Dual Xenon Swirl Finder Spotlight is a very important tool to have around and use for inspecting lighter color paints. For those of you wondering, I left the black car above dirty on purpose in order to try and show how even through the fairly thick layer of dust and grime, you can still easily make out the difference between the two lights. Both are very durable, functional and valuable tools that are very hard to compete with for paint inspection. The fact that they’re rechargeable makes them that much better of a product as compared to any battery powered flashlights and I highly recommend both of these Brinkmann products to anyone seriously considering paint inspection and correction.
Well as always, I hope this article was helpful and thank you very much for reading!


Thank you for the detailed review.If you could only have one,would you chose the LED ?
Thanks again for the excellent review.
Bob
Bob I would definitely choose the LED if I could only have one of the Brinkmann lights.
To take it further, if you owned a silver car, but did some work for few friends on a side would you still get the LED?
I’d surely choose the LED over the Xenon if I had to choose one.
Great review, Ivan !
Working with the two, the LED and the Xenon, I prefer to have both on hand since they reveal different levels of swirls in varying paint colors and metallics. I work outside a lot, as most mobile detailers do, but I also have a 5000 lumen LED on a stand that’s incredibly bright but doesn’t work well in sunlight. Go figure…
I happen to prefer the Xenon for the most revealing of all depths of paint swirls.
Thanks Sean, I appreciate it. I know of a few other detailers that prefer the Xenon over the LED, so obviously to each their own. As I said in the article, I surely appreciate having both lights and like using both, but if it came to it I’d have to choose the LED just because of it’s versatility.
Ivan, I completely agree with you. It’s about seeing the light refection in your own environment and to your eye.
Without a light system it’s impossible to turn out solid paint work.
Great article !
thanks for all the great info!
My husband has a LEDXENON light but it doesn`t charge when I plug it.
Could you tell me what the problem is? He loves this light.
He’ll have to disassemble it and see what’s going on. For me when that happened to a few lights it was either the battery wouldn’t charge (in this case though the light usually comes on) or there’s an issue with the wiring or charging port (mine broke a couple times).