
3 Dual Action (DA) Polishing Tips: From Newbie to Pro
by Nick Whitaker
If you are picking up a DA (dual action) polisher for the first time you have likely been to YouTube to watch a few tutorials or have spent some time scouring the internet on how exactly you should use this awesome tool.
It is likely you have found the common tips about keeping the pad flat while polishing, amount of pressure applied while polishing, etc. etc. Those are the basics. What I want to help you with comes after your first internet search and initial attempt at running the polisher. These are things I wish I knew when I got started.
The 3 tips are aimed to do two things: First and foremost they will help you achieve better results. And, secondly, they will keep you from looking and feeling like a newbie by improving your form. When I say “feeling”, those of you that have completed your first vehicle know what I mean. Everything and I mean everything hurts. I don’t care if you are 20 years old with the body of a Greek god, you are going to hurt. Shoulders, back, legs, you name it. The pros have figured out the best ways to tackle running a DA polisher on a daily basis without making the jumbo bottle of Ibuprofen a regular purchase.
Time to level up your polishing skills from newbie to pro!
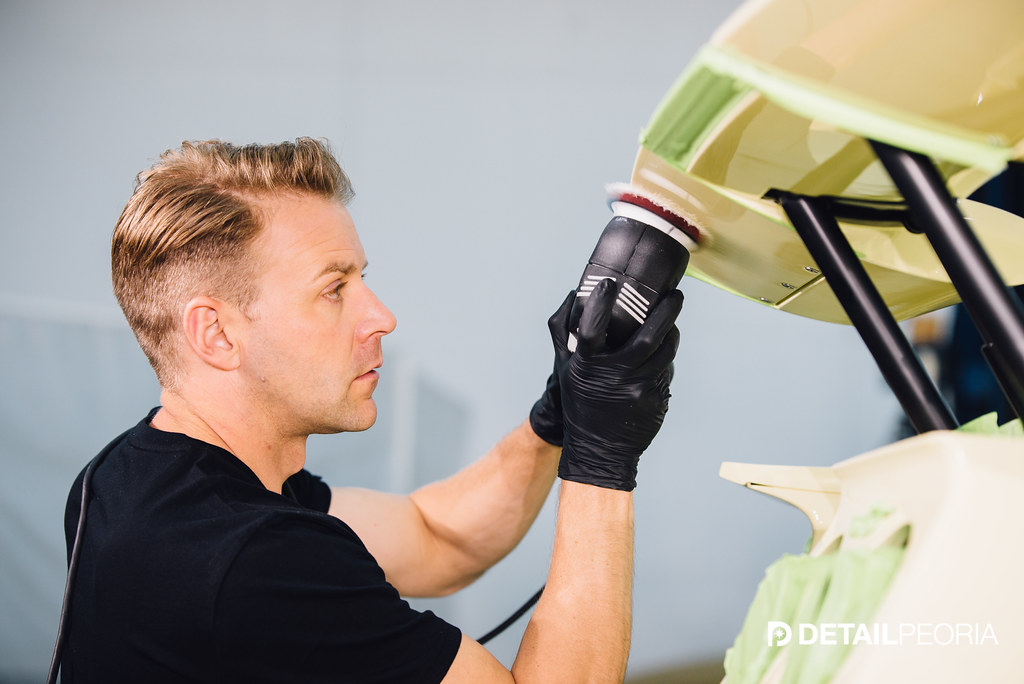
1. Get Close!
Whether I am training a new team member or helping a friend polish their vehicle for the first time, this critical error is a dead giveaway for a newbie. Not only will this tip drastically improve the end result of your polishing it will also cure fatigue and pain in your shoulders. If you were to only take one thing away from this, take this concept: You cannot be too close to the polisher! Get in there! You need to have your face looking across the area that you are polishing. Have your elbows bent rather than an extended and locked position. Also, work with the machine not too far above or below your shoulder line as often as possible. These simple adjustments will give you the ability to work into tighter areas, produce a better product since you have a better view of what you are working on, and reduce fatigue and pain in a major way.
2. Plan Your Attack
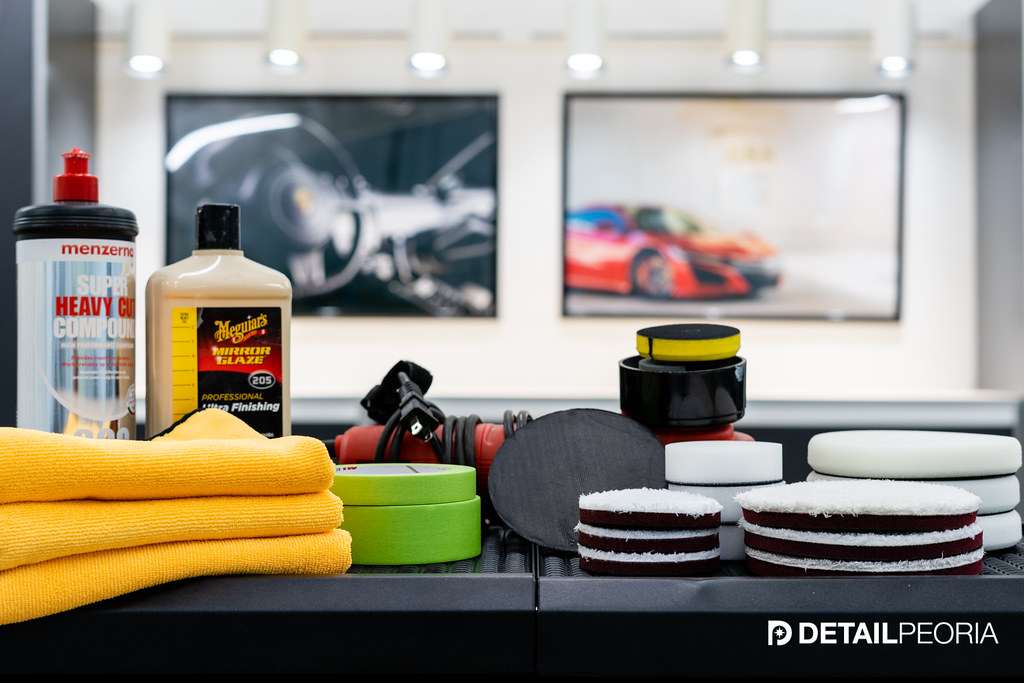
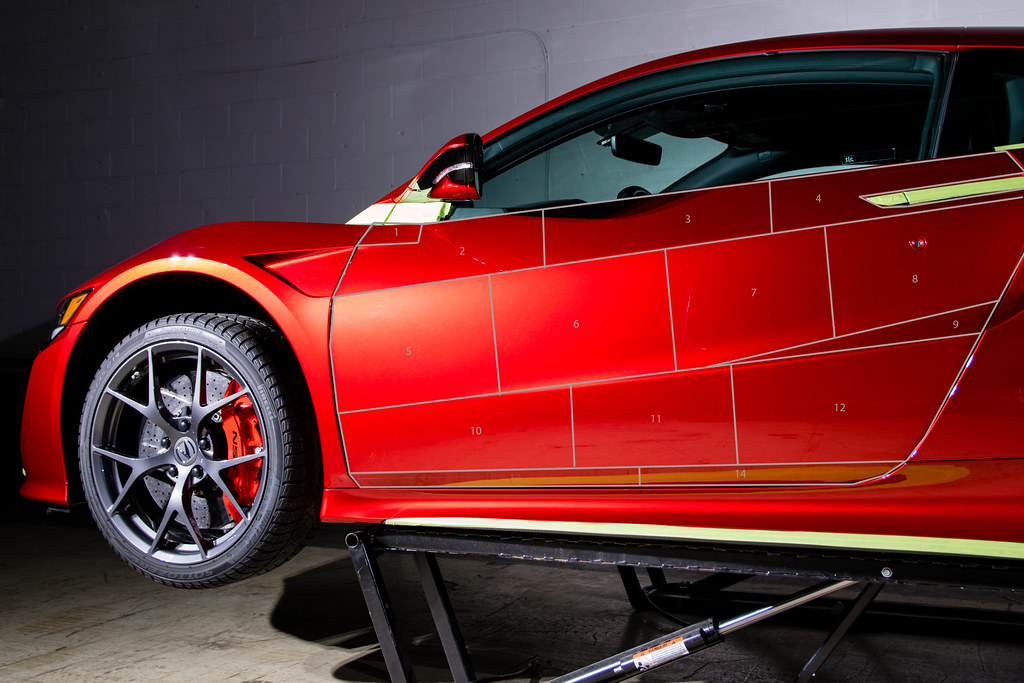
When you are getting ready to tackle a new project it pays to plan! Planning should consist of a few things that relate to getting better results and avoiding pain. Firstly, you need to know what pad, product, machine speed, and pressure to apply. That is best accomplished by a series of test spots. Zach McGovern, fellow Ask-A-Pro contributor, has an excellent write up that you can find by clicking here.
Next, get yourself setup to work. If you are like me, you will want to put your head down and do some serious polishing without taking extended breaks too often. So, setup is important. Have your tools ready to go. A quick inventory of pads, compounds and polishes, pad cleaning tools, tape, lights, and towels on hand near your working area is an excellent start.
Lastly, start breaking down by panel how you plan polish. After completing the test section you now are ready to work. So, you should be able to break down how many sections each panel has. I always recommend working into the tighter areas, such as around handles, moldings, and emblems first. This is a term detailers commonly refer to as “cutting in”. Then work your way to the large, flat areas of each panel. By cutting in the tighter areas first you give yourself the best opportunity to achieve a nice tight finish without having to redo work that was done with a larger pad.
3. Have the Right Tool for the Job
Taking your polishing game from newbie to proficiency has very little to do with the equipment, yet it has everything to do with the equipment. What do I mean by that? Simply put, you need the basics, but not the holy grail to produce great results. The basics need to incorporate some versatility as opposed to having a number of polishers. Let’s break this down…
So, beginning with polishers, have you ever needed to unscrew a phillips head screw, but only had access to a flathead screwdriver? I think we have all been there. You can get the job done, but no matter how awesome that flathead screwdriver is, it cannot do the job as well as the phillips head screwdriver. In a situation of having different types of screws you really want a screwdriver with the interchangeable screwdriver bits.
When you set out to buy a polisher there will be a temptation to buy a top of the line polisher right off the bat. I get it… But, that is not necessary and those top of the line polishers lack some of the adaptability that a more basic DA polisher has. A great place to get started is with a polisher such as the Griots 6″ DA polisher. No, it does not have the same throw or power as some of the top of the line models, but it absolutely can deliver the same results. And… It has more versatility. With this type of polisher you have the ability to swap the backing plate from a 6″ to a 5″ or even a 3″. This added adaptability now gives you the ability to work into those tighter areas such as panel contours and around tight areas like handles and moldings. Spend the money on the backing plate and associated pads before you go out to buy a slew of polishers.
When it comes to pads make sure you order enough. Here is why, if you do not have a clean pad you will be spending more time and getting average results. These pads are not designed to work with excess product left in the pad or the actual paint or clearcoat that has been transferred from the vehicle to the pad. After each section, you polish it is important to clean the pad. You may find this article helpful from fellow Ask-A-Pro contributor, Ivan Rajic, which highlights how to clean the pad with a brush. Click here to give it a read!
You will find that pads will need to be swapped out for clean pads to maintain the results achieved in your test section as you progress around the vehicle. So, it would make sense to have at least 4-5 of each type of pad you plan to use to ensure you can polish without the delay of cleaning and drying each pad.
The moral of the story, when it comes to DA equipment, is making sure you have the right tools to get started. It doesn’t need to be the best, but it needs to be versatile enough to do the job right. By having the right tools, rather than the most expensive tools you are going to save time not polishing areas more than once. Once you reach across to polish that massive hood on your vehicle to polish the same section twice, you will understand what I mean. It is not the best feeling when your shoulders and lower back are burning, because you didn’t swap out for a clean pad or the smaller 3″ backing plate to work the polisher in close to a body line. Be prepared with the right tools to achieve the best results and save yourself the pain and frustration, like trying to use a flathead screwdriver when you need a phillips head screwdriver instead.
Going from novice to proficient with a DA polisher can take some practice, but keep these three tips in mind. They will help you achieve better results and take you from looking and feeling like a newbie to someone that is confident in their abilities.


And that is how you make a solid intro to the Blog 🙂 Nice article, Nick!
Great article!
Very good tips!
Great tips- thank you! This is what I needed to better plan. My big takeaway is to use fresh pads on the hard to reach areas to minimize time in an uncomfortable position. Also, it’s worth the extra 10 minutes to put the car up on jack stands to make the sides easier. Lastly, I think the additional benefit of cutting in first beside the better blending is getting the tedious and finicky parts out of the way while you’re fresh. Kind of like eating veggies before steak.
Way to set the bar high with your first post!
I think you hit the nail on the head Kevin! If you put yourself in a position to be comfortable, with a planned attack the job becomes far more enjoyable.
-All the best!
Very nice tips….I’m agree with all specially the part of back and shoulders pain !!
Good article with great tips! This detailing newbie and fellow Illinoisan thanks you!
Hi Nick,
What is the best way to tell if you have soft or hard pait and or clearcoat?
Thanks Rick
Rick, Todd Cooperider wrote a nice, short article on this in the Ask-A-Pro blog. Check it out: https://www.detailedimage.com/Ask-a-Pro/hard-paint-and-soft-paint-what-are-your-polishing-choices/
There needs to be a bucket full of water and pad cleaner ready to take those used pads as soon as they are changed out, to make the final cleaning of the used pads easier and faster..
Foam pads especially need 24+ hours to dry, sometimes more, depending on your ambient temps, how you set them out to dry and any air blowing across them, etc..
A really good pad cleaner that I have used since I discovered it here over 10 years ago is Snappy Clean,which happens to be made by Lake Country, the same people who make those great foam pads..
Nice additional tips Dan! Thanks!
Very nice write up!, this should help a lot of new guys out that are looking to get into the polishing side of detailing.
I’m going to be polishing my car for the first time. I’m going to use a Shurhold DA. My question is, after I clay my vehicle can I use 3D One and 3D HD Poxy together
Good article, I would add that you need good light. A nice color match headlamp at minimum like the I-view. Regular room light is not enough. You can’t even tell if all the polish is removed under normal lighting.