Window Etching & Stain Removal | Getting the Most Out of Your Meguiar’s Cutting Discs
by Brian GuyHey Everyone!
Does anyone have a problem tossing old pads? The ones that are borderline ready to be trashed and could also get another use? They begin to stack up over time and find their way to the back of the shelf, waiting for one last go.
I’ll eventually find use for them! I recently have found two uses that worked out very well for me and also which got me thinking about this. Not only thinking about this, but I also felt better when it was time to toss them. Knowing I got full use of my Meguiar’s Cutting Discs!
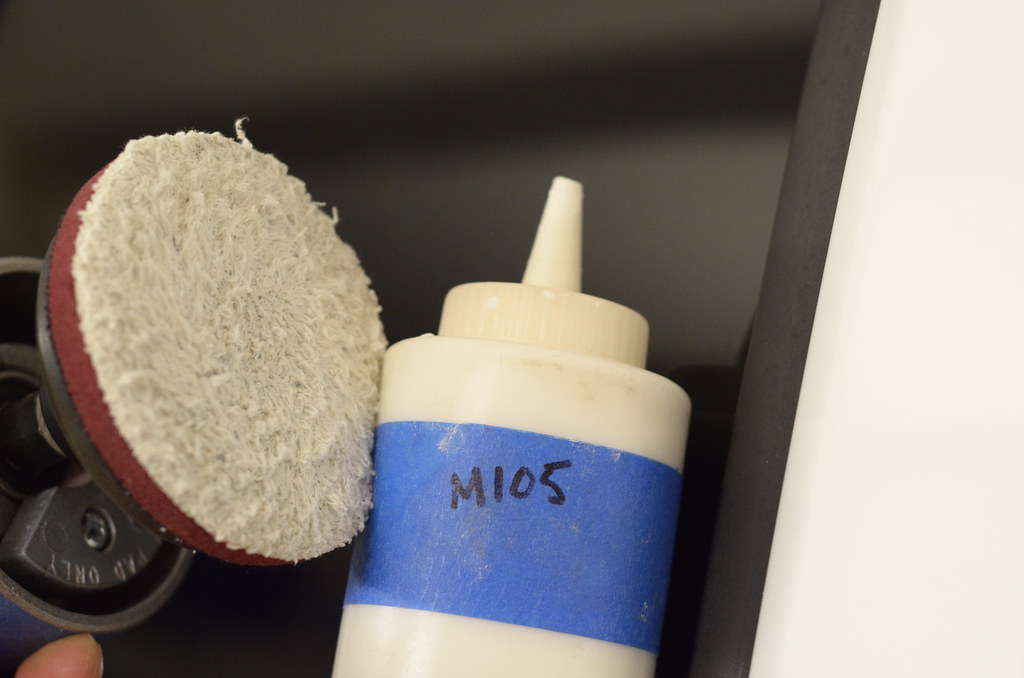
So one of the great uses for an old worn cutting disc is window cleaning. Great for the removal of water stains and hard water etching. These are great pads to remove the minerals that build up. If I was to use a brand new pad for example, I would be pretty hesitant (even after cleaning it) to use it again on paint. Being that the sole purpose of the Cutting Disc is designed for paint, I would be hesitant because the amount of calcium, iron etc. would be pretty imbedded into the fibers of the pad after use on windows. So, I reach to the back of the shelf and find a few that have seen better days!

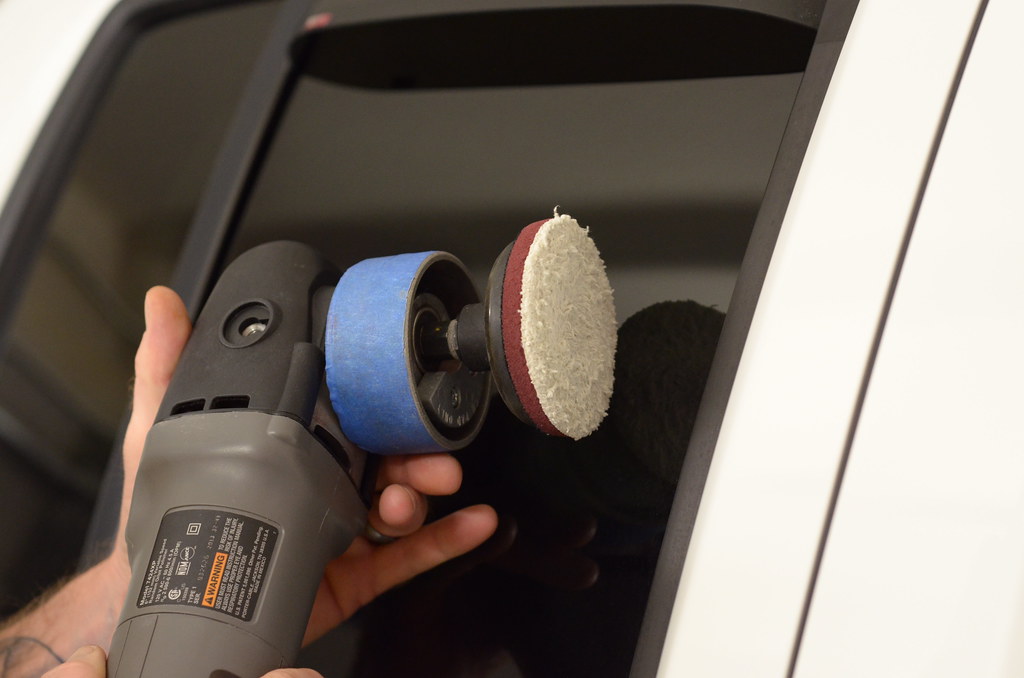
This picture above shows a pad that the micro-fibers have been worn thin. Along with one of my methods of action against window stains (Porter Cable, Cutting Disc and M105). This combo is very effective and works great. The windows should be cleaned (IPA several times) very well followed up with your choice of glass protection, otherwise it’s not worth the effort if not protected afterwards.
An old Meguiar’s Cutting disc will do a great job on the windows. The only down side is being able to get into the corners. The corners and some edges I usually follow up by hand with an all purpose microfiber towel and the same liquid source (M105 in this example) for all corners and edges.
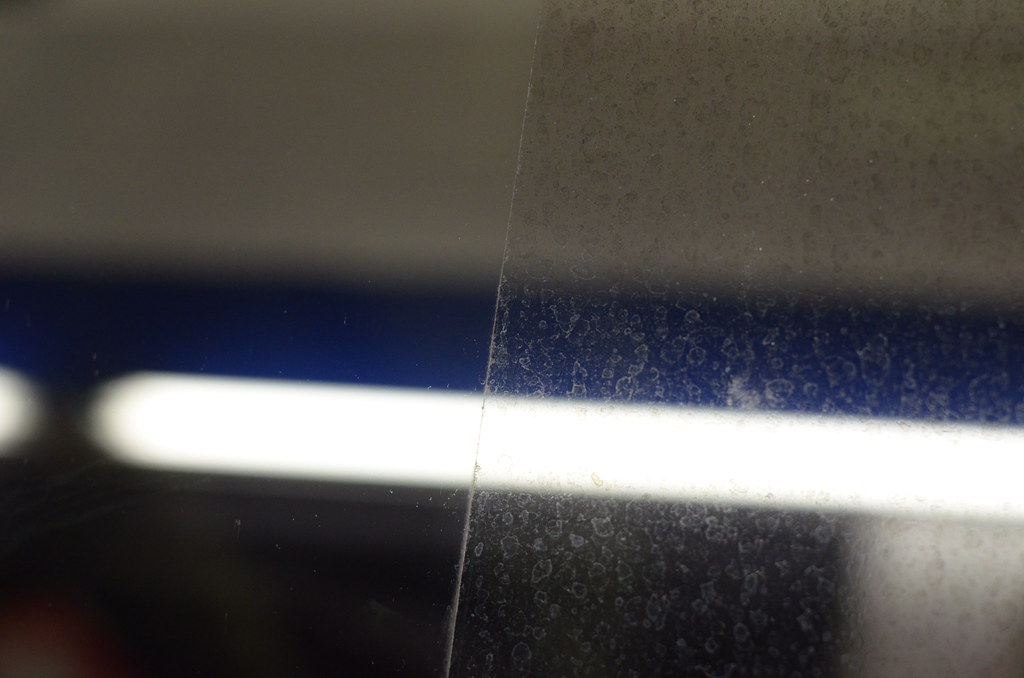
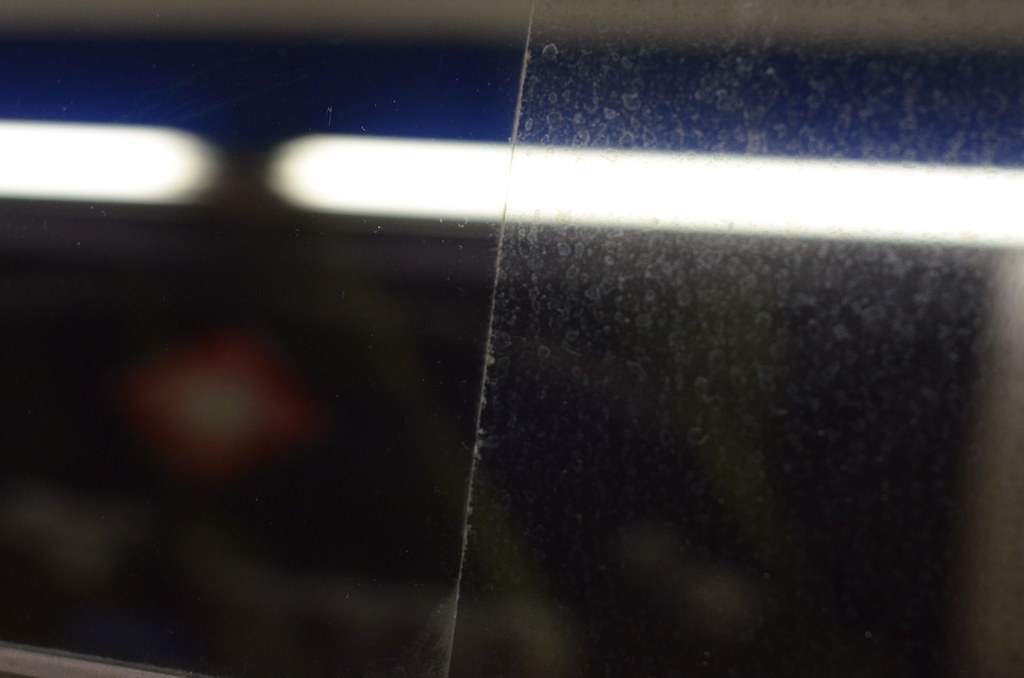
Something that I see a lot of car windows suffer from here in FL is caused by sprinklers. Much like the Nissan windows in this documentation, they were horrible! Subjected to sprinklers for some time and mostly on the passenger side with this particular vehicle (routine parking in the same area). Irrigation systems are full of iron for the most part, whats coming out of there is good for our grass, not our vehicles. Iron and calcium builds up and is a very hard mineral. Once those minerals get into our Meg’s cutting pads they cause the fibers to become very stiff and tied together. This is very difficult to clean thoroughly if using a brand new disc.
An old medium or heavy cut foam pad may be just as effective. Although I personally would still refrain from using them again on paint after touching a heavy stained window.


As you can see! This is one effective way of cleaning glass and getting the most of your DA Meguiar’s Microfiber Cutting Discs. After a glass treatment like this I have no problem playing Frisbee golf with the trash can and a old pad! Feels good to know I took it for all it was worth and got an over expected use of a great pad.
Pad cycling! Hope you enjoyed! Feel free to share your way of cleaning glass with heavy hard water stains! I’ve seen so many great ways of this done by others and have tried many myself. But I’m very particular about keeping my pads separate for their time and use!
Thanks for reading! Lets fill this area below up with some other great ways of cleaning glass!
Buy Products From This Article
Purchase the products used in this article individually or in one convenient package here!


Thanks for sharing Brian. Definitely a great idea. What do you recommend following up with after you do this? Anything in particular that won’t leave a hazy film over the glass? Thanks again!
Thanks Mo!
Following up with Gtechniq’s G1 and G2 Smart Glass or Rain X would help keep the windows in better condition and would be a ideal for protecting the work that was just done. Neither of these two window protectants will leave a haze behind.
Great post Brian! Would this technique be applicable with foam pads? I don’t use microfiber pads but would like to achieve these results.
Mark, absolutely! Foam pads can be just as effective.
If the window is really bad, like this one was… And I only had access to foam pads, I would use a tough cutting pad. DI’s yellow pad for example. I like the 3″ pads for this because I feel more comfortable getting closer to the edges and trim.
Thanks for the tip!
Thanks for checking the article out Kris!
Nice work would this work on a side mirror a friend of mine has a 3 series with realy bad water marks i obviously know it will work on glasss but i dont know how it will work on a side mirror and i dont want to touch it hes tried lot of otc products with no luck its a tight area so i would have to use a rotary and 3 inch pad
FELIX,
Thank You!
I would not use any machine on the side mirrors. Unfortunately doing it by hand would be my recommendation for them.
Great post Brian, I will be trying this.
Thank You Bruce!
Keep us posted as to how it works out for you! Would love to hear!
I recently purchased a used Toyota 4Runner in Natural White. The glass is etched big time like your picture shows. I will give your suggestion a shot and hopefully it works. My issue is I have the same exact water spots on the doors of the vehicle. I used the yellow cutting pad with Blackfire SRC compound and Mequiars Ultimate Compound. I was able to get the heavy oxidation but the water stains are still very visible. I am at a loss here! Any ideas or thoughts?
Thanks so much.
Steven,
Congrats on the new purchase!
Your paint is defiantly going to be effected differently than the glass would as far as mineral deposits.
I would recommend switching to the Megs Cutting Disc & M105 for the paint. You should have some luck as far as the side door panels and quarters. If it’s etched heavily on the roof, hood and truck… I would just shoot for a better result. Not necessarily perfection.
About a year ago I had a Mazda RX8 come in for questioning about the etching in the roof. (Your Toyota has similar paint) I had to explain to them that complete removal of the etching would put the roof in a “very high level maintenance bracket” for as long as they have the car, they would have to baby that roof. (coating it would have been highly recommended if it was done) Giving the paint measurements on such vehicle paint (which is very thin) It is very difficult to completely remove. I would love to say, “here is what to do” and the problem be solved. However, each case may be different. Japanese paint can be kinda tricky, and most do have some sort of etching within horizontal panels. (horizontal panels will suffer worse due to gravity) After speaking with this customer in person and he got to see the measurements and what the process would have consisted of… He said something I will never forget.
He said, “I came in thinking I had a cavity and found out I needed a root canal”
Such was the case and how very true…. We ended up just going with a Better Result and not seek perfection out of it. (as far as the etching) Most of the time a better result will be rid of it under the natural sun… but not under the garage lights.
You’re more than welcome to give me a call or trade emails with some photos etc… That would help give me a better understanding as to how bad it may be. And what would be my best recommendation.
Kindly,
Brian
Thanks Brian. I will send you some photos and see what you think. I wish Atlanta was closer to Orlando!
My windshield has swirl marks/spiderwebbing. Would you recommend doing the same thing you did for the window etching to get out the spiderwebbing? Or do you recommend something else?
Brian guy, if you dont mind I have a follow up to steven’s question about water staining on paint..
Meguiars makes a new water spot remover for all hard exterior surfaces including clear coat. Its an abrasive and chemical cleaning product. And it works wonders !!! It goes about removing hard water spots differently than a standard paint leveling compound. The chemicals cleaners break down minerals while the abrasives go to work to level the area the water spot has etched the paint.
http://www.meguiars.com/en/automotive/products/a3714-water-spot-remover/
I recently put this product to work. I had some nasty hard water spots on my coated vehicle (opti-coat) that were seriously set into the surface. So much so that my only option was to mechanically remove them along with the coating on all my horizontal panels. I started with a simple finishing polish thinking I would easily remove them while preserving the coating. This step had zero effect on the water spots. So I stepped up along the way, all the way up to M105 on a light cutting pad. M105 removed all the light washing defects that I had along with the majority of the opt-coat (no beading or sheeting after cutting the paint), but skimmed right over the water spots, effectively doing nothing to put a dent in them. At a loss, I tried a few chemical spray on water spot removers (duragloss), and again, no effect on the water spots. So I decided to live with them, thinking they may need to be wetsanded. Something I was going to source out to a professional as I am not confident wetsanding my factory clear.
Along the way, I saw this product in Walmart and decided to give it a try. I tested it out by hand on some of the tiny water spots on my rear wing ( wing always gets polished by hand due to the concave nature), and to my suprise I was able to remove them on the third or fourth application, completely. Checking to make sure I wasn’t just covering them up. I had to use an aggressive MF pad and a lot of pressure though. So I went ahead and used a light cutting pad on the paint with the Over the Counter Meg’s water spot remover and to my amazement, I removed every single water spot !!! amaing for an OTC product. I came to the conclusion that you need the right chemical for certain situations, this one being a perfect example.
FYI, while this product is also an abrasive polish that was designed for clear coat , dont expect it to finish down as well as some of the high quality , fancy finishing products. Expect to finish off with a soft foam pad and finishing polish. Also, more is better with this product. Use a very wet application so that the chemical’s get a chance to really break up the minerals before going at it hard. After spreading the product really wet, I let it sit on the paint for a minute or two before making my pass’s with the machine.
hopefully Detailed Image can pick up some stock of this product, as its the best WSR I have ever tried. WAY more effective than the chemical guys product on here. (which is a great product as well, just not as potent)
hope that helps !
Absolutely Mike! They’re is defiantly more than one way to attach window stains!
Can the Black Tornado air compressor attachment be used to clean interior glass? Is seems as though it would work great….but who has tried this tool in that fashion? Also…..I am of the opinion that some OEM glass is better than others….I am wrong? I have a Honda civic, the windshield is fine, but the rear glass just does not clean well and has micro-distortions in addition to water spots that will not remove. I am so frustrated. I welcome any advice.
This looks pretty efficient for cleaning hard water stains from the windows. I would love to have one and see how it works. It’s definitely difficult to maintain them and to remove those stubborn stains! Thanks for sharing
Wow the glass looks great. I will try the same with the porter cable 7424XP and a 3″ lake country backing plate and 3″ cutting disk. Question -> what should I use for a counterweight in the porter cable? Thanks, George