
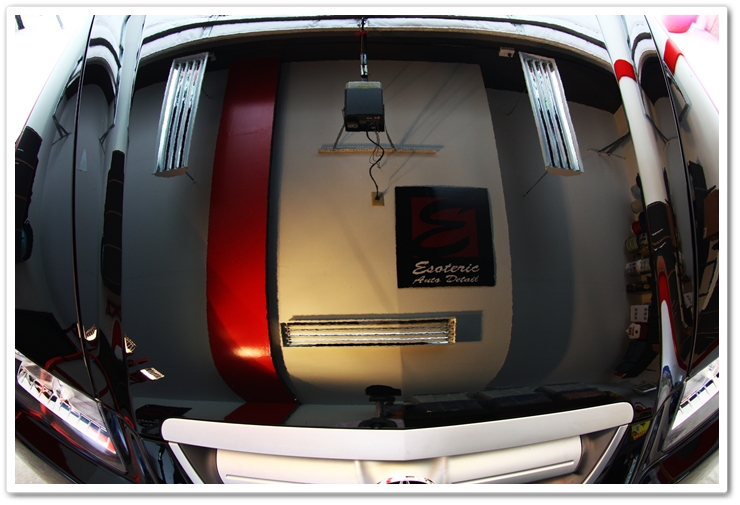
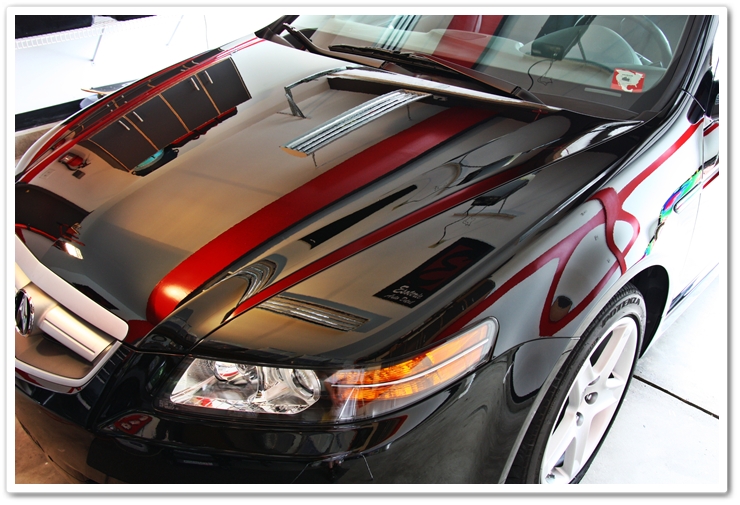
2006 Acura TL in Nighthawk Black Pearl (part 2)
by Todd CooperiderQuick Jump
This is part 2 of a 4 part series (read part 1, part 3, part 4)
- Using a clay bar to properly prep the surface
- Polishing your paint to a swirl free finish
- Measuring the paint’s thickness
- Properly taping your vehicle prior to polishing
- Choosing the right polish
- Using the proper amount of polish
- Results after one pass of Menzerna Power Finish on an orange pad
- Polishing lower panels with problem areas
- Removing deep etchings from the paint
- Safely polishing the trunk lid
- Removing scrapes, scratches and other deep imperfections
- Safely polishing pillars
- Alcohol wipe down after polishing
- Post-polish clean up with ONR
- Protecting your paint with a sealant
Using a clay bar to properly prep the surface (Return to Top)
Next up is to clay the surface to remove any contaminants that still sit on the paint. After you’ve washed your car and it is still wet, you can lightly glide your hand across the surface to see if it’s completely smooth, or if you feel any rough areas. The contaminants causing the rough feeling need to be removed. I recommend using a clay bar at least once per year (after coming out of winter) to keep the finish looking its best.
Since Acura paint (and most Japanese manufacturers) mar so easily, you want to do this process very carefully if you’re not planning to polish afterwards. I recommend using the DI fine grade clay bar, and Dodo Juice Born Slippy clay lube. Remember during the process to use very light pressure and to use plenty of lubricant to protect the finish from marring. For a complete step-by-step guide, please refer to my Tutorial on Proper Clay Bar Usage.
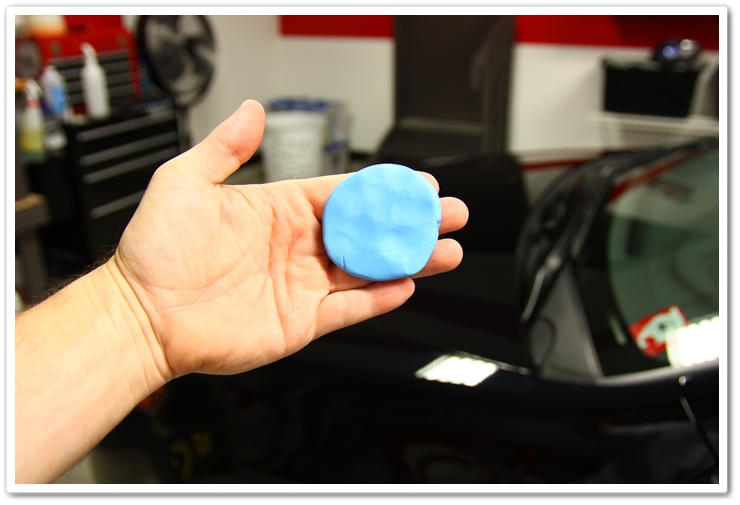
Start with a fresh piece of clay.
Apply plenty of clay lube, and lightly glide the clay across the surface in a straight back and forth motion. You should hear and feel the clay picking up contaminants.
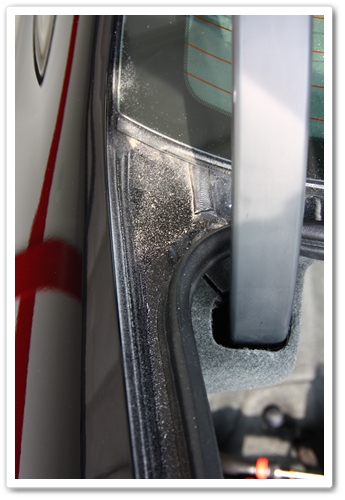
On most cars you will find that the most contaminated areas are the horizontal surfaces, the areas just behind the wheels, and the front and back bumpers.
Polishing your paint to a swirl free finish (Return to Top)
Measuring the paints thickness (Return to Top)
So far I’ve covered techniques and methods that can and should be performed by enthusiasts at all levels. Now I’m going to go over more advanced topics, but I don’t want the average enthusiasts to stop reading here! There is still plenty to discuss and learn, and later I will be reviewing interior detailing that everybody will benefit from.
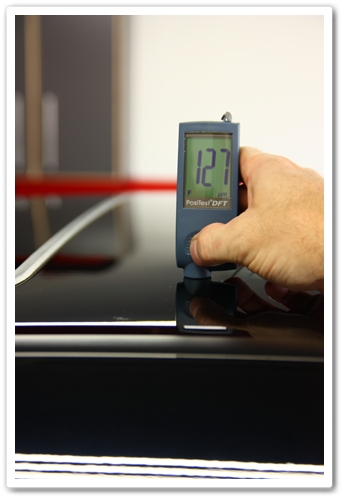
The next step is to take some paint thickness readings to see if any work has previously been done to it. While I’m looking for overall thickness, I’m mainly looking for consistencies. If I find an area that’s very thin or thick compared to the rest of the vehicle, then I know it’s been worked on (body work or heavy compounding) and will treat it accordingly. If I find a thin area in particular, I’ll be extra cautious and only lightly polish it.
Here I’m using my DeFelsko PosiTest DFT paint thickness gauge, and the readings are consistent with what are normal on Acuras.
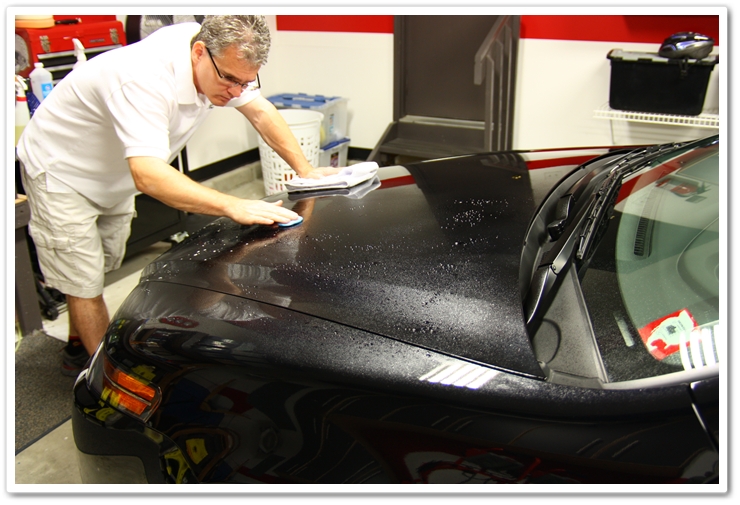
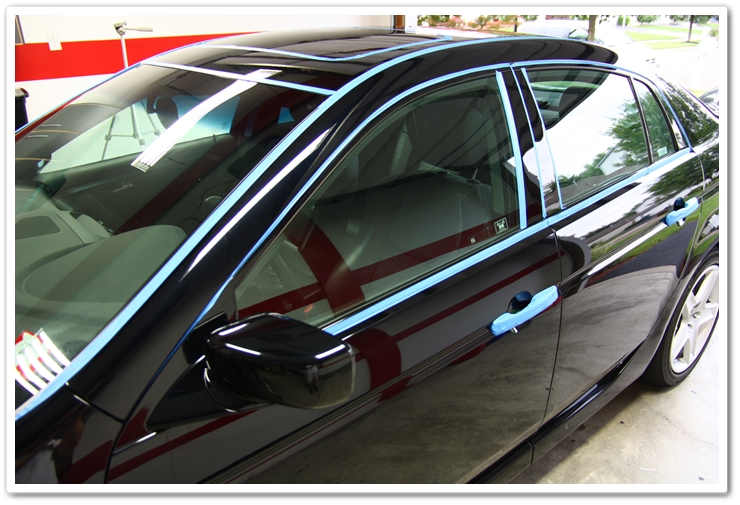
Properly taping your vehicle prior to polishing (Return to Top)
Once the car has been clayed and wiped down, and measurements taken, it’s now time to prep for polishing by taping up plastic and rubber trim, and other areas that can get damaged by the polisher. Some polishes have a tendency to stain black plastics and rubber, so you want to be sure to get it all covered up. I find that 3M’s blue painter’s tape works perfectly, and is readily available at your local home improvement store.
On the TL doors, the rubber seal comes over the top edge of the door, and then overlaps the pillar above it. This is a common area to get stained by polish or wax, so you definitely want to cover it up. Instead of just taping directly over it, I’ll open the door and cover the inner and outer area (fold it over). This way it’s covered, and you can still get in and out of the car if needed.

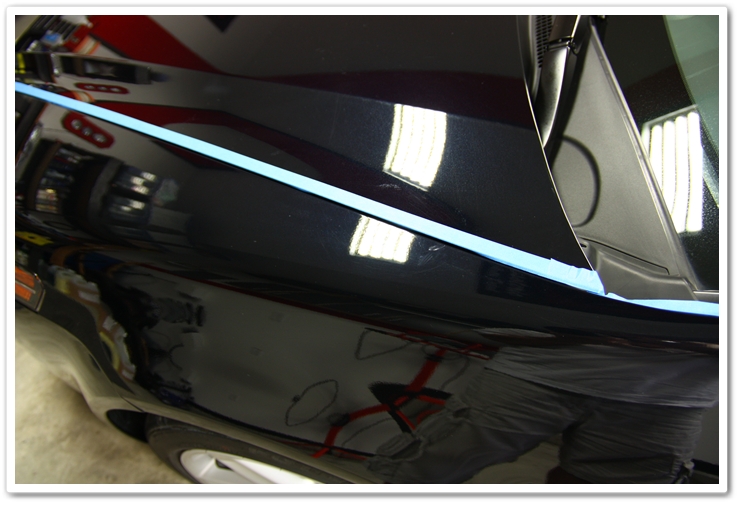
Other areas you need to be careful of on the TL’s are the hood and trunk. If you look closely at the seams where the hood/trunk lid and fenders meet, they are not even (especially the trunk area closest to the rear windshield). If you try to polish over these, there’s a good chance you could burn through the paint on the higher of the two surfaces if not careful. This is more of an issue when using a rotary versus a random orbital, but better safe than sorry!
What I’ll do is tape over the hood-side of the edge and tuck it into the seam when polishing the fender. When I move on to polishing the hood, then I’ll remove the tape from that side, and move it over to the fender. You could also just apply the tape where it adheres to both edges and covers the seam…whatever works best for you. The key is to always be careful at seams, edges, and high spots because that’s where the paint is typically the thinnest.
Choosing the proper polish (Return to Top)
Are you ready to start polishing (finally)?
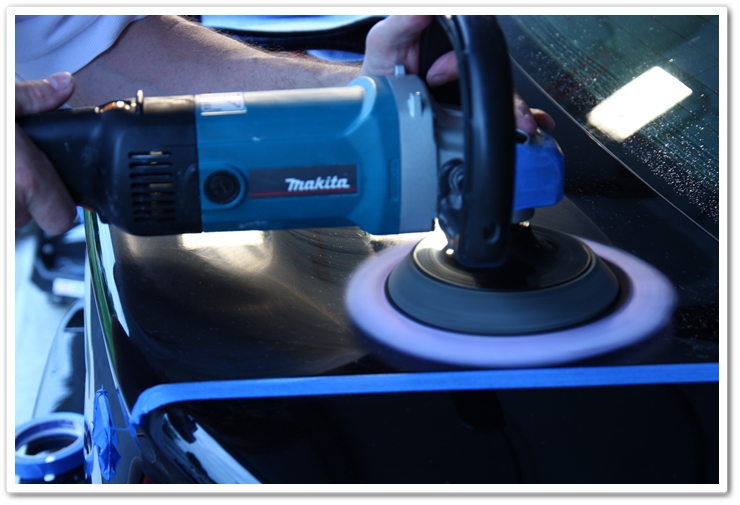
Since I know the Acura paint so well, I had a plan of attack for polish and pad combinations based on the level of correction it required. I grabbed for an orange Lake Country pad (light cutting), and a bottle of Menzerna PO203S Power Finish. This is a medium-cut polish that finishes down extremely well. I could have used a heavier polish (Menzerna SIP) and a less aggressive pad (white polishing), but it wouldn’t have finished off as well. The goal is to use just enough cut with first polish and finish down as nicely as possible so that your final polish step is much easier. NBP finishes extremely well with Menzerna PO85RD, and the combination of PO203S/orange allowed me to go straight to the ultra-fine PO85RD afterwards.
Using the proper amount of polish (Return to Top)
Just 3 or 4 small drops of polish is all that is required for a working area (the bonus dribble in the middle is unnecessary).

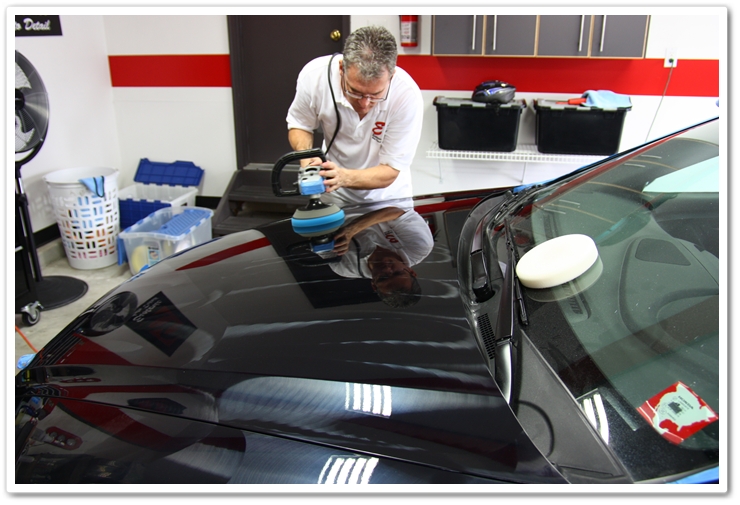
Results after one pass of Menzerna Power Finish on an orange pad (Return to Top)
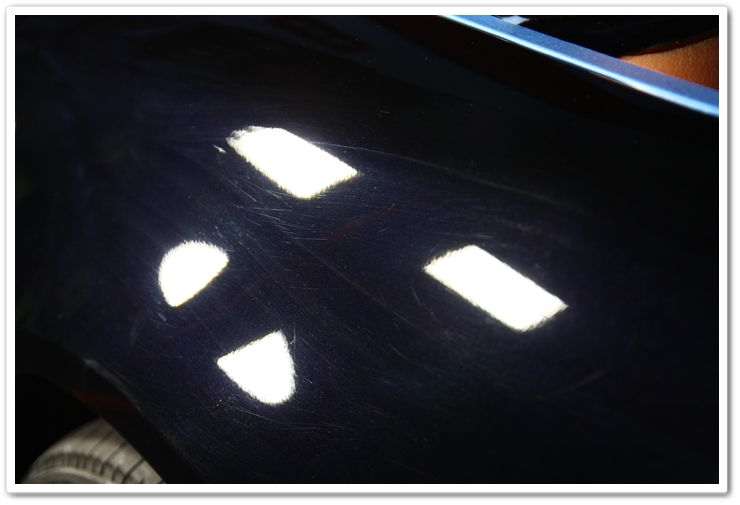
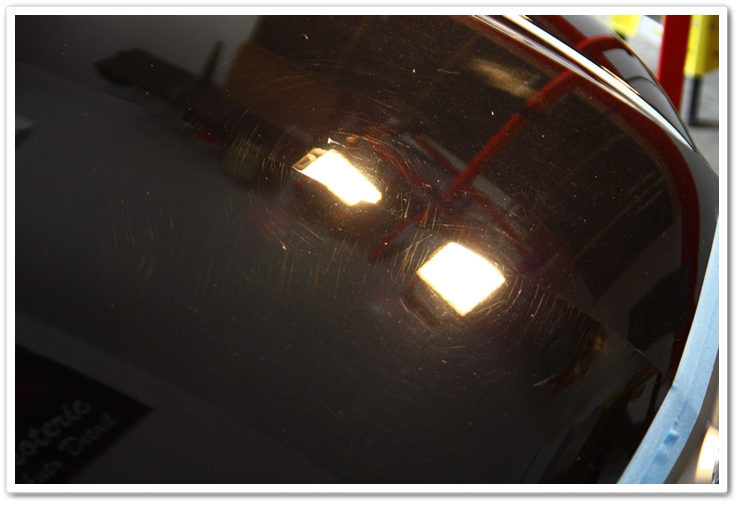
Here is the fender before. Notice that it is hazed over with fine scratches and swirls that prevent the blue flake from showing that well.
After just one pass of Power Finish / orange pad on the Makita rotary. I first worked the polish in at 900rpm’s for a few passes, then kicked it up to 1500rpm until the polish was fully broken down, and then backed it down to 900 rpm’s for a few more passes to burnish the paint and leave a nice finish.
Look at the difference in clarity in the before and after photos. This first step restored the natural deep blacks, and allowed the blue flake to show through.
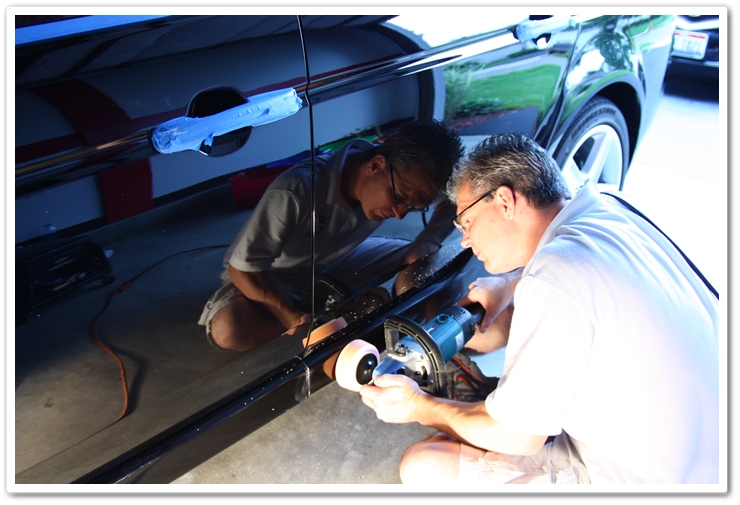
Polishing lower panels with problem areas (Return to Top)
Now it’s time to move on to the hideous rocker panels. This is always the worst area of every TL, and I knew it would require more aggressive tactics to get it looking good. I knew that some of the defects would be too deep to safely remove, but if I could at least get it 80% corrected I would be happy, and the transformation would be huge.
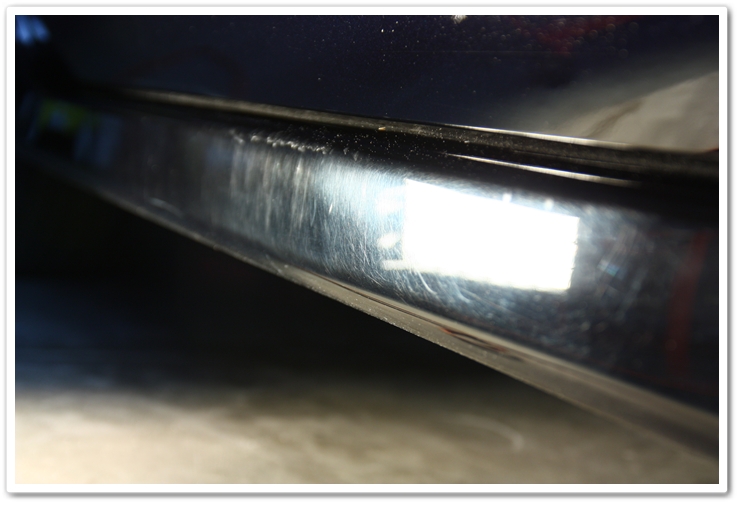
For this area I used Megs 105 and an orange 4″ spot pad. After a couple of passes, all of the swirls were gone, leaving just some of the deeper imperfections.
Sorry that this photo wasn’t in better focus…it’s hard to get these shots perfect while lying on the floor in poor lighting. It sure looked good in the viewfinder after I took it.
Removing deep etchings from the paint (Return to Top)
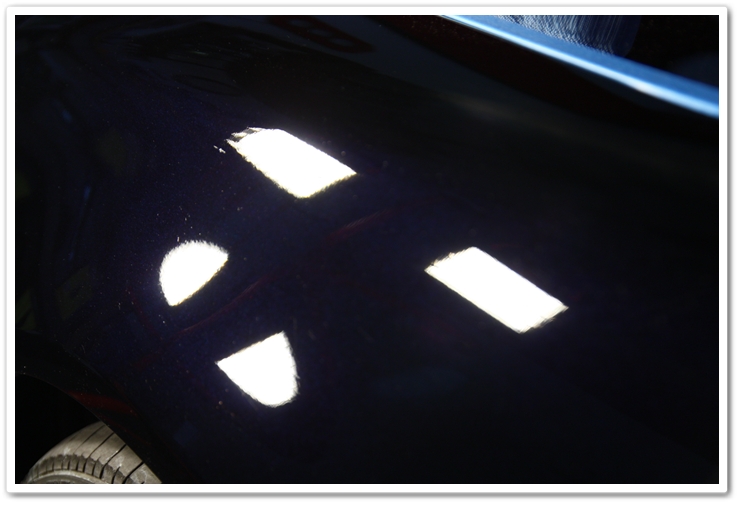
I’ve moved my way around to the back of the TL, and it was time to tackle the heavy stain. You can see here how severe it was in addition to the general cloudiness of the paint because of swirls and scratches.

First I tried the regular combination I was using on the rest of the car (Power Finish/orange), but the stain laughed at me! It was personal at this point so I broke out the big guns…Purple Foamed Wool pad primed with Megs 105. I hit it at 1500rpm for a bit and then checked my work to see how the stain looked. I was happy to see that I made a major dent in it, and then applied more 105 and hit it again. I was able to get rid of about 98% of the stain, as it left some very slight but deep etching into the clear. You had to really look hard to even see it.
As is to be expected, the Purple Foamed Wool left a bit of marring and holograms on the soft Acura paint, so I went back over it with the combination of Power Finish and an orange pad to clean it up.
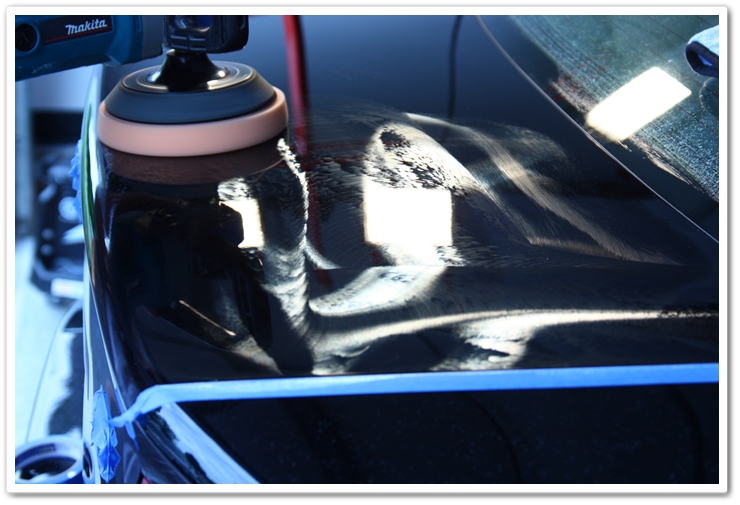
Polish worked until broken down, and ready to be removed.
All cleared up! Look at the difference between this photo and the first one that showed the stain and haziness. Big transformation!
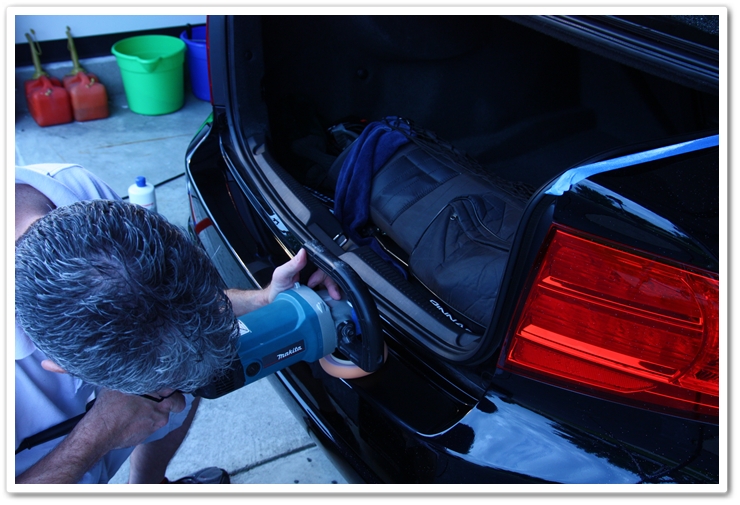
Safely polishing the trunk lid (Return to Top)
For working on the back face of the trunk lid, you need to prop it open to safely polish the lower portion…otherwise you risk damaging the top face of the bumper underneath. For this I simply place a bottle of polish on either side of the trunk jambs to prop it open.
And here you can see how much easier it is to polish these areas.
Just keep the trunk lid open to work on this part of the bumper with a 4″ spot pad. This is typically another area of the car that gets abused pretty badly because of getting stuff in and out of the trunk. And there’s no need for grey-hair comments here…I’m completely aware!
Removing scrapes, scratches and other deep imperfections (Return to Top)
As I work my way around to the right side of the TL, I start to encounter all of the scrapes. Here’s a bit on the right rear fender.
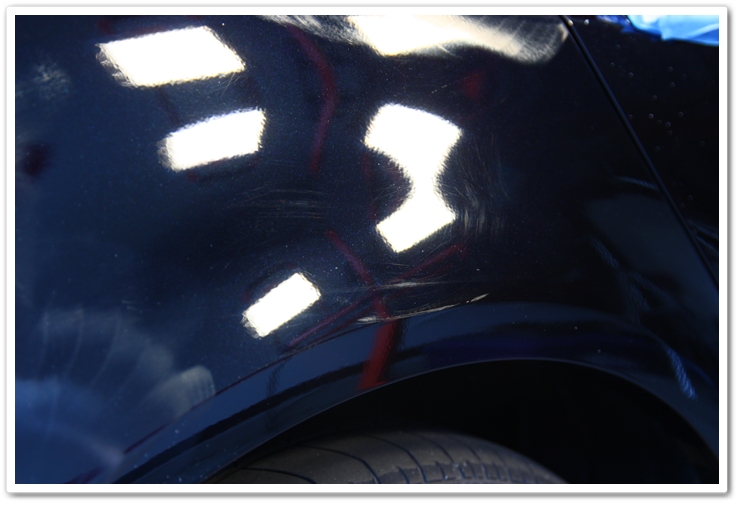
Once again…big difference in the color and the blue really shines through now.
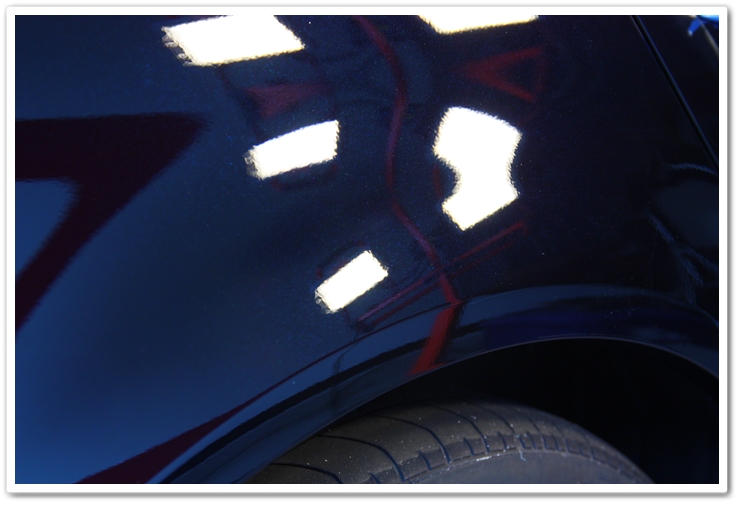
More scrapes, and more cloudy finish.
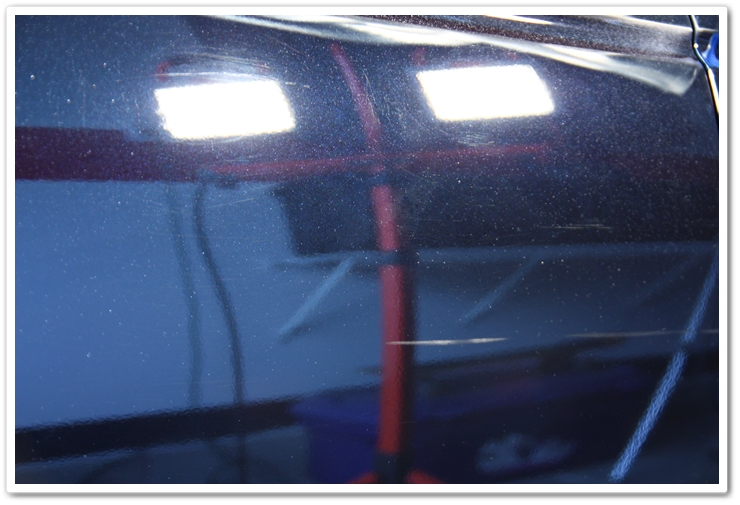
Afterwards it looks like a completely different panel.
I’m just hanging out in the garage…on the floor…taking pictures of myself. I think the high heat and humidity are getting to me.
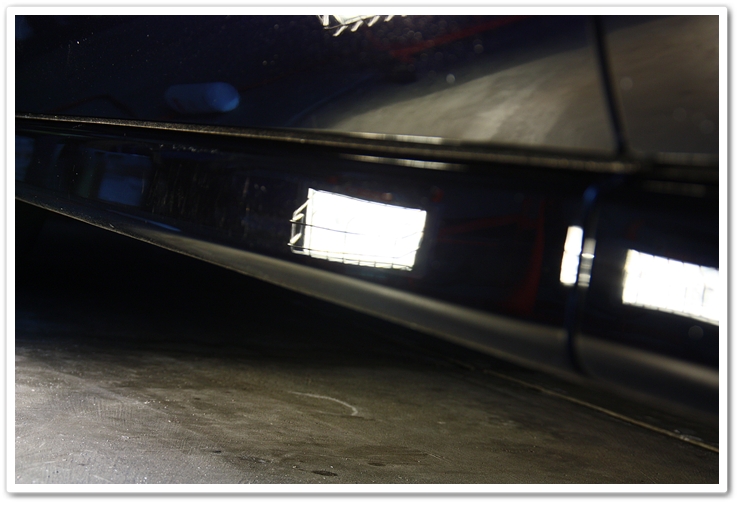
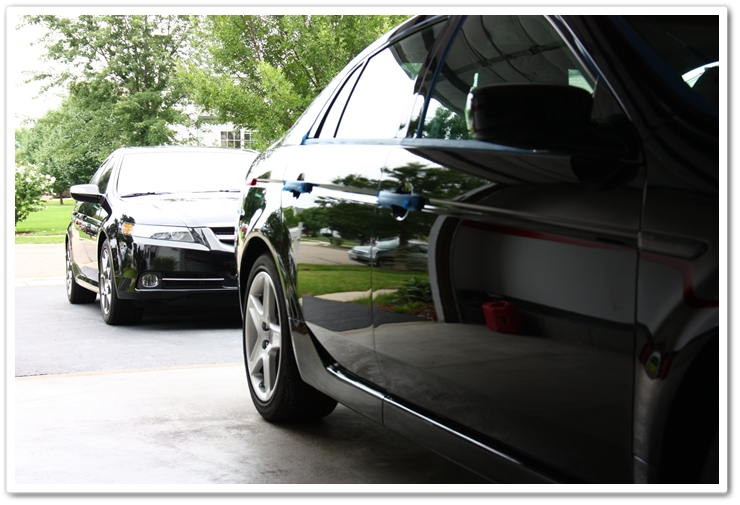
Remember how bad the lower rocker panels looked in the first photos? There was no reflection in them whatsoever. Now look at them…like mirrors! Proper leveling of the painted finishes really creates a high level of reflectivity.
I kept my TL-S parked right behind the one I was working on so I had an easy reference for the gloss level of the finish. Since I had not gotten to final polishing yet, my TL-S still had the edge…more work to be done!
The hood typically gets beat up quite a bit, and requires more effort than most parts of the car. This TL was no exception.
First I polished it with Purple Foamed Wool and Power Finish to remove the deeper defects, and then followed that up with an orange pad and Power Finish to remove the haze left by the heavy-cutting wool. Even before the final polish you can see that the clarity is greatly improved.
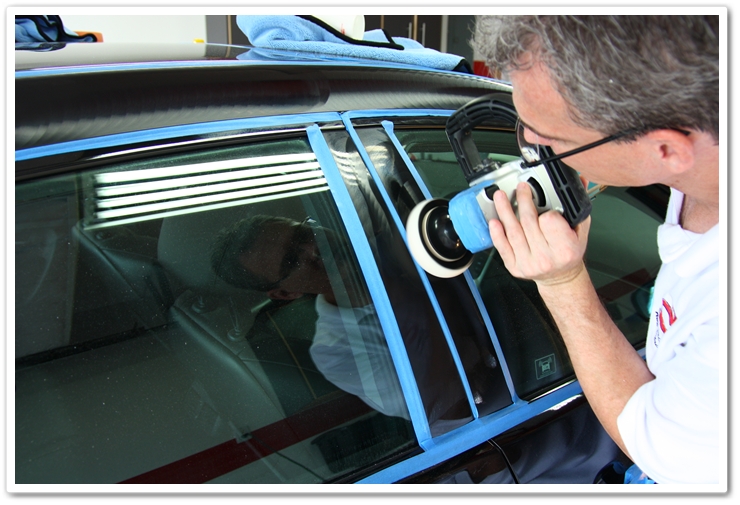
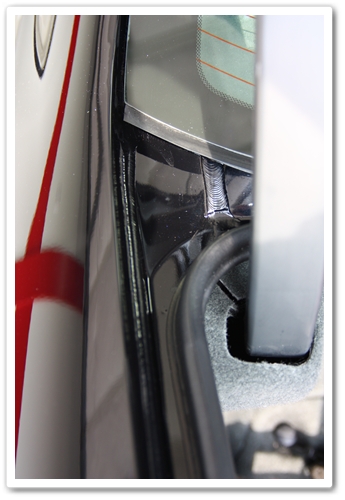
Safely polishing pillars (Return to Top)
These pillars are soft, and get swirled and scratched very easily. This is another area where people like to grab hold of to close the door. They polished out easily with a 4″ white pad and Power Finish.
Jeweling your paint to a new level of gloss and depth (Return to Top)
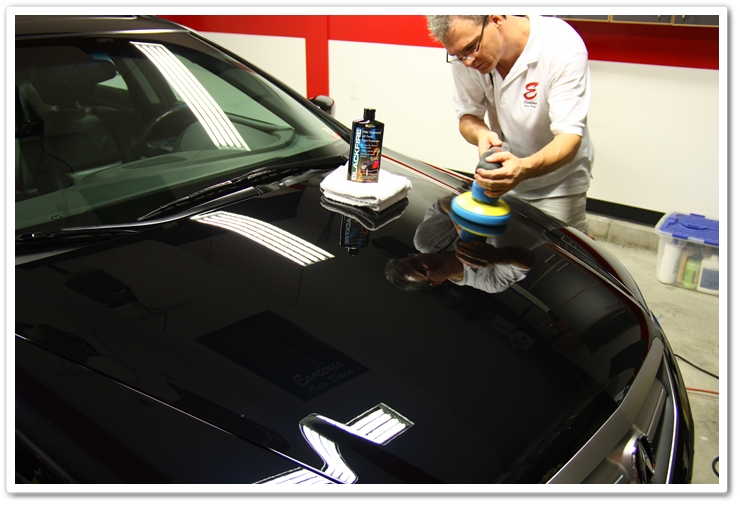
I’ve finally completed the first polishing stage to remove all of the defects, so I’m ready to go back over the entire car with Menzerna PO85RD ultra-fine polish to jewel the finish and bring out the highest gloss possible. I did this step with a very soft blue (finessing) pad. The most effective method I have found for this polish is to work it in at 900rpm, then move my way up to about 1400rpm with medium pressure, and then back it down to 900rpm with no pressure and slow passes for as long as you can work the polish without it drying up. This ensures maximum gloss and clarity without any worries of holograms.
PO85RD is arguably one of the absolute best ultra-fine polishes available, and it is very easy to work with. When you think that the finish looks good, you can almost always do another polishing step by using PO85RD and take the gloss to another level. In polishing, there’s a significant difference between a finish that looks good, and one that looks great!
Post-polish alcohol wipe down and clean up (Return to Top)
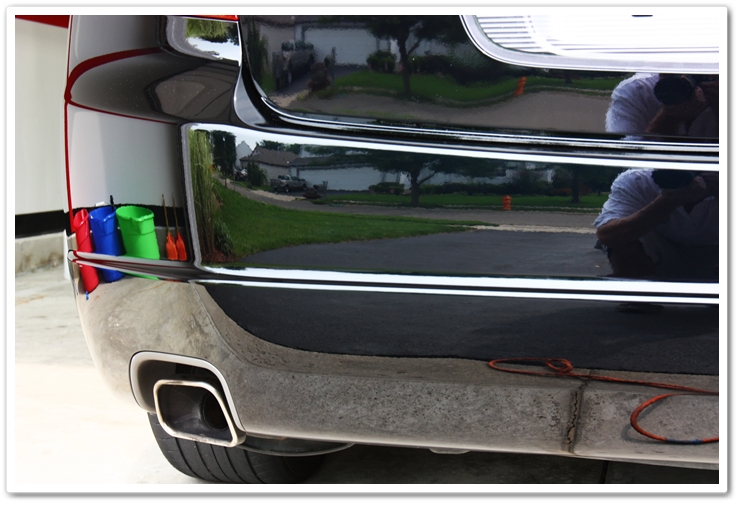
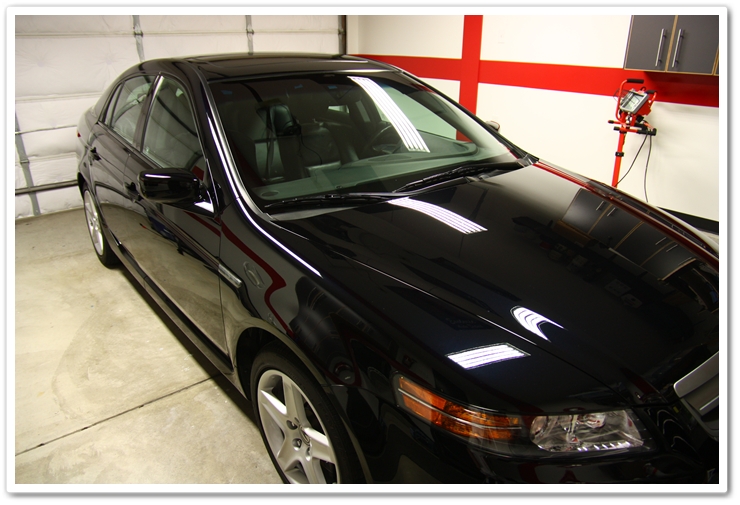
All the polishing is now completed, I have thoroughly removed all of the polish and carrier oils from the surface by (gently) wiping it down with a plush towel and Isopropyl Alcohol, and I’m getting ready to start cleaning polish dust out of door jambs, the trunk area, etc. I wanted to snap a few photos before applying sealant so that you can see the true condition of the paint. As I’m sure you will agree, the NBP now looks absolutely stunning!
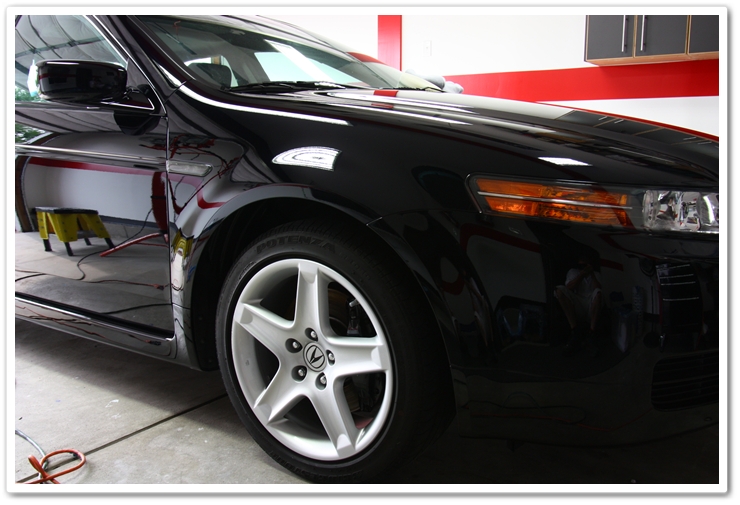
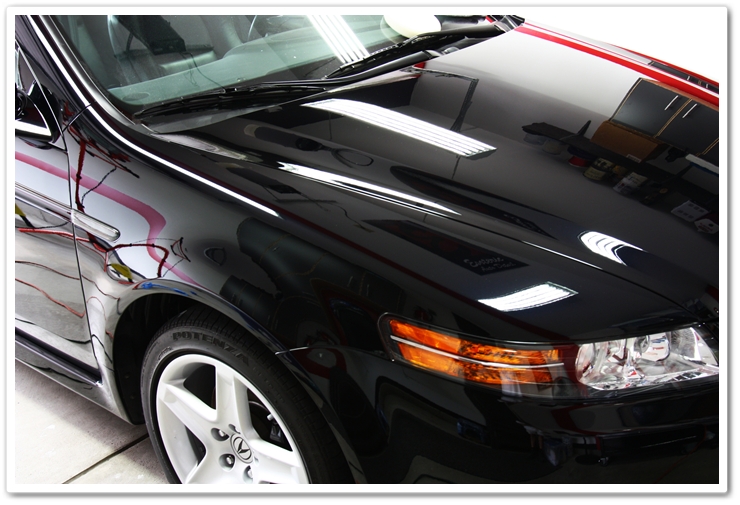
Look at the clarity in the bumper. When you look into the reflections, it really looks like a mirror.
A few money shots for sure…
Post-polish clean up with ONR (Return to Top)
Now onto the dirty work of cleaning polishing dust out of everywhere. Even if you’re not polishing, these areas need to be tended to on occasion. The easiest solution I have found is to keep a spray bottle full of Optimum No Rinse at their quick detailer ratio on hand. Lightly spray the area and wipe it down with a clean microfiber towel. This works great for the trunk lid, inside the hood, door jambs, and for the fuel fill area.
After
Protecting your paint with a sealant (Return to Top)
Once all of that is cleaned up, it’s time to do the final step on the painted surfaces…apply a durable and long lasting sealant. Today I chose to use Blackfire’s Wet Diamond sealant applied by PC 7424XP on a blue finishing pad. I have found that both the Blackfire and Optimum Opti-Seal look tremendous on NBP, so you can’t go wrong either way. For more in-depth information on both products, please refer to product reviews I have written about both of them: Blackfire’s Wet Diamond Paint Sealant Review & Optimum Opti-Seal Review.
Polished, sealed, and waiting for finishing touches.
This is part 2 of a 4 part series (read part 1, part 3, part 4)
If you have any additional comments or questions, please submit your reply in the comment box below.


Hi Todd, I’m wondering when you’re polishing this TL, did you just stick with the orange Lake County pad? Or did you use a black pad for finishing? I too have an NBP Acura, and your tutorial has help me understand polishing a lot better.
Thank you,
Eric
Eric,
Thanks for your response. After polishing with the orange pad and PO203S, I went back over the entire car during the finish polishing/jeweling stage with Menzerna PO85RD and a blue LC finishing pad. Please refer to the section above titled: “Jeweling your paint…”. This step really brings out the clarity and gloss in the paint.
Thanks again,
Todd Cooperider
Thanks for the response Todd. Just wondering, why didn’t you go with the black finishing pad?
-Eric
Actually, nevermind, I think I know why.
Hi Todd,
I’m hoping you still see these comments.
I have a 2002 NBP Acura RSX-S, am 23, don’t have a garage for it 🙁 and am just trying to take care of the NBP. I am wondering what the difference is between the DAS Ultimate Detailing Machine XP by Porter Cable and the Porter Cable 7424XP you use is. They look very similar. I can only afford one buffer/polisher and am searching for the right one.
Thank you so much for you detailed blogs,
Nate
Nate,
I used to own an RSX-S myself…fun car!
Getting yourself a PC7424XP will be a great investment for maintaining the NBP finish, and you’ll be amazed at the results you’ll be able to achieve in a short period of time.
I’m not sure if there are any differences between the two, so why not just get the original Porter Cable 7424XP! It’s a fantastic machine…
Thanks,
Todd
Todd,
I noticed you used a Makita. I am new to detailing and plan on buying a PC 7424XP and was seeing if the pad/polish combo would be the same on a PC? Also, how would you rate Honda cleaning products? I’ve used the Honda Cleaner Polish and liked the results. I’ve also used their interior cleaning products but do not know if there would be a significant difference to the products you have stated. Thank you so much for your posts as they’ve helped me understand how to properly care for my car as I recently bought a 2010 TSX and want to do things right from the start but currently on a semi-tight budget.
Thanks,
Fabian
Fabian,
As far as the pad/polish combo goes for your TSX, it really depends on the level of correction that you may need to do. If you just wanted to make an initial investment in tools and polishes to get you started, and want products that get great results (and user-friendly), you may want to consider the following items:
Porter Cable 7424XP
6″ Backing Plate
2) Lake Country Orange Pads
2) Lake Country White Pads
2) Lake Country Black Pads
Optimum Polish II (for medium to fine correction)
Optimum Finish Polish (for fine correction and maintenance polishing).
Optimum Opti-Seal or Blackfire Wet Diamond (sealants)
As for the Honda products, I can’t comment on their quality in comparison to name brands because I do not use them. OEM’s will typically have these products private-labeled, so it’s hard to say exactly what products you may be comparing them to.
I hope this helps.
Thanks,
Todd
Todd,
Thanks again for the information! My 2010 CBP TSX just has some minor scratches from winter, in which I brushed off the snow from the car as I don’t have a garage and left some visible scratches. I’m confident in the selection that you advised me will help me get my car looking great again. Another thing is that my sister’s car is a 2004 NBP TSX and was in the similar state as the car you did in this article sans the milk stain. Would the products you recommended me also work for her setup or should I get something else in terms of polish/pad combo for the PC7424XP?
Thanks again Todd. You are the man!!!
Fabian.
Fabian,
NBP is pretty soft and corrects pretty easily, however if you have defects similar to what were on the TL, then you may want to step up in the level of aggressiveness. The Menzerna PO203S and Orange pad combo with the PC works very well, and then you’d want to refine it afterwards with something like a black pad and the Finish Polish.
Thanks,
Todd
Todd,
Sorry to bother you again, but I ended up buying a Flex XC 3401 VRG. I plan on buying Menzerna PO203S and PO85RD. What pads should I use with the Flex then? I’ve been told to use this combo: PO203s/LC green pads and PO85RD/black pads. Would this be correct? I’ve been told that the LC white pads will leave micro marring on the clear coat. I also plan on using Collinite No.476s as my wax too. I’ve also been told to use 5.5″ pads for my flexibility around tight spots and to keep the dust level down as they have more direct contact with the vehicle and don’t create as much dust.
They aren’t too many combos that I’ve found for the Flex for the soft Japanese paint.
Thank you again!
Hi Fabian, and congrats on the Flex purchase.
You’ll find that there are a lot of different combinations possible with pads and polishes, so keep that in mind when working on the car. Always work with your least aggressive combination first and adjust from there.
The plan you have there with PO203S/Green, followed by PO85RD/Black sounds pretty solid to me. Just take your time with the finishing step to extract the most gloss possible. After you’ve broken down the PO85RD on a higher speed, back it down a couple of notches and work the clear polish as long as you can with very light pressure. Patience pays off with this polish.
Take care,
Todd
Another quick question.
When I am going to clay….
I have a few “dime” rust spots..(1) how and what would should I use to remove them. and (2) clay before or afterwards?
Dan
Dan,
Is the rust under the paint (like a bubble), or on top of the surface, or in a rock chip? If it’s on the surface or in a rock chip, you might try some polish or compound by hand in that small area to see if you can get rid of it. I’d then clay afterwards just so you’re not getting very abrasive rust particles in your clay.
I see you wiped down the vehicle with Isopropyl Alcohol after applying all the polishes.
This won’t remove the gloss produced from using the polishes, especially after using PO85RD?
I thought the alcohol rubdown is down after washing but before claying to remove old wax and sealants. Or this done here in the post for a different purpose?
Thanks again,
David
David,
If you want to get the best results out of your sealant or wax, it’s a good idea to remove the polishing oils from the surface first to ensure a good bond. You can either wash it with a strong solution, do an IPA wipedown, or use a product like Chemical Guys EZ Creme Glaze or 408 Vertua Bond between the polishing and sealing stages. And no, it won’t affect the gloss…
Thanks,
Todd
Amazing! I have a 04 NBP…Having the hardest time keeping it clean…and my detail doesn’t come close to your results!
Todd, amazing write up and great detail. The car turned out amazing. I have two questions for you though.
1) (dumb question but not sure) Once the polish or any other compound is applied, how do you remove it. Do you just buff it out with a clean pad that was the same as what the compound was applied with?
2) I have an 04 audi a4 that im looking to completely detail up finally. Any compound & pad suggestions for that paint type? Its dolphin gray by the way.
Thanks again, and amazing write up
-Jeff
Thank you Jeff.
1) After you have worked the polish with the buffer/pad, you remove it with a soft microfiber towel. Be sure to remove all of the polish residue and oils from the surface by spraying the panel with Isopropyl Alcohol and wiping it with your microfiber towels, or re-wash the vehicle. This will ensure that you get the best bond out of your wax or sealant that you use.
2) If you’re just starting out, I would recommend going no more aggressive than Menzerna Power Finish and a White pad on your PC7424 at speed 6. This will give a nice amount of cut, and will finish down very nicely too. This will be a great one-step option for that color.
Thanks,
Todd
Todd, thank you so much for the quick response! im absolutely enthralled by your write ups. the details are stunning as are your results. thanks again for the response and putting these tutorials up!
–Jeff
You’re very welcome Jeff! I’m glad to hear that you’ve found them to be helpful.
Regards,
Todd
Dear Todd,
Fantastic job on the TL-S. Those “money shots” are the reason why i’m starting to pay more attention to these details and want to make my NBP RSX with the same shine (or i’ll try to). Between claying, using Menzerna PO203 and Menzerna PO85RD and Blackfire wet diamond paint sealant, and actual driving, is there a minimum or maximum delay (waiting time)?
Thanks Will. Many people simply don’t realize how good a car can be made to look with proper detailing, and when they’re introduced to it through articles like this, they quickly become interested in detailing.
Once you’re done with the process, and have finished wiping down the Blackfire Wet Diamond (and any other areas), then you can go right out and drive the car and enjoy the new finish.
Take care,
Todd
Todd,
Awesome write up. Found out about your site over at Acurazine. I have a 2007 NBP TLS with some decent scratches and swirls. Would the Meguiars M105/205 combo with an orange pad on the Porter Cable 7424xp be too aggressive for this?
Dennis,
Thanks! The M105 / M205 combination would work for NBP that is in need of some serious polishing and defect removal. As Jared said, you’ll probably want to finish with a black pad and the M205 to get it to finish down. Just play around with pressures and speeds to see what works out best for you. I find that using M205 with a black pad on speed 5 with light pressure works well for the finishing stage on this paint, but once again, try a few different methods to compare the results.
Hey Dennis,
Im sure Todd will chime in but I figured I would reply as well. M105/205 should work well with our NBP TL’s. If you were to go that route I think you want to use an orange pad with the M105 but with the M205 i believe you would want to use either a black or blue pad as those are finishing pads. I would use a similar combo that Todd uses which is Menzerna Power Finish PO203S with an orange pad and Menzerna PO85RD with a blue pad. I would also check out Optimum Poli-Seal if you are in need of a quick 1 step polish/seal to save time. Good luck!
Todd,
I am from India and I was just amazed at the detailed work and the finish of after the polish. Though we won’t get the same brand of products down in India, the steps were simply amazing. Keep up the great work.
Cheers,
Sai Sudharsan
Thank you Sai!
Todd, I just bought my first Black car, a 2006 Infinity M35. It looks good as it has been well maintained but there are a few areas that need attention. I have never detailed a car to your standards and have been absolutely amazed by your article on the Acura TL.
Since I’m a beginner and don’t have any of the mechanical polishing equipment, my question is: would it be possible to do a good cleaning, clay job and then polish a car by hand without a mechanical polisher ? I have no doubt that I would ever get the results that you do with the proper equipment, but was wondering if I could do a “maintenance polishing” by hand and then maintain the car with proper washing and waxing until it’s time to have it professionally polished. If you think this is doable, could you recommend the appropriate polish and pads ?
Thanks,
Chuck,
It is true that you can’t achieve the same results by hand as you can with a machine like the Porter Cable 7424XP, but with some of the new polishes out there like Meguiar’s M105 and M205, you would be surprised on how much correction you can actually get. I would recommend reading Rasky’s article on removing swirls by hand as it provides product recommendations as well as techniques.
Hi Todd, i had read this article over the summer and was planning on doing an over haul on my 2004 Dolphin Grey Audi A4. Anyway, you have given me sound advice in the prior question but now in the time since life has gotten in the and not having time to do the over haul, before i start it this time, i have 3 new questions.
1) What is the difference between a sealant and wax?
2) How do you know what pad and polish combo to use i.e is there a guide for pant thickness to go by?
3) what does it actually mean to Cut and/or Buff?
Thanks again Todd, I still can’t begin to explain how great these write ups are and how indebted anyone is to you once they have seen this site and taken any knowledge from it. Quite the great service you are doing.
-Jeff
Jeff,
1. The biggest difference between the two is durability. Sealants can get 3-6 months protection, whereas waxes are usually just a month or two. Sealants are typically a polymer, and waxes are usually a carnauba product.
2. Pad and polish combinations have nothing to do with thickness. They do however relate to paint hardness and the level of defects. You could come up with a general guide, but there are simply too many variables to have a definitive one. Some manufacturers will make the same car in two different factories, and each of them can have different hardness levels. It also depends on the severity of defects and the level you wish to take it. This knowledge mostly comes from experience, but even with that it doesn’t mean that two of the same cars with the same level of defects will require the same combinations. Weather also plays a role in it. Typically speaking however, your Audi uses a very hard clear coat, and requires a more aggressive combination to get a high level of paint correction. I’ve had a lot of luck with many (but not all) Audis using a rotary with a Cyan pad and M105 for compounding, and a white pad with Menzerna 106FA for the finishing.
3. The term “cut and buff” is pretty much old-school. Cutting is referred to the compounding stage where you’re using aggressive techniques, tools, and compounds to remove defects. Buffing refers to the finish polishing stage where you’re using a softer pad and finer polish to refine the finish.
I’m glad to hear that you’ve found these tutorials to be helpful!
Hey Todd,
Do you use the Optimum Instant Detailer before claying or is that product only for regular washes? I am under the impression with the sequence of the steps that you wash/dry/use instant detailer/clay and so on.
This has been the single most useful article in all of DI that I have it bookmarked for any references. I’ve learned everything I know from this website. Thank you so much.
Niraj,
Thanks, and I’m glad you’ve found it to be helpful! No, you don’t need to use the quick detailer prior to claying. I was simply showing how you would do a normal wash and dry routine, but if you’re going to clay or polish, use of a quick detailer during the drying stage would not be necessary.
I hope you find more beneficial articles here on Detailed Image in the future.
Thanks,
Todd
Hey Todd,
I found this article really interesting. Im actually going to detail my nbp tl-s 08 in about 2-3 weeks. Im about to get a Pc7424x but Im really confused on which polishes to get. Im thinking either going with optimum or menzerna. The paint has a pretty good shine to it although there are swirl marks all around the car, but is not noticable 10 feet away, and is only noticable when the sun is hitting the paint. Any advice would greatly be appreciated.
Thanks
Sarb,
Either way you go on polishes, you will be happy with the difference that you make on the paint. The Optimum polishes may be a little easier to work with for those just learning how to use a Porter Cable, but the Menzerna polishes might yield slightly better results. With either polish you choose, don’t get frustrated if the first trial doesn’t go as well as planned. It takes some time to learn as you figure out the buffer, pressure, work times, etc. I would recommend first trying to just use a finishing polish and pad instead of going for major correction. For instance…combine a black pad with Menzerna 106FA. Get your finishing process dialed in first.
Hi Todd, first off I want to say that I greatly admire your attention to detail and dedication, it has inspired me to maintain my 03 TL-S in a similar fashion. I have one question, I bought my TL-S from a friend and the pillars are heavily faded, either buy the sun (I live in Houston, TX, so the heat can really get to the cars) or something else. Is there any way I could treat the pillars to look like new? I would really appreciate your advice.
Thanks.
Thanks Andrew. What are the pillars on that year…plastic, painted, other?
The pillars on the 03 are painted.
If they’re painted, you could try a product by hand like Meguiar’s ScratchX. If you want to polish by machine, then you’d want to try the same products you’re using on the rest of the car. Just be careful in these areas as there’s a chance that you don’t have the same thickness to deal with as you would on the other painted surfaces of the car.
Hi Todd,
How many microns of paint were removed from this paint correction ?
Also, about how many hours did it take for the polishing steps ?
Awesome work !
Thanks
Dan,
It’s been quite a while since I worked on this car and wrote the article, so I can’t remember the specifics. I would say that in most areas the material removal was probably no more than 1 to 2 microns at most with the methods I was using. And the polishing steps were relatively quick…perhaps only 8 hours worth or so. Thanks!
Todd,
I bought some supplies from detailedimage.com last week before reading this article. For clay bars, you suggest using the Gentle Fine Grade, but I bought the Ultra Fine Grade thinking that it’ll be even more gentler than the former. Is this clay bar just as good and safe? I have a 2010 Black (CBP – Crystal Black Pearl) TSX.
Thanks in advance
In addition, why do you suggest Optimum Protectant Plus or Leatherique for the trim? Are they leather? Is 303 Aerospace good enough for them? (The moonroof/door trims.)
Those products are good on leather, vinyl, rubber, etc so they are compatible with those areas. You could use 303 as well…
It just depends on the level of contaminants that you have. The finer the grade, the less chance of surface marring, but at the expense of its ability to remove heavy contaminants. If you clay an area and have problems removing some contaminants, then you’ll know that you need a more aggressive clay.
Hi Todd,
Is there a particular reason why you were using a blue pad instead of a black pad for the 85RD in the final polishing step? Would this combo be effective if using a 7424? I would like to go as gentle as possible but not sure if the blue pad would do anything with a DA for jeweling.
Also, I see you taped up some painted surfaces like edges, seams, etc. to avoid damages during polishing. How did you treat/polish those areas afterwards?
Thanks!
All I wanted / needed was a very fine refinement at the end and the blue pad met that need for this particular paint. On a PC, you might want to step up to a black pad, but then again it’s dependent on the paint you’re working on. As with all cars, you need to test the different combinations and determine what is giving you the results you’re looking for.
If edges get protected during the compounding stage, then they’ll get cleaned up during the final polishing stages. And if you’re doing compounding with a PC, you wouldn’t tape up nearly as much as I did with the rotary here.
Wow that was a FAST reply! Thanks a lot!
Sorry I failed to specify my applications in the question above. I will be working on the similar paint as the Acura TL. We have two Hondas and one Acura in the family and they are all black. I want to follow your pad/polish combination but I only have a PC. I was wondering if the soft blue pad has the ability to break down the 85RD at all with a PC (on this type of paint). If yes, then there is no problem. But if not, do you think the abrasives in the polish would adversely mar the paint for it being not broken down? That was my real concern. I know I should do the trial and error myself but just thought I should ask you first.
I used to detail our cars as a hobby with simple tools and products. But the more I read your posts the more I want to get into the hardcore action. Guess it’s time for me to invest on a rotory… You’re such a bad influence, Todd! 😛
With the way current technologies in pads and polishes are trending, you really don’t need to “step-up” to a rotary! I know a lot of very good, and very talented detailers that don’t even own a rotary…
Having said that, yes…the DA can break down 85RD, but you might want to try a black pad.
I have a PC and I have the 203s, which i was going to use with an orange pad, and the 85rd, but i didnt realize that you used a rotary with the blue pads, and I just purchased 2 pads to use with my PC.
Will 85rd/blue pad suffice on my Acura paint after using 203s/orange with a PC? I don’t wanna make another purchase to get black pads
The only way you’ll know for sure is to try a test section / panel. It should work, but not all paints react the same so you never know until you give it a try.
Hi Todd, I wrote the following in another post, but thought I’d post it here too for the readers of this article.
I’m new to detailing and plan on doing a complete detail on my ’04 pearl white Acura TL soon. I plan on buying a PC 7424xp for the whole job. After reading your NPB Acura TL job, i plan on using the same products you used, since my paint condition is almost the same, maybe slightly better.
Any suggestions for my white paint vs the black in your blog example? I see that dodo has a “white” wax, and Poorboys has a “white” glaze…do these products, that are made for specifically lighter paint, need to be considered for Acura’s pearl white paint?
Thanks! I love this site btw, you guys ROCK!
Paul
Thanks Paul.
Since so many new products have come out since I wrote this article several years ago, I’d probably approach it a bit differently. For compounding, I’d most likely use the Meguiar’s Microfiber Cutting Discs paired up with their D300 compound. And for finishing, I’d probably go with Menzerna Super Finish and a black finishing pad. As for the final products, you could use the Dodo White, or if you wanted something much more durable you should look into CarPro CQuarts. I hope this helps.
Hi Todd,
Thanks for your reply. Were you making recommendations based on me saying that I was going to use a PC 7424xp for the whole job?
I actually already bought the products that you used in the article prior to reading your response! So for any compounding work (rocker panels) I’m planning on using M105/orange pad. And for the finish I’ll use the PO85RD/Blue pad combo. Followed by the Wet Diamond Sealant.
My wife has a ’07 TL Type S, like yours, and I figured the products will be useful for her car too. Does that sound ok?
One last thing: How do you clean the door handles, and the area behind it where alot of scratches are from fingernails? I’m assuming this is done by hand, just not sure which compound/polish is best?
Thanks again! I can’t wait to get started!
Paul
any recommendation on what to use for the tail lights? Mine arent in bad condition, maybe light swirls if anything. Thanks.
Man, you are a rock star. What a stellar job of detailing. Kudos.
I’m sitting here in India, wondering where I can get my hands on all the different stuff that you used to make this happen. This might be my next project!
Thank you. Yes, I know that getting a lot of the good detailing products in India is more challenging. And the technologies change so quickly so what I used to do this car (3 years ago already?), some of them may be different today.
hey todd,
great write up, your skills are tremendous, i’ve been detailing for 5 years now and hope to be as good as you one day. I also drive a nbp tl and it is my 3rd nbp car So i;m getting there, i got acura/honda clear down pat pretty good right now. As you mentioned tl’s hoods get quite nasty, also i find the front bumpers are usually horrible. Do you have any write ups on rock chips. In some cases (most cases over 30 clicks) more like even coverage of rock chips across the bumper and first foot or so of the hood.
Thanks
Jay!
No, I don’t believe we have any articles on rock chip repair…but we should. To do it right, you’ll need to be able to sand down the touch-up, and then buff it back out. Rock chip repair / touch-up will never blend in and look factory…especially with metallics. I gave up on chasing rock chips on the front of my TL a long time ago because they were accumulating much faster than I could react to them. And the factory NBP touch-up paint looks too blue.
Hi Todd…. TL looks absolutely amazing… I also have a NBP TLS with minor to moderate paint defects. I was reading your review of Chemical Guys Black Light Hybrid Radiant Finish and was thinking of trying that product out first with my PC 7424xp set to 3.5-4 using light to moderate pressure and a Black or blue pad. Would also finish with Pete’s ’53 and Chemical Guys HYBRID V7. Could you give me your thoughts on what to expect from going that route. Also would I still need to do the tape prep work or can I just be a little more careful around edges? Thanks Todd
Conrad
Thanks Conrad. That sounds like a good combination with the NPB TLS and should make a nice difference at least on the lighter haze. While it won’t be perfect by any means, it will most definitely look better than the majority of the NBP cars out there that you’ll see. Good choice of products…
Hey todd, I think you did the ol skippidy do on my post lol.
Todd,
Excellent work sir! I’ve always wanted to learn how to do a better job of detailing my 2008 TL-S. This article is a perfect step-by-step instructional tool that will definitely help. I have a couple questions for you. My car is Carbon Bronze Pearl. In your experience, will the difference in color (compared to the NBP) require any different steps or would you recommend any different products? I like the Menzerna combination but the Meguiars 105/205 also seems enticing. Also, the 3 buckets used in the tutorial, where did you get them?
Thanks,
Matt
Matt,
I’d probably use the Meguiar’s MF Cutting Discs and D300 compound for heavier correction, followed by Menzerna 106FA and a black pad for finish polishing. I think those buckets were purchased at Lowes…but only use 5-gal buckets these days (this is an old article). Best of luck and have fun detailing.
Thanks for the follow up. A lot of your other articles state that you should use a rotary with the 106FA and black pad for the finishing process. Any recommendations for finishing with the PC 7472XP? I’m still fairly new to detailing and would like to avoid having to purchase a second polisher already. I’ll be using the Blackfire Wet Diamond for my sealant along with the LC blue pad. Do you usually stick with the 5.5″ pad when applying a sealant or do you think a 6.5″ would be more time efficient without sacrificing quality?
Thanks again,
Matt
Greeting from over the ocean. Great article I shall return for more.
First of all , congrats , the car looks amazing.
After everystep like polishing scratches and Jeweling your paint to a new level of gloss and depth …
How do you know when it is the right time to remove the polishing/wax product ?
and how do you remove it ?
Todd,
I”m from Indiana right next you in Ohio and I am planning on getting my car detailed. From this article I can tell that your hands put my car in great shape and I would love to get it detailed by you. Please contact me so I can get more information.
-Vikesh Pareddy
Todd, I have a white 2007 Acura TL, being new at the detailing world would you be able to give me some detailed advice on how to get started and what products would best be suited for my car that has a few scratches etc… Also where to buy these products, keep in mind I have never used a electric polishing tool 🙂 sad right lol
This might be hands down the most useful DIY I have ever come across. Thank you for going into the level of detail and for your efforts, greatly appreciated!
Hi Todd,
First of all, I would like to thank you for all of your information on this topic. I have a 2001 Audi TT roadster than required detailing so I followed these instructions and I didn’t quite get the look I was searching for. I have the PC 7424xp and online it says the speeds were 1500 – 6800 opm and maybe I didn’t go fast enough or applied enough pressure. When I did an area it would look slightly foggy and not have a gloss to it until I wiped it down. It would have the orbital lines throughout the area. Is the polish not breaking down enough. are there tricks of the trade I need to know about? And there is a photo that says not the polish is ready to be removed, did you just go over it with the orange pad and power finish to get the shine? And lastly how do you know if the polish is broken down?
Respectfully,
Justin
Awesome so much detail cant wait to do it to my car i have a nissan altima coupe (super black). I have a griots garage random orbital and their 1-3 polishes and their orange pads looking to their new pads too to help with the nasty swirls/scratches on my car think those are good enough?
So great post ! never found anything so complete ! Thank you for all, you are an expert ! (I hope you don’t mind I post this comment on every part of your post to be sure that I will receive the next comments by Email)
Hi there, this is the most detailed post I’ve ever read about detailing!
So I’m reviving this post with a question: you said that, “All the polishing is now completed, I have thoroughly removed all of the polish and carrier oils from the surface by (gently) wiping it down with a plush towel and Isopropyl Alcohol”.
I understand doing this step is to remove any oils and leftover surface contaminants, but this also removes the polish? I always though you can apply sealant over the polish (assuming the polished surface is clean).
Sounds like I’m still a noob when it comes to detailing, so thanks in advance for clarifying!
Eddie
Eddie – Using IPA or a product like the CarPro Eraser will remove any polishing oils or leftover polish that may be on the surface. This is an essential step that is needed to allow a coating to cure to the surface. If not done, the coating will not bond correctly and will not last long on the paint. For a traditional sealant, you could apply that after polishing as the oils in the polish did not affect how that sealant bonded as it is a completely different type of product. With that said if you used IPA to wipe down the surface before applying a traditional sealant, this would allow that sealant to last longer as it is being applied to a clean, bare layer of clear coat. With sealants however, that may only mean the difference of a week or two in longevity. With coatings that could mean weeks or years of a difference, so it is much, much more necessary. Hope that helps!
Thanks Reece for the insightful answer! Somehow, I haven’t come across any other websites that mention this step of removing polishing oils. I will make sure to use IPA or CarPro Eraser from now on as a definite step prior to applying sealant. Thanks again!!