
How To Detail a Brand New Car, featuring a Mercedes-Benz SLS AMG!
by Todd CooperiderHere on the Detailed Image Ask A Pro Blog, we’ve featured plenty of full paint correction details on cars that have been neglected over the years, as well as some that have come directly from the factory in less than stellar condition. But what about the majority of the brand new vehicles being delivered that are already in good shape? Do they require “detailing” services, and if so, what exactly should we be doing with them?
Most people assume that brand new cars are as good as it gets, and therefore no detailing work is required. This actually isn’t the case however, as new cars can benefit from a few crucial products and services in order to start them out on the right foot so to speak.
You should always start with proper surface preservation and protection when the vehicle is brand new. These are services that the factory or dealer simply can’t provide. Why not ensure that your vehicle remains as beautiful as the day you bought it, and stays protected from the elements into the future?
I’m going to outline some basic steps and services that you can perform yourself, or that a professional and reputable detailer can perform for you. By following this basic outline, you’ll be sure that your brand new vehicle is in top shape, and properly protected from the elements. This is also very similar to the same procedure you would normally do to prepare your car for winter.
For our demonstration vehicle, we were fortunate enough to have access to a brand new 571hp Mercedes Benz SLS AMG. This beauty is a modern throwback to the original and very famous 300SL Gulwing that was produced back in the mid fifties to early sixties. With 0-62mph times of just 3.8 seconds, and a top speed of 197mph, it is definitely a highly capable grand tourer!
I’d also like to take the opportunity to introduce everybody to Addison Good. He’s a detailer / friend of mine here in Columbus that helps me from time to time, and the SLS actually belongs to one of HIS very good clients! So thanks to Addison for the help and for the demo car. 🙂
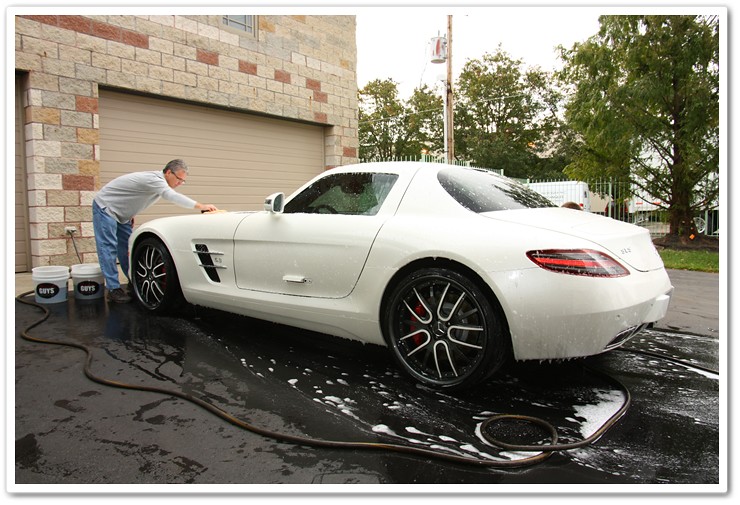
Decontamination Wash
The first step we need to take is to perform a thorough decontamination wash to make sure that the surfaces of the vehicle are completely stripped from any oils, shipping residue, dirt, or waxes / sealants that may have been applied by either the factory or dealership. This will ensure a good bond when we apply our own sealants.
For a detailed outline of the safe and proper wash methods, please follow our wash and dry tutorial.
One of the best ways to strip the surface is to use a high quality soap that is designed for this task when mixed at proper ratios. First we used our Gilmour Foam Gun to pre-soak the vehicle and allowed the solution to dwell and break down any previously applied waxes or sealants. While using Chemical Guys Citrus Wash at the paint prep ratio of 1 ounce per gallon, we proceeded by using the Grit Guard 2×4 wash method to safely clean the SLS.
Once the wash process was complete, we proceeded to clay the car using DI Ultra Fine Clay. Even on brand new cars, you’d be surprised at how many contaminants you’ll find embedded into the surface. If you don’t remove these right away, you’ll likely notice them in a few short months as very small rust spots that are easily seen on white cars like our new Mercedes. They’re still present on the darker cars, but they can be hard to see. If you’re not planning on polishing the vehicle, then I only recommend using the Ultra Fine Clay as the more aggressive compounds could potentially mar the finish. For more information on the claying process, I recommend reading our claying tutorial.
After the claying process was complete, we re-rinsed the surface to remove any residue, and then used our Metro Vac & Go to blow out all of the water from the cracks and crevices.

Engine Compartment
Despite the fact that we’re dealing with a brand new car, we still have some areas under the hood that can use our attention. We wiped down everything using Optimum No Rinse pre-mixed in a spray bottle, and we cleaned up any overspray from grease that had been applied to hinges from the factory. This is a nice touch because over time this will accumulate a lot of dirt and debris and will quickly turn black! Once everything was clean, it was time to add a layer of protection on all of the plastic components by using 303 Aerospace Protectant.
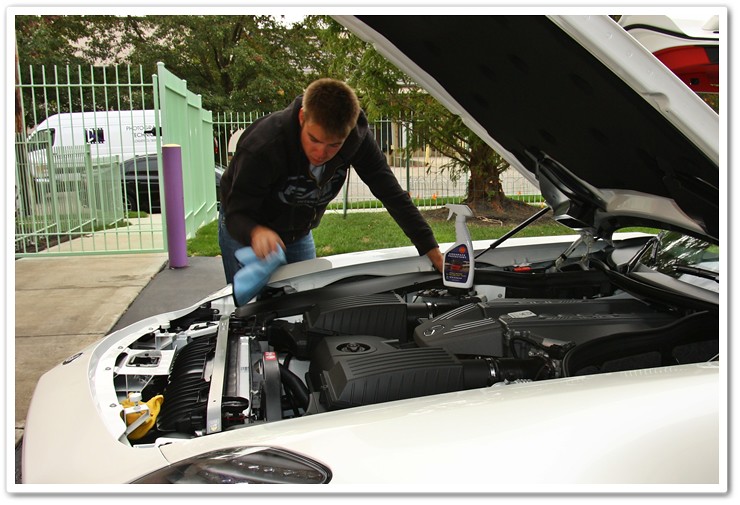
For a more complete breakdown on the process of detailing the engine bay, please refer to our tutorial.
Interior
While the interiors are typically going to be clean when new, they still require the application of various protectants depending on the type of surface. By using the proper products, we’re protecting the interior from harmful UV rays, spills, dirt, and anything else that comes in contact with it.
For all of the leather surfaces in the car (and there were a lot in this one!), I used Leatherique Prestine Clean. Not only does it have conditioners in it, but it also provides UV protection as well.
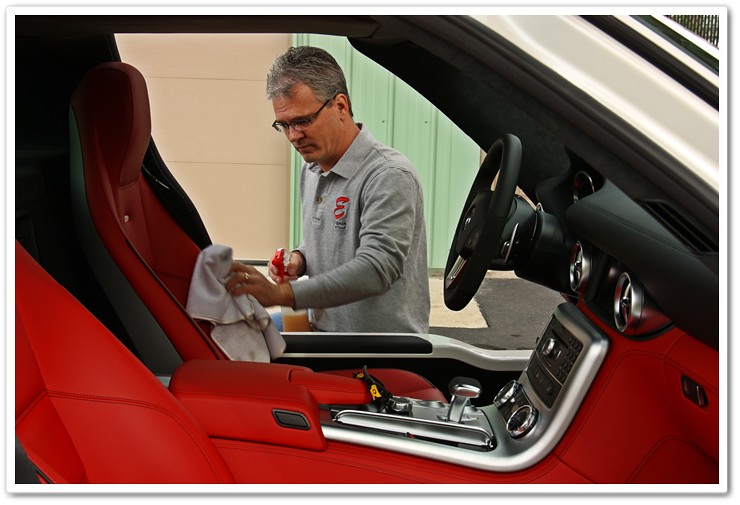
On the other hard surfaces inside the car, including the gauges, console, Nav screen, and stereo controls, we used 1Z Cockpit Premium to clean and protect.
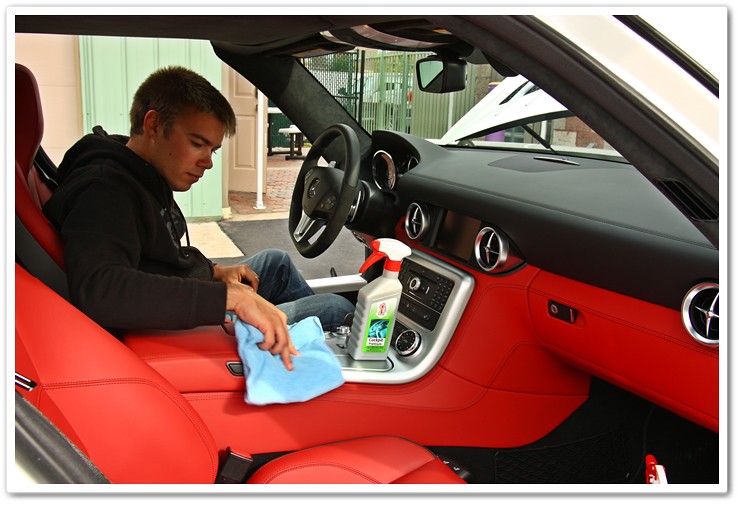
For carpets and floor mats, a thorough application of 303 High Tech Fabric Guard is recommended too (especially in the northern states!).
Another area that is important, yet often overlooked, is the treatment and conditioning of the seals around the car. If not cleaned and treated on a somewhat regular basis, the seals can start to dry and harden, which can lead to leaks and / or unwanted wind noise. We used 1Z Rubber Care Stick (Gummi Pflege Stift) on all of the door, hood, and trunk seals. Leatherique Prestine Clean is another great product option for the seals.
Sealing the exterior for protection:
Since the exterior of the vehicle gets bombarded with the most harsh elements (UV rays, road grime, bugs, birds, salt, rain, snow), it’s absolutely imperative that we start the sealing process from the beginning. It’s equally as important to make sure that we get into a regular schedule of having it refreshed every 4-6 months.
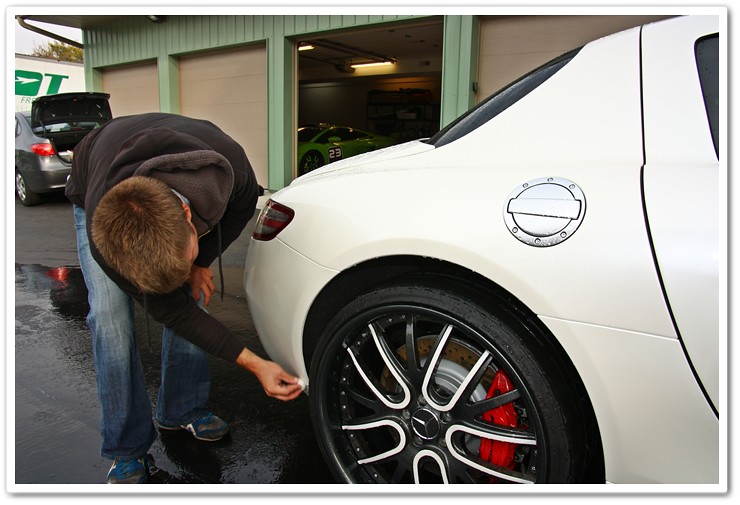
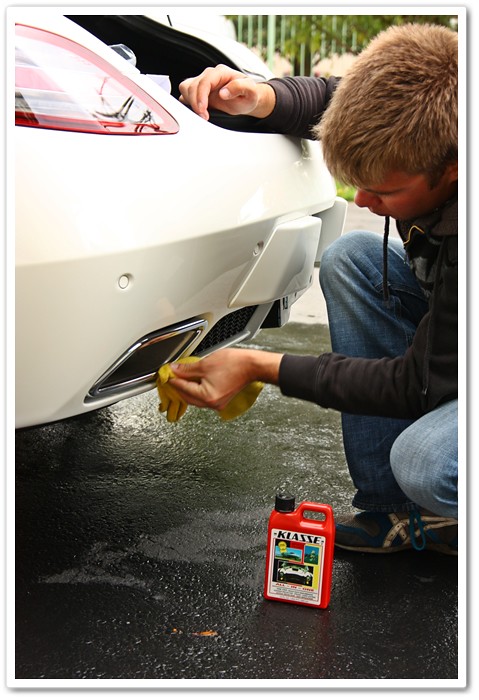
The wheels take a lot of abuse with brake dust, so in order to protect them and to make the cleaning process easier, we should seal them up and keep after them even more frequently than we do the rest of the car. There are a lot of great product choices for this task that are all relatively easy to use. Products like Optimum Opti-Seal, Wheel Wax, or Klasse Sealant Glaze are all great options. Another recommendation would be to use a spray wax on them each time you clean your wheels (just don’t spray it onto the brake calipers!).
On any metal parts or emblems around the car, I like to use Klasse All-In-One. It can actually be used on just about any hard surface (glass, paint, wheels, exhaust tips, door jambs, etc), and it does a great job of polishing and sealing.

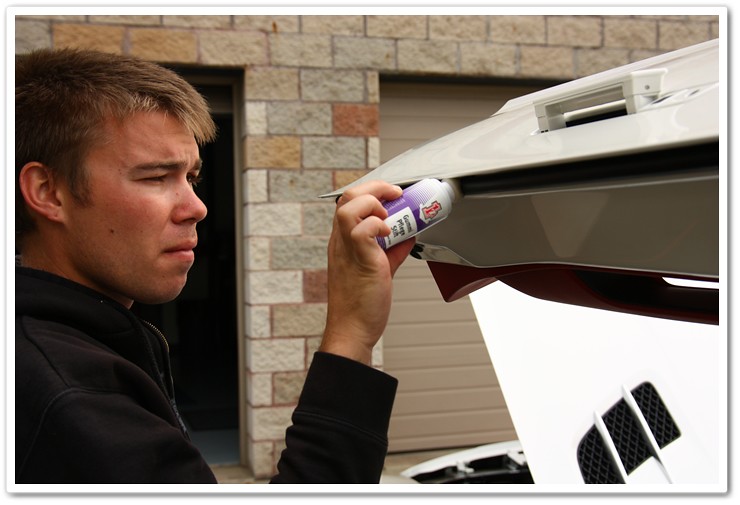
Let’s not forget the plastic trim on the exterior of the vehicle. Here Addison is treating these areas with 303 Aerospace Protectant.

Now that we’ve got all of the smaller areas sealed up, let’s move on to the most important…the paint! We chose to use a durable sealant as a base on this SLS, and as Addison does his maintenance detailing on it in the future he’ll most likely freshen it up occasionally with a high quality carnauba wax. Most sealants can be applied by hand or by buffer, and here I am using the Porter Cable to ensure I get an even coverage. For the tight areas where the machine can’t reach (vents, door jambs, under mirrors), I simply apply it by hand. There are a lot of great sealants to choose from, and some of my favorites are Blackfire Wet Diamond, Menzerna Powerlock, and Optimum Opti-Seal (only apply by hand). Most quality sealants will provide 4-6 months worth of protection from the elements.
On light colored cars like our SLS, it can be difficult to see how well the sealant is spreading over the surface. As you can tell from this photo, I must pay close attention to the surface to ensure an even coverage.

All Finished!
This process only takes about 3 hours to do, and it is well worth the effort. We treated and / or protected just about every surface inside and out of the car, and it will all help to keep our new car looking its best for much longer.
Now that our brand new car is properly detailed and protected from the elements, let’s go out and enjoy it!


Please reply in the box below if you have any additional comments or questions. Thanks for reading!


As usual, great advice, and meticulous detailing work, from Todd!
nice car!
Jealous. Great work! New cars need protection just as much as older cars.
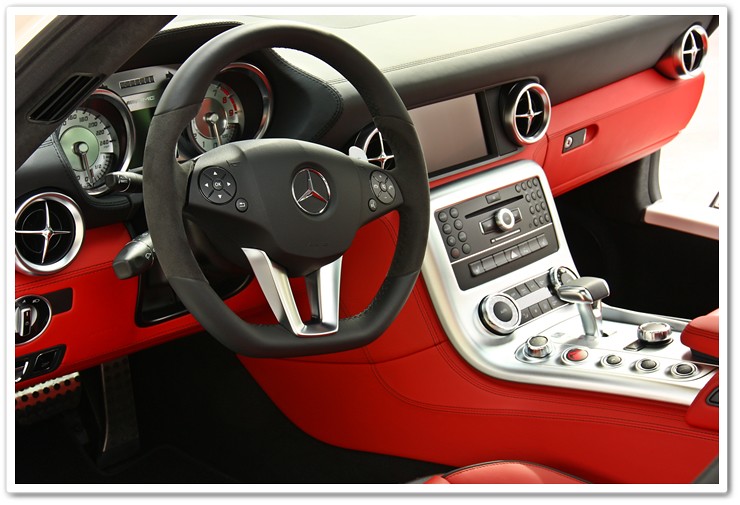
Great job guys! Todd, that interior shot is perfect!
Todd,
Great job an amazing machine by the way, thats good your getting some help every so often plus he gets to learn from one of the best in the bis.
Danny R.
amazing as usual todd. car is simply stunning!
A real beauty! Now the owner can truly enjoy the fresh & new feeling of his ride.
Amazing! Congrats Todd!
Todd
I have a 09 Silverado what is the best way to get my ,dash,door panels,console to look natural,really dont like the shiney look,mainley plastic and vinal.
thanx
Tom
Products like Optimum Protectant Plus and 1Z Cockpit Premium leave a more natural finish as opposed to a “dressed” look.
Todd,
I noticed for the new car that the car was not polished, just clay barred. My wife’s new car has small scratches down the front and on sides were it looks like someone dry towel cleaned the car used the wrong sort of towel on a black vehicle. What would you recommend?
Dave
Using a very fine clay on light colored surfaces in particular shouldn’t cause any marring that would require polishing (on new cars). Now if you have a car that has been driven, and it requires aggressive claying, it would most definitely require polishing afterwards.
On your scratches, you can try a product like Meguiar’s ScratchX by hand, but if that doesn’t do the trick, you’ll need to polish it / have it polished by machine to remove or reduce them.
Todd,
I have a new Frozen White Focus RS mk2. What in your opinion is the best product/s to give that deep wet look to this type of vehicle colour?
Best Regards
Mark (Oz…. down under)
Mark,
Thanks for checking in! There are a lot of different products that would look good on white, either in sealant or carnauba form. It also depends on what you have available to you down in Australia. Chemical Guys Blacklight is really hard to beat, and is extremely easy to use! Check it out and give it a try…
Todd..awesome writeup, awesome car!
I did a similar type of “new car detail” when I got my Mustang in May of 2006. The dealer was flabbergatsed when I told him I didn’t want them to do anything to the car before delivery… I even went to the point of telling them not to attach the registration sticker to the license plates, as I wanted it to be perfect.
Yoy mentioned that new cars will form small rust marks if not properly cleaned right away. Well fiancé bought a 2012 elantra in white about 9 mints ago and I noticed those spots. I used clay on it and it I’d the work but it was everywhere and I did not have the time that day for it. I have 2 questions for you. Why does that happen? Also what’s a good way to get them off right away? I have a pc7424xp. Thank you.
Those wheels….man those wheels!
First, thank you for the wealth of information you put out here for us all to use. It’s like having a complete book on detailing. Even though I’m getting older and can’t do as much as I used to, I still manage to keep my carslooking great.
I do have a question sbout a new car though. I just used Opti Seal for the first time and noticed that the hood had a little roughness to it. After reading this article, it’s clear that I should have clayed first.
So now I turn to the pro and adk “How should I proceed from here?” By the way, I did finish the sealing. I would really sppreciate the advice.
Ed in San Diego
Didn’t see any info on removing Film on the car when first received, how hard is it to remove and I read 3m Adhesive Remover.
Do you recommend this or have dealer remove and wash car only and seal and wax myself?
Also what high quality carnauba wax do you recommend
I just purchased a brand new 2015 Ford Explorer. I purchased this with a protection package already put on the exterior and interior of the vehicle. My question is…What can I do to either keep this or, as in the article, remove contaminants on the SUV? I did use their protectant supplied for the Interior to protect the ventilated seats, but not sure what to do about the exterior. It has a triple coated metallic white finish. I take great pride in my vehicles and really would like to keep this one around for a long time. Please advise as to what I can do. I really don’t think I should “remove” the sealants that are on the vehicle, but I love the articles…I have learned a bit about how to properly detail my new vehicle. Thanks for your input!!
this image is thhe number one!
Hello,
I am a petite female and owner of a brand new 2017 Kia Soul, a very adorable car which I now have for about 4-6 months. I have been doing the basic hand washing and drying the car myself, about every 3-4 weeks (probably should do more often, and not as easy as you guys make it sound) using all the right tools, (car shampoo, MF towels, 2 bucket, etc, etc, etc). I have the car about 4 -6 months now and have not waxed or polished or sealed yet. I live in South Florida where there is just too much sun which is NOT good for the paint. After reading about all the steps and the million products to use for this and that, quite frankly I have a huge headache. Was wondering if the people that spend so much time detailing their cars have day jobs LOL. Anyway the point is yes, the car gets dusty, yes the car gets bugs,grime etc. So why am I writing? I need an easy, no nonsense, basic essentials car care routine (with minimal products) that I can manage. I just want to keep the car nice as long as possible. Can you please advise? Also very confused as to the timing of when to use bug and tar remover; (before rinsing the car, after rinsing the car, before washing with soap, after washing with soap, before drying, after drying, you get my drift, ?????. And best/type of product to use for this purpose. Thanks in advance. Best wishes! 🙂 P.S. If I read one more article about car care, (so many varying opinions) I am going to scream! 🙂
more content please