
Ferrari F40: 60 Hour Restorative Detail by Todd Cooperider and Craig Reed
by Todd CooperiderOK, so we had a little fun with our F40 Preview, and I actually got a bit overwhelmed with the amount of emails I received asking for more information, photos, and a date when the completed project would be available. The plan was to produce the movie with Jason Statham as Craig Reed, and Robert Downey Jr as Todd Cooperider, but unfortunately neither were available in the near future. Since the whole project then got put on hold, I decided to just do the old fashioned write-up! Note to self: time to fire our agent and get one that can make our movie happen with the actors of our choice! 🙂
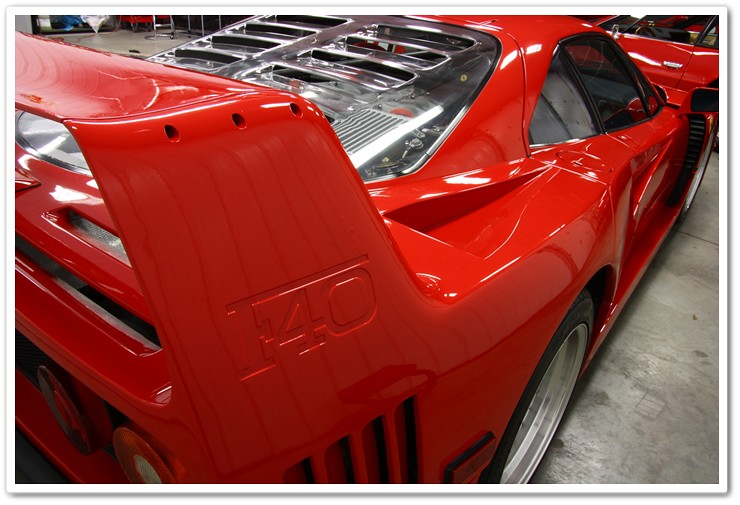
Ferrari F40: A True Supercar!
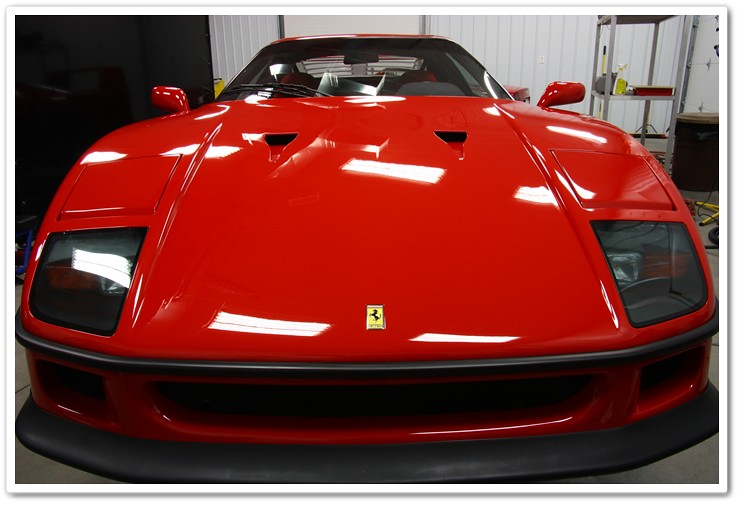
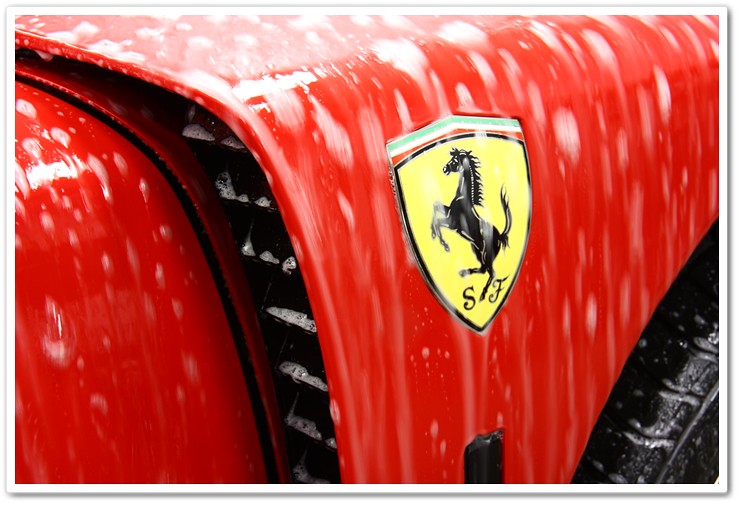
Very few supercars in history generate as much passion in automotive enthusiasts as the Ferrari F40. The aggressive yet timeless styling, the raw feel of a race car disguised for street use, the intoxicating sound, and the amazing performance all make for a car that will always hold a special place in automotive history.
The F40 was designed and built to commemorate Ferrari’s 40th Anniversary, and the designers and engineers pulled out all the stops when developing the successor to the rare and very limited edition 288 GTO. Although manufactured from 1997 through 1992, only a total of 1315 F40’s were ever built.
Powered by a 2.9L, 471hp twin-turbo V-8 engine, the F40 was capable of 0-60 runs in just 3.8 seconds, and a top speed of 200mph! It was the first road legal production car to reach 200mph.
While some supercars look very similar to others, there’s simply no mistaking the F40 for anything else out there. In my opinion this is one of the most stunning vehicles ever produced!
A Professional Detailer’s Responsibility to Preserve History
When a professional detailer is commissioned to perform paint correction on an F40, or any highly collectible vehicle for that matter, it is imperative that the goals are to make the vehicle look much better while at the same time preserving the history. The level of expectations should be thoroughly discussed and agreed upon by both the detailer and the owner of the vehicle, and they should be realistic as well. These expectations will be based upon the current condition of the vehicle, the types of defects that are present, and where the defects are located. There are so many (thinly painted) edges, corners, and tight areas that present a high level of risk when doing paint correction on an F40. A highly skilled detailer will know how to evaluate the defects and risk factors, and will know when to say when. Trying to chase down defects that are in dangerous spots is very risky when working on a car like the F40, and in my opinion the risk of damage or too much paint removal is not worth getting another 5% worth of correction. On this particular vehicle for instance, there were areas that I was able to achieve 95% correction, while others were 75%-80%. Some may have opted for wet sanding on a few of the remaining defects on this car, but quite frankly I think that would have been an irresponsible approach. Because of the Carbon and Kevlar-weave construction on the body of the F40, the paint thickness is very inconsistent, and there are areas where you can clearly see the texture and weave of the body. This causes potential problems when trying to measure thickness, which leaves you guessing in some areas. So should you decide to take such an aggressive approach with wet sanding to fully correct a deeper scratch, you could either cause immediate damage by striking through the paint, or you could possibly thin the paint so much in that area that there won’t be adequate paint thickness to do any further corrections down the road. There are simply some defects that should remain as part of the vehicle’s history. Paint preservation should always be top priority!
Something else that is important on vehicles like the F40 is to preserve originality as much as possible. That’s not to say that if the car originally came with buffer trails, holograms, or swirls that they shouldn’t be corrected because I’m sure that when the car was designed and developed it was never intended to get shipped that way (and many Ferrari’s do). But if the cars notoriously came from the factory with paint drips or runs, then they should stay that way.
Having the opportunity to restore a vehicle like the F40 is an honor and a big responsibility. The work you do will become part of the car’s history. Everything gets documented and passed on to future owners. The more precise documentation on the history of the car, the more that it can add to its value. The key here though is to become part of the car’s history, and not to create your own history. What that means is that if you’re doing paint correction and preservation (or any other type of work on the car), it should simply look good when you’re done without leaving any traces of evidence that you were there.
Introducing Craig Reed
Many people in the Ferrari community are well aware of Craig Reed’s long history of being a highly skilled Ferrari mechanic for the better part of 30 years now. Craig has a large following of clientele that have trusted him to work on their prized possessions for many years, and cars are shipped to him from around the country on a regular basis. Craig also serves as a Technical Advisor to the Ferrari Club of America – Ohio Chapter. Craig’s mechanical abilities never cease to amaze me, and I always enjoy watching him perform his magic. He’s tearing down and rebuilding engines, he’s fabricating parts, he’s doing his own re-plating, he’s managing restoration projects, and he’s doing it all with a high level of passion. I remember walking into the shop one day right after he put a 308 motor back together, and wish I had a camera with me that day. He was standing beside the purring engine, staring off into space while peering over the glasses that were perched at the end of his nose. One end of a stethoscope was in his ears, and the other was being placed in different spots of the engine while he listened carefully to what was going on inside. He was in his own little world; just man and machine. I’m sure he’s walked over into the detailing studio and found me in a similar state of mind while I stare into the paint.
I’m very fortunate to have Craig around to help me out with the major detailing projects. When there’s a need to disassemble one of the Ferrari’s that I’m working on, Craig’s the guy making it happen for me. When you look at major projects that I’ve written about like the Mini-Restoration on a 355GTS, you can see all of Craig’s “behind the scenes” work. This time around, I wanted to give credit where it’s due, and I wanted to showcase some of Craig’s work at the same time.
The Evaluation and Game Plan
Despite having only 3,500 miles on the odometer, the 20-year old Ferrari was still, well…20 years old! The condition of the paint was actually pretty decent for a car of this vintage, with a medium level of swirls, scratches, and other light defects. The undercarriage, suspension, brakes, and engine compartment however required a lot of work as it appeared as if it had ever been detailed, it was a very long time ago. There were also a few other small fixes and repairs to be done to various components, and we had plenty of opportunity to freshen up hardware and hoses.
My goal then was to achieve a high level of correction to the painted surfaces, while Craig’s was to freshen up as much as he could within the engine compartment.
Ferrari F40 Paint Correction Detail
The first step in the process is always to fully prep the finish for polishing during the wash and claying process to ensure a clean and smooth surface that is fully stripped from any waxes or sealants. For more information on this process, please refer to my article on How to Prep a Car for Polishing.
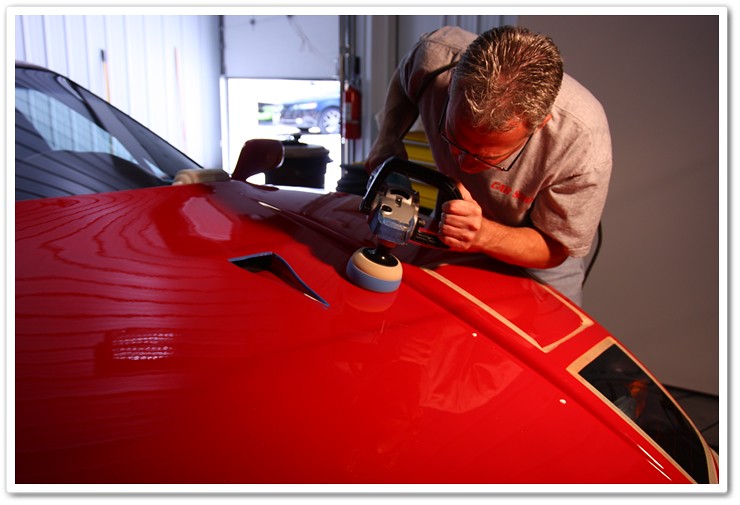
For the F40, I started with the hood to develop a process and combination of pads and compounds / polishes that would work for the entire car. Each polishing job is different, and requires some testing to see what’s going to work on that particular vehicle, on that particular day. Everybody asks how one knows what combination to go with, or they ask if (x) polish and (y) pad would be good for (z) car. With experience, you typically have a good idea of a starting point based on the car you’re working on (some paint is soft, some hard), what level of defects you have to work with, and what level of correction you’re aiming for. While this will help us narrow down our selection, it’s still not an exact science because some cars simply react differently from others. It’s simply a matter of having an outline based on what you have to work with, and then testing your combination to see if it achieves the desired results. Once you have your system dialed in, then you can proceed with the rest of the vehicle.
The single stage F40 paint is similar to that of the 288 GTO in that it required a more aggressive approach to get the desired level of correction. I wouldn’t necessarily call it “hard” paint like on the 430 or 458, but it still required some massaging. I found that for the compounding stage, the best combination was Meguiar’s M105 on my Makita rotary teamed up with a Lake Country Cyan Hydro-Tech Pad.
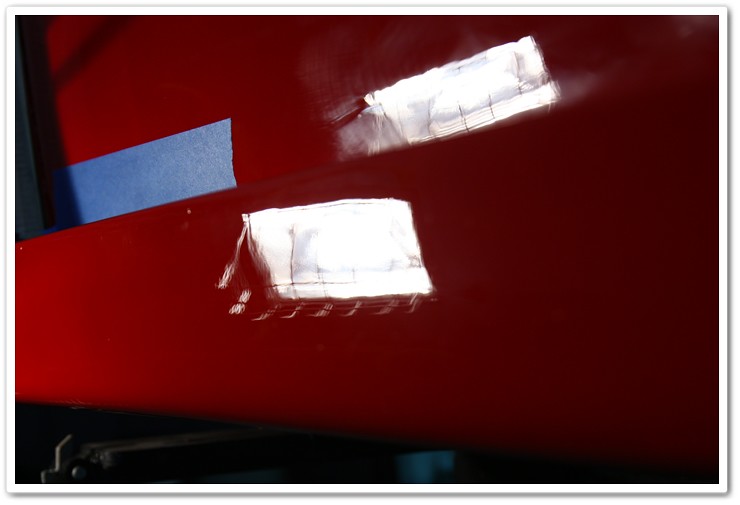
In this photo, you can see that I am using the 4″ spot pad to get better access to the defects next to the raised edge on the hood. The smaller pad in areas like this will give better cut, and provide more control as well which is very important when dealing with delicate and highly valuable vehicles.
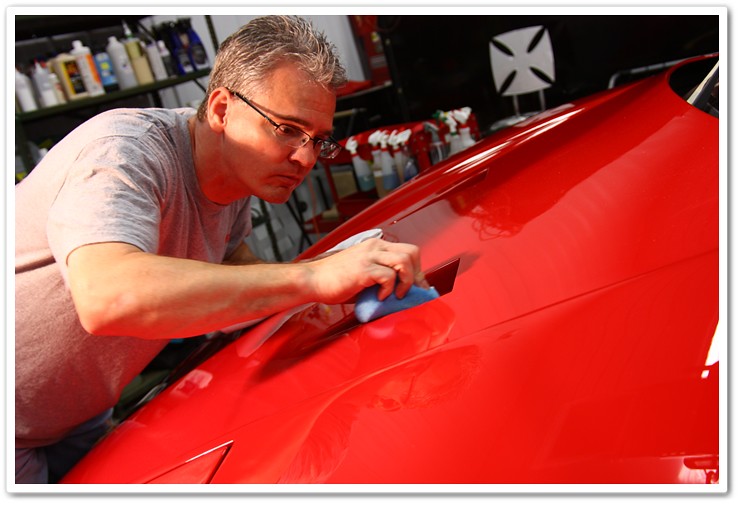
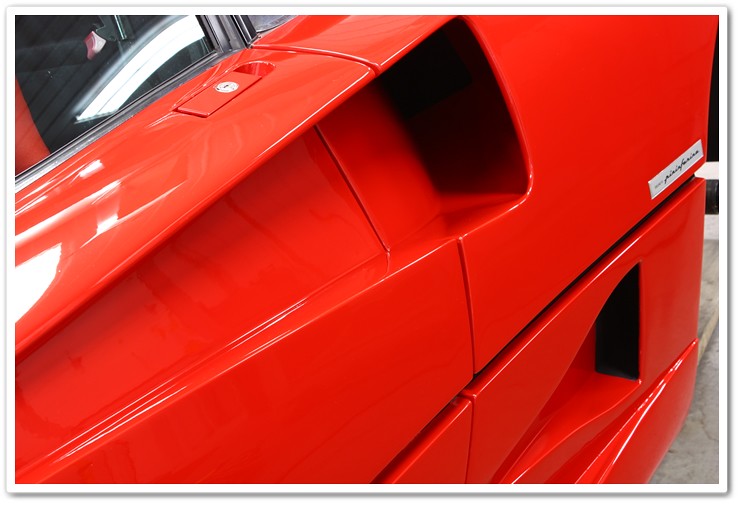
With the exception of the main part of the hood, and the roof, the F40 required the used of 4″ pads on the rest of the car! Because of the smaller pad surface you have to work with, you can plan on spending a lot more time polishing. There are just very few large, flat surfaces on vehicles like these and you have to take that into consideration when calculating the amount of time it will take to work on the them.
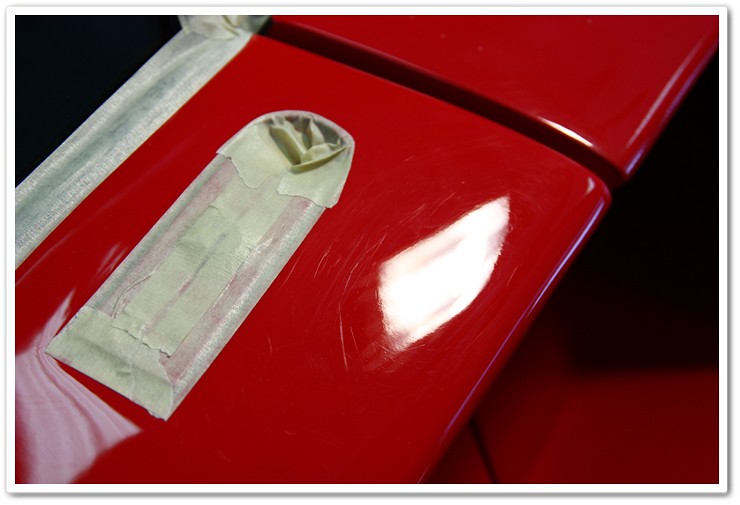
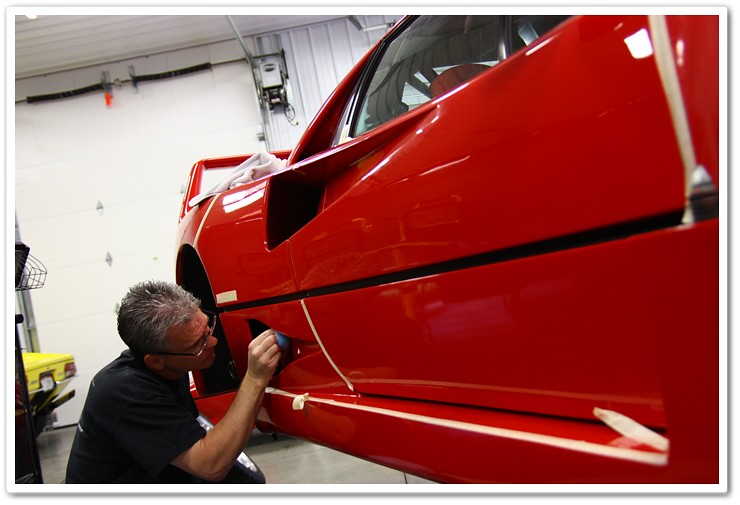
In this photo you can get an even better example of why the F40 takes so long to polish. Not only am I using the small 4″ pad, but in many areas like this I can only use a very small part of that pad. The trim is completely taped up to protect it from the pad and backing plate, and the entire process is slow going. I don’t recommend polishing areas like this right after downing a few cups of coffee as you want and need a steady hand!

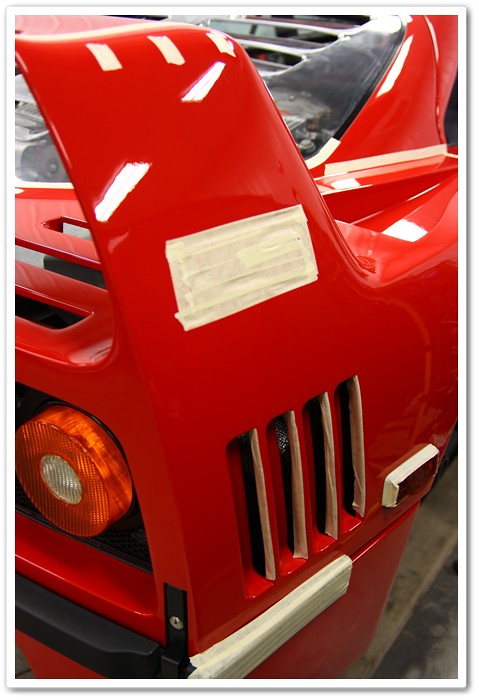
And yet another example of why the F40 requires so much time…there’s a tremendous amount of hand-polishing required! As you read through this post and look at the photos, take note of all the ducts, vents, and other small areas that can’t be polished by machine. While you’re not going to achieve the same level of correction by hand as you would by machine, you can still achieve good results when using Meguiar’s M105 compound and M205 Finishing Polish.
Normally my process would be to go around the car for the compounding stage, and then when finished I would start at the beginning again with the finishing polish stage. For the F40 however, I decided to change it up a bit and work in sections. For the front end in particular, I did all of my compounding, and then moved onto finish polishing with Menzerna 106FA polish and a Lake Country Tangerine Hydro Tech Pad before moving on to the rest of the car. The front end alone took an entire day! The reason I did this is because a vehicle this complex can become a daunting task. I knew that it was going to require a tremendous investment in time, and I wanted to compartmentalize the car a bit to keep each area fresh. The compounding stage in particular requires a lot of focus, and you can quickly get both physically and mentally drained when all you’re doing is compounding all day long (for multiple days). By breaking the car down into sections, I was able to compound, then do my finishing polish, and I knew that I was “done” with that section. There are also a lot of challenging areas on the F40, and it’s good to keep your focus on that specific area until you’re finished. Had I done it the “traditional” way, I’d have to get my mind wrapped around those angles and set of challenges, and then do it all over again once I came back around for finishing polishing days later. I would get into a zone so to speak while working a specific area until I was finished with it, and then move on.
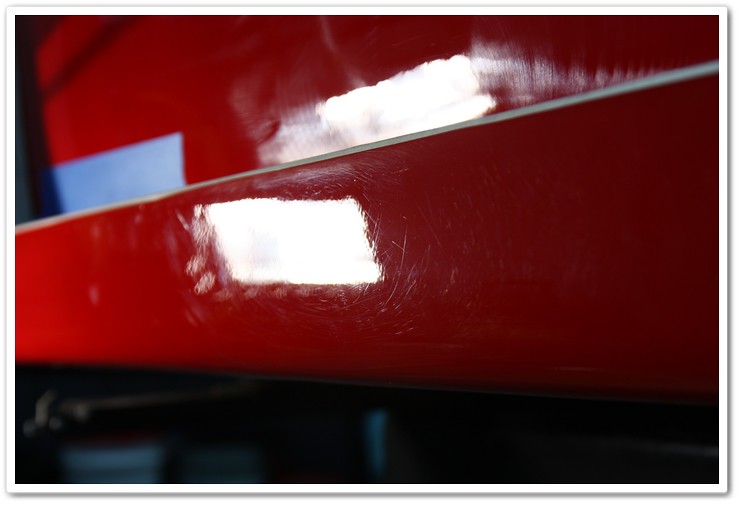
Now on to the driver’s side of the car, I’m working on the lower rockers. This area is typically bad on all cars, but on the F40 it was in pretty rough shape because it’s quite difficult to get in and out of the car without having your shoes or leg rub up against it. I wasn’t able to get the camera angle and light just right to capture the severity of the defects, but you’ll just have to trust me on this one…they were bad!
After polishing:
The door handle area on both sides of the car had quite a bit of deeper scratches from years of handling. What made this area even more challenging was that the edges of the recessed door handle were so thin that you could actually see through them. I used plenty of tape, and did a lot of very slow passes to safely clean up as many of the defects as possible.
Driver’s side before:
After:

Passenger side before:

After:

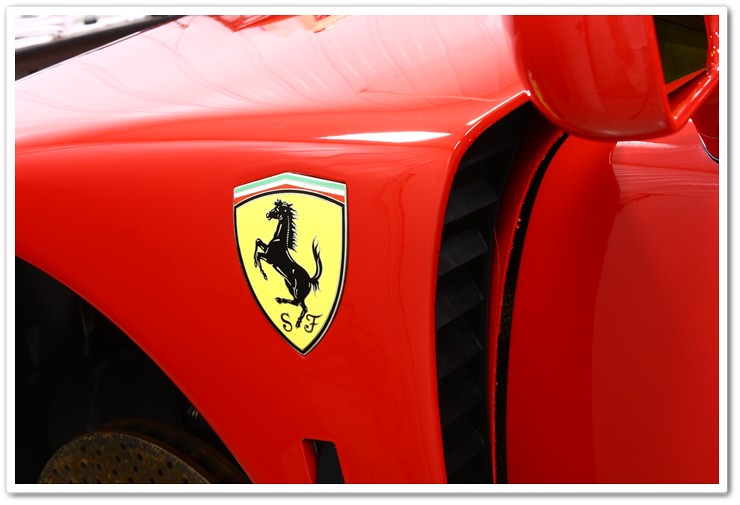
When working around all of the dangerous curves and thin edges of the F40, being cautious was top priority. On the fuel caps for instance, the edges had already been compromised at some point in the past so I made sure that the buffer never came close to preserve as much paint integrity as possible.

Here as well you can get a good idea of the amount of taping that is required for protection. I went through several rolls of Meguiar’s tape on this car!
The left side of the car at this point had been completely compounded and polished, and a quick check in the halogen shows it to be defect free now with a significantly improved level of depth and gloss.

Another early morning in the shop as I start to work on the passenger side of the car.

Another check in the halogen after compounding and polishing reveals a finish that this F40 hasn’t seen in many, many years. As the swirls were removed and the finish was leveled, the true shade of red came out at the same time.

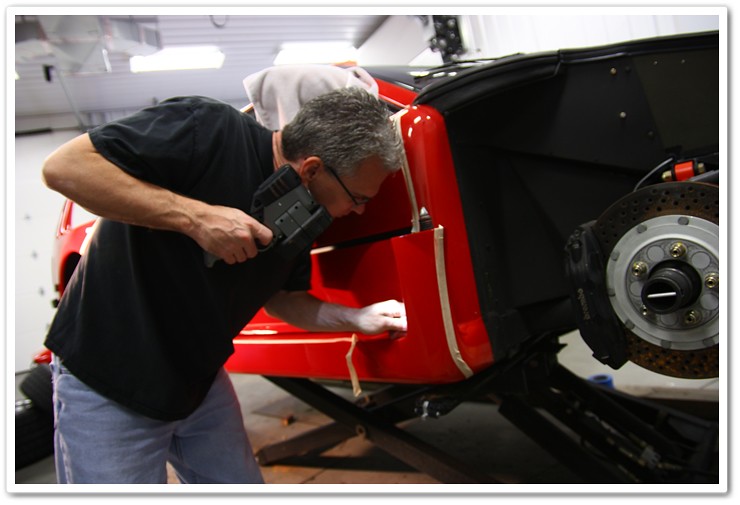
The huge door sills on the F40 were challenging to say the least. They had some of the highest level of defects, they are very hard to reach all of the areas, and the multiple edges were very thin (I could see right through the paint in some areas when using my Brinkmann Dual LED inspection light). I taped it all up, and polished to get as good as I could while being safe. In the end however, these areas achieved about a 75% correction level.

Here was one of the many areas that couldn’t be reached with a machine, so I viewed the defects through the light of the Brinkmann while polishing by hand to get it as good as I could.
And yet more polishing by hand…
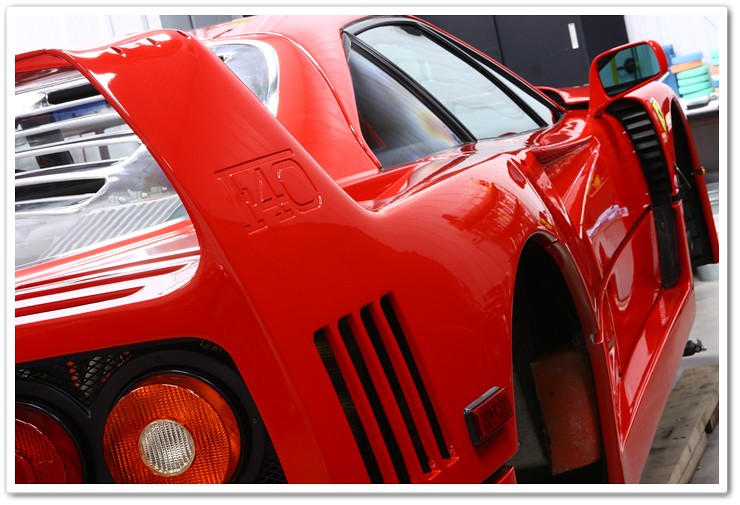
The back end of the vehicle had by far the most challenging areas, so I saved it up for last and made it like a mini-project in itself. There were a lot of different issues to tackle while back here for sure!
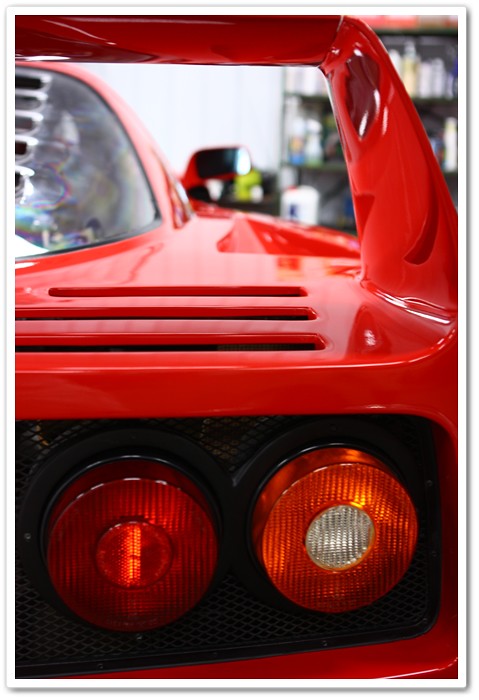
The tail lights get swirled up and hazy just like the paint does, and they can be polished out as well. When you look at the first photo here, the lens doesn’t look too bad…that is until you look at the second, “after” photo.
Before:
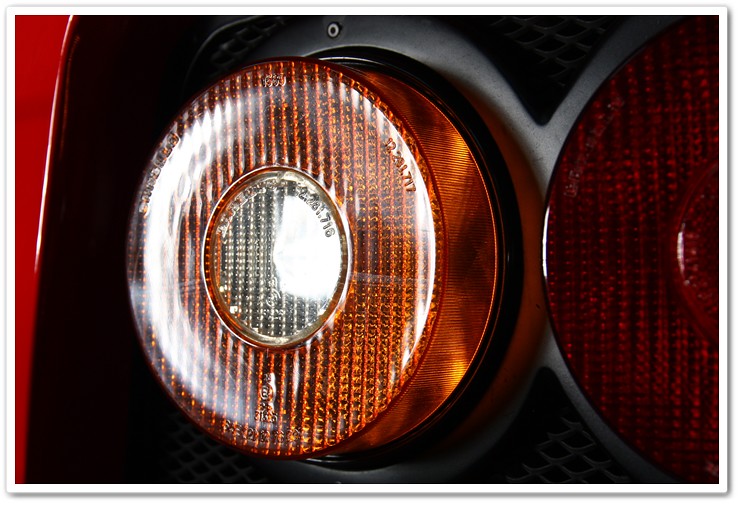
After: Look at how the clarity has been improved by removing the haziness.

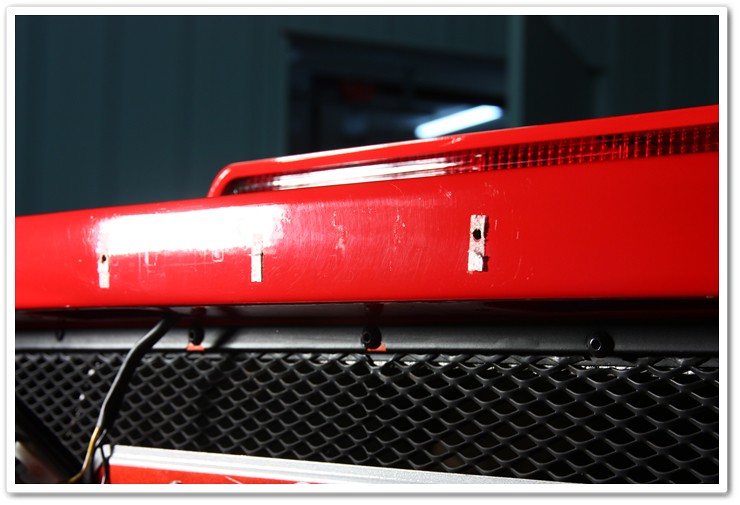
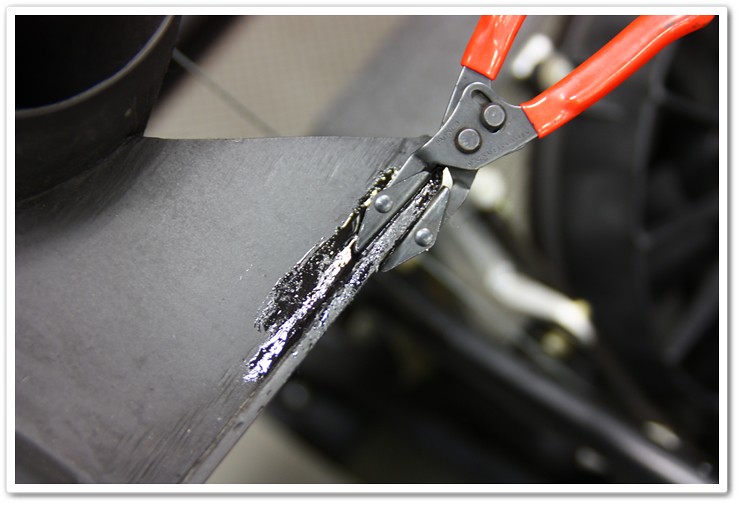
The painted surface underneath the emblems typically get neglected, and there’s no way you can fully polish them out to match the rest of the surfaces without removing them. So…I had Craig remove the Ferrari emblem at the back of the car (which wasn’t the easiest task!). Look at how hazy the paint is where the emblem goes:
After polishing

This was quite a labor-intensive section of the F40
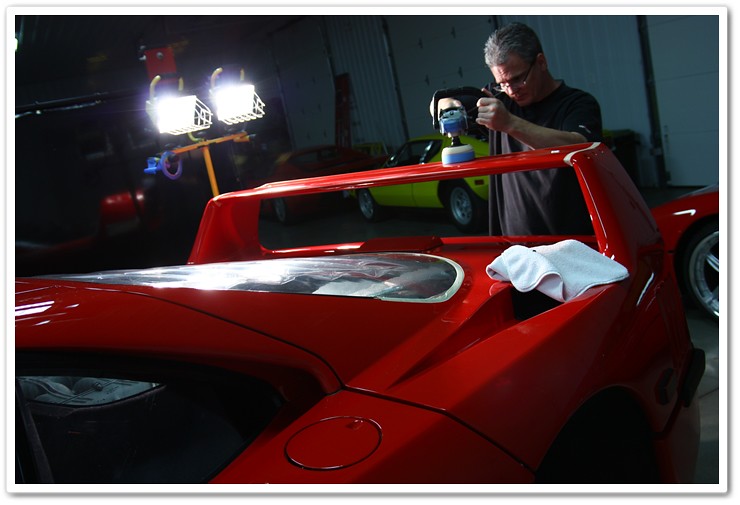
The Porter Cable 7424XP D/A was used in the tighter areas.

And my wife wonders why I’m so physically worn out at the end of the day!

At this point I have finished all of my compounding and polishing, and am ready to clean the paint and apply a sealant. For compounding I used Meguiar’s M105 Ultra Cut Compound and Lake Country Cyan Hydro-Tech Pads. For finish polishing I used Menzerna 106FA Super Finish and a Tangerine Hydro-Tech pad in some areas, and Menzerna PO203S Power Finish and a Black Pad in others.
For paint cleaning and to prep the surface for my sealant, I used Chemical Guys EZ Creme Glaze applied with a PC. For my sealant, I used Blackfire Wet Diamond also applied by PC.
Before we move on to other aspects of the detail, let’s take a quick look at how our paint is looking now that it’s completely polished and sealed:
The color is looking much better, and the gloss and clarity have improved considerably as well.

Now that is what red is supposed to look like!
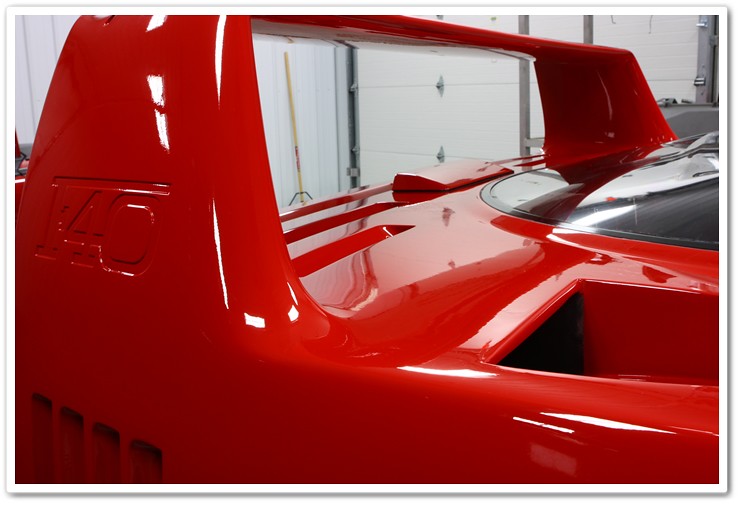
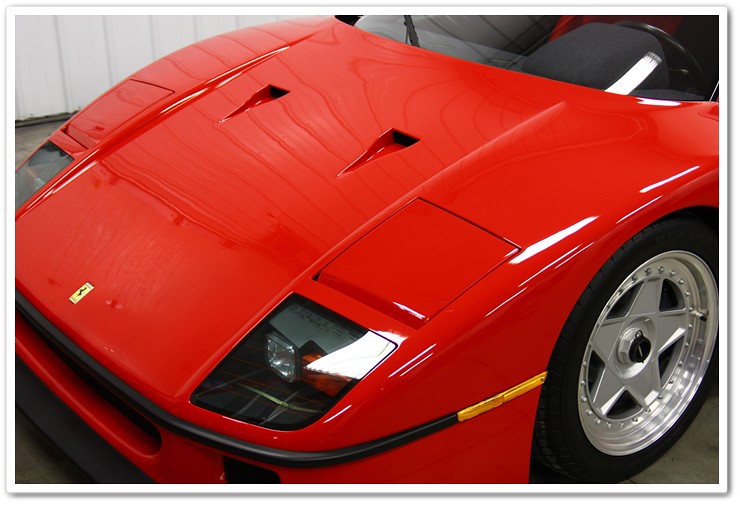
First of all, this angle really shows just how beautiful this car is! Secondly, it makes it painfully clear why it takes so long to polish the F40.
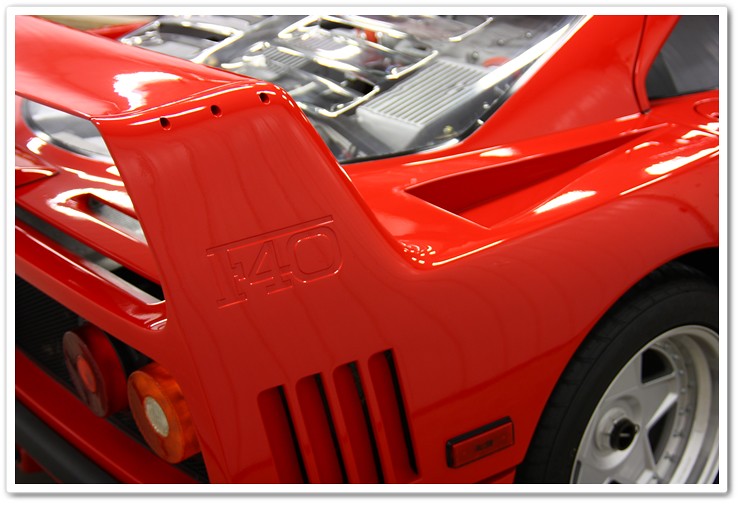
Got Gloss?
And yes, I did polish all the way inside these vents by hand!


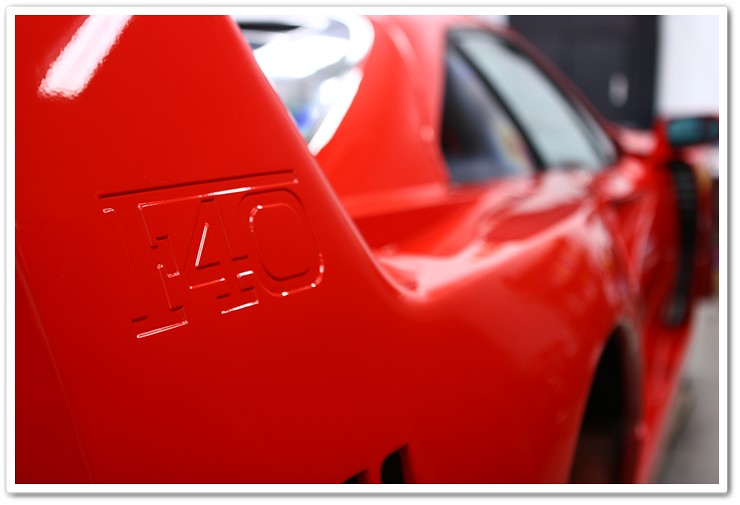
The embossed F40 logo was all polished by hand because of the thin edges.
Now that I’ve given you a taste of what the paint looks like, let’s move on to other parts of the car and to show a bit of what Craig had to work on.
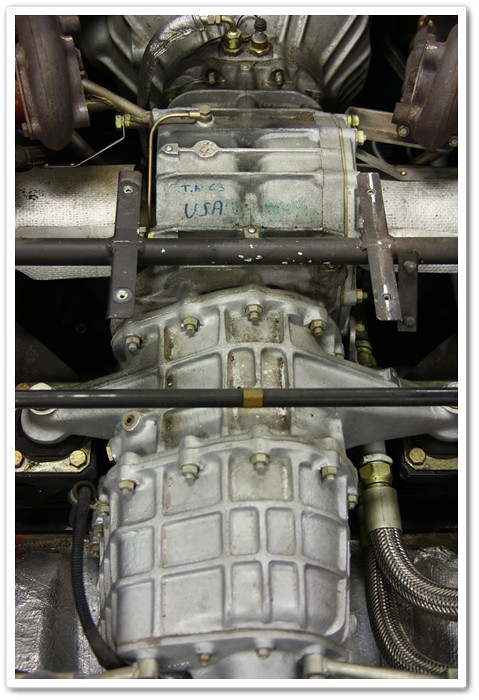
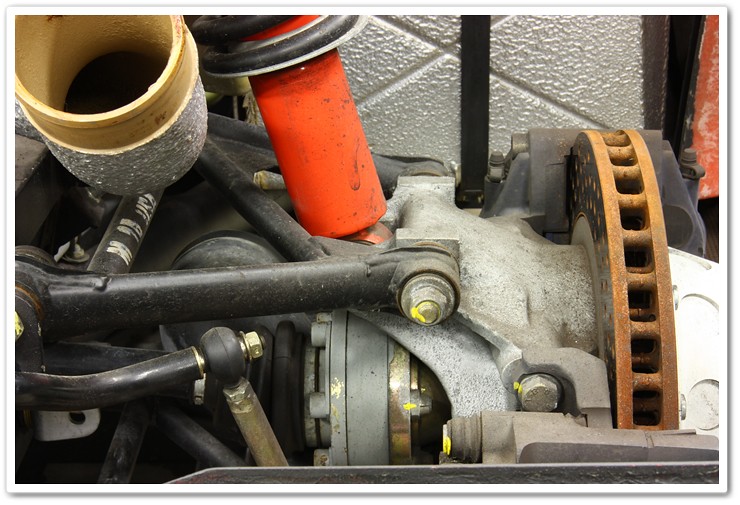
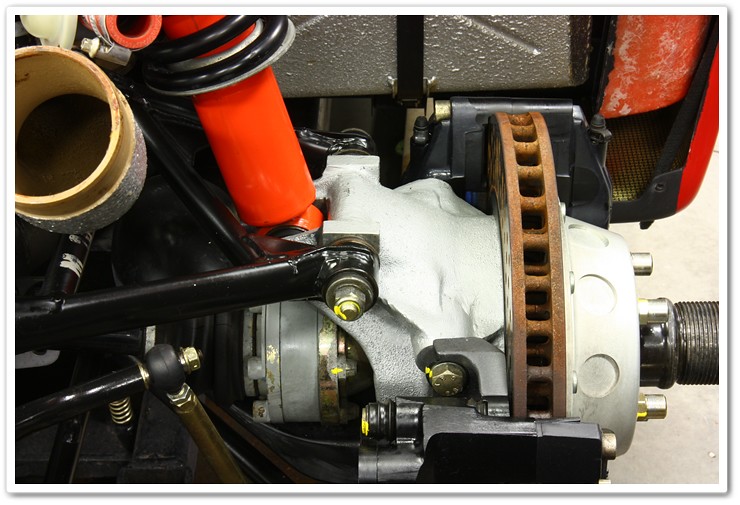
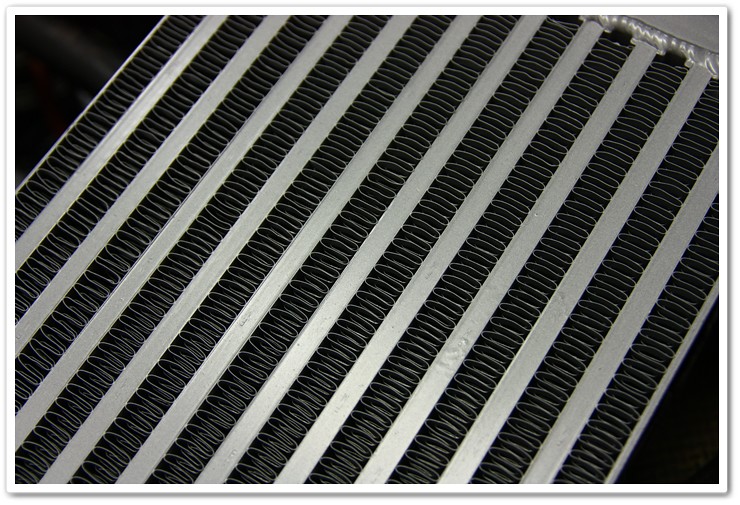
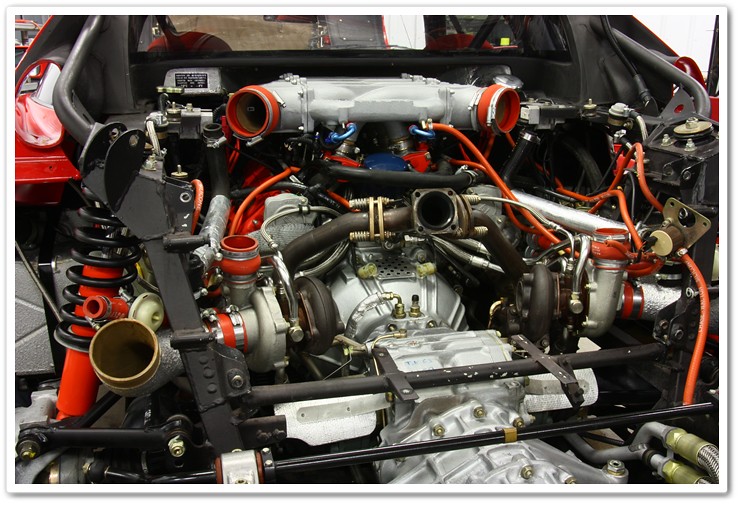
F40 Engine and Suspension Detailing / Restoration
This was the part of the restorative detail that required a lot of meticulous work combined with years of mechanical expertise to do it all correctly. You’re simply not going to get this level of engine detailing by a detailer, so having Craig Reed to team up with is a huge bonus for me.
And the service that he/we performed wasn’t limited to simple cleaning of engine, suspension, and brake components. Many items were painted, some hardware and miscellaneous odds and ends were re-plated (in-house), appearance repairs were made, and some hardware was replaced. Craig himself had roughly 25 hours invested in his portion of the restorative detail on the F40.
So as the process started, Craig (pre-haircut) began to disassemble the engine.
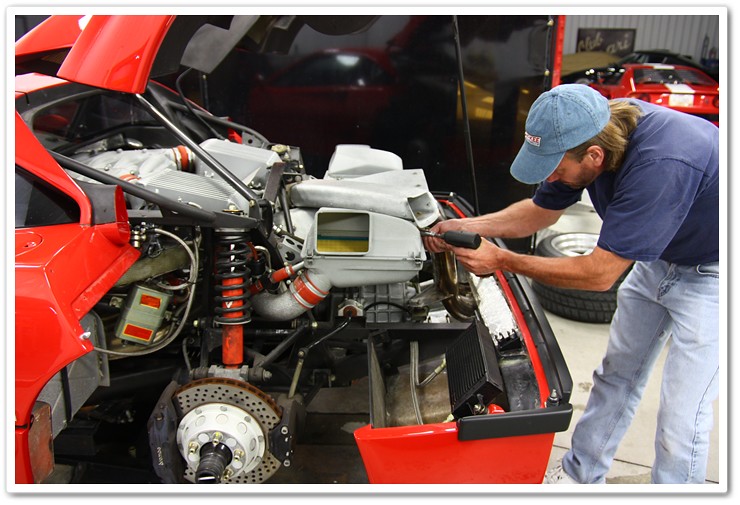
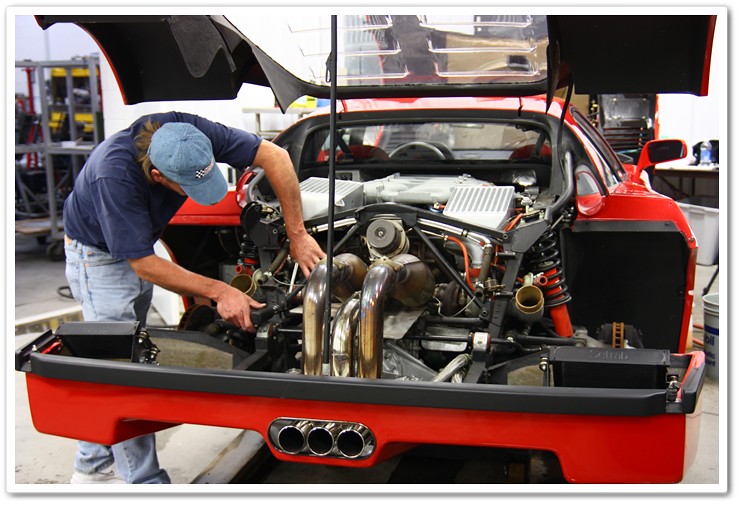
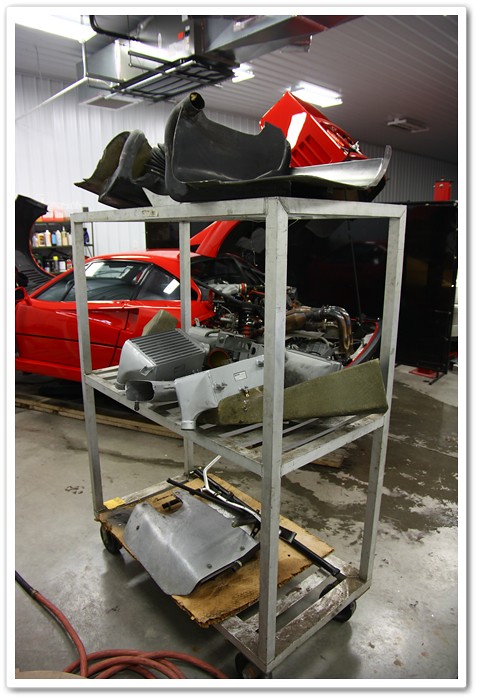
Things are really starting to happen now! Each item removed would be fully detailed, repaired, and / or painted as required.
Now we’re in business, and Craig Reed can really get busy bringing the engine bay back to life.

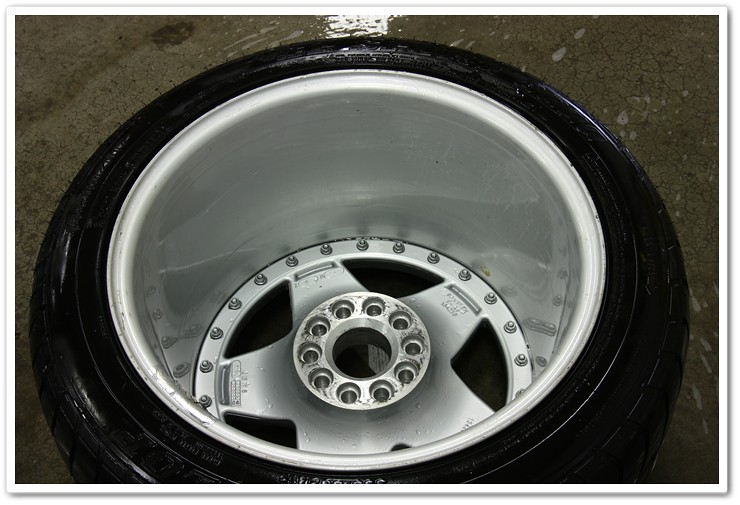
While Craig was busy working on cleaning up 20 years of grime in the engine bay (proprietary tools and methods), I started on the wheels. Given the design on these massive Speedline rims, it’s near impossible to properly clean them while they’re on the car. We had everything removed in order to get to the suspension and brake components, so it made the process much easier. I soaked the wheels in P21S Wheel Gel to break down all of the brake dust and grime.
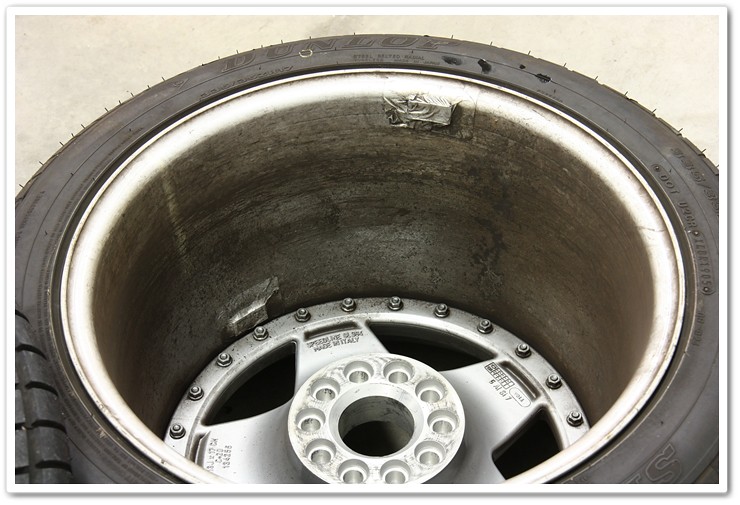
Wheels are soaking in the gentle and safe cleaner.
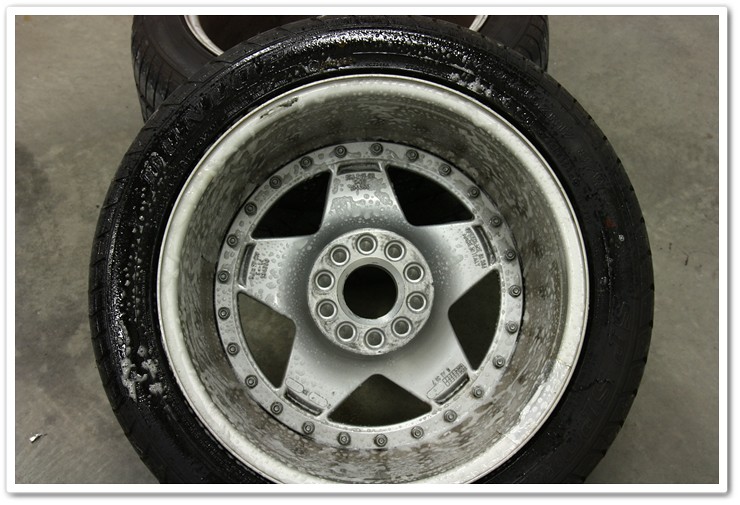
All clean! They would eventually get sealed up so that they will resist the buildup of brake dust.
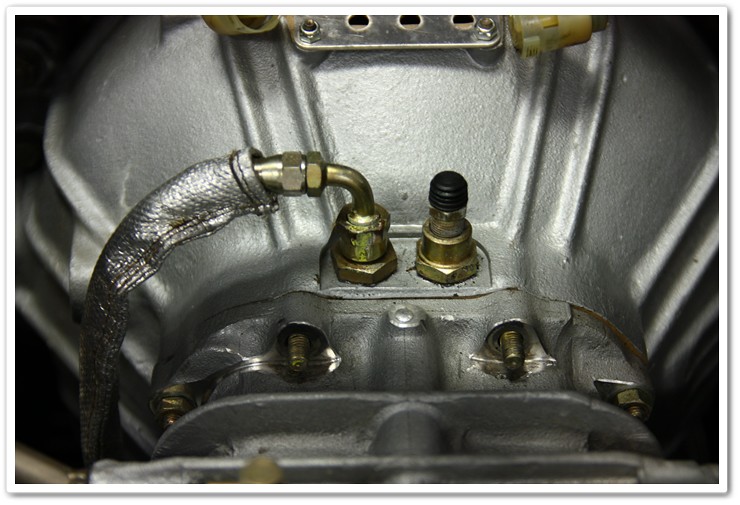
Now I’m going to go into a series of before and after photos for specific components and areas of the engine, brakes, and suspension. There are no dressings or protectants in any of the after photos…
Before
After. Craig went back and touched up the “USA” writing as well before putting everything back together.

Before

After
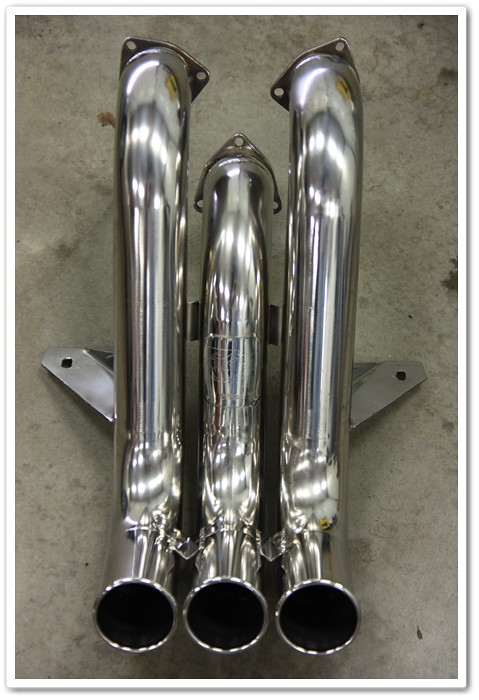
Tubi Exhaust before

After
Even items like these were fully cleaned
After
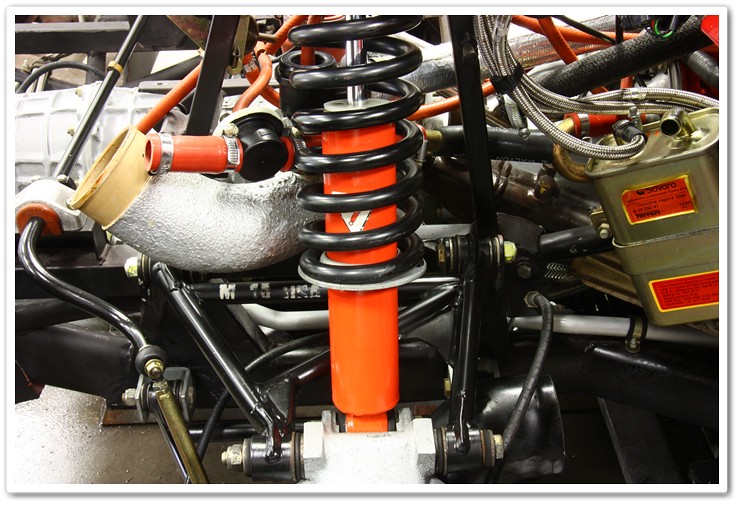
Suspension before
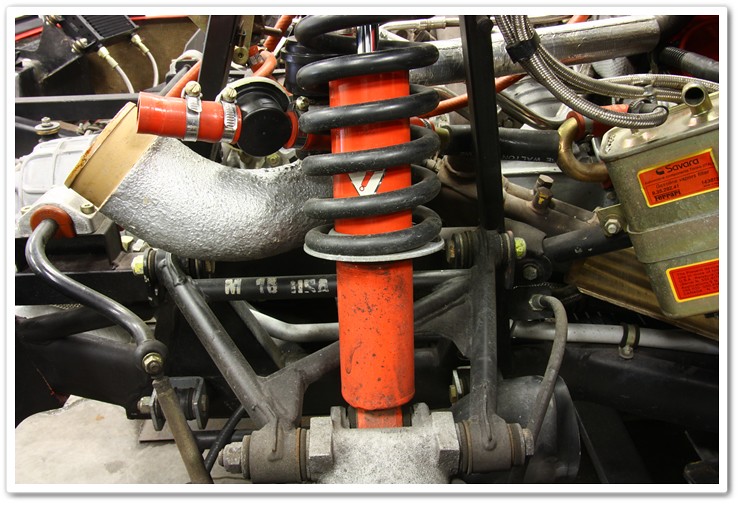
After (once again…no dressing was applied so you’re seeing the true condition)
Before
After
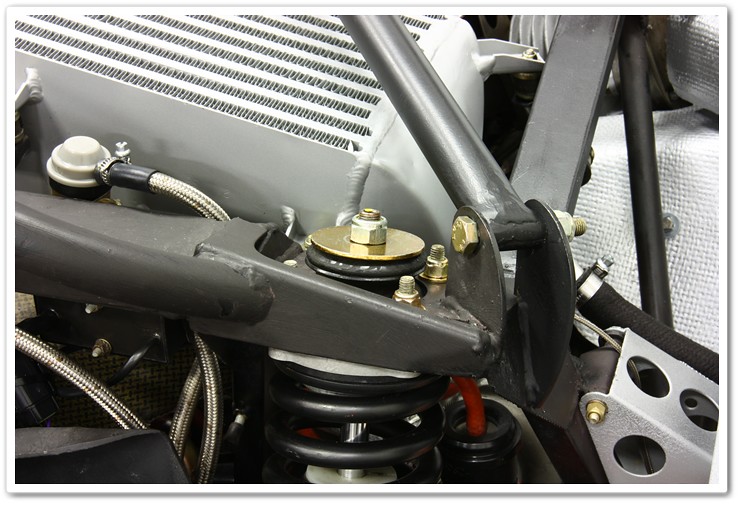
You want to talk about attention to details…notice how some of the coils are slightly bent in this photo. Craig went in and individually straightened each one of them.
Before

After
Now the engine, suspension, frame, and brake components are all cleaned up and ready for Craig to put back together once he’s finished with some painting, re-plating, etc.
There were small cosmetic repairs here and there that needed to be tended to…in progress
After

The factory protective film at the front of the car was delaminating on both sides of the car, so Craig went in and repaired them accordingly
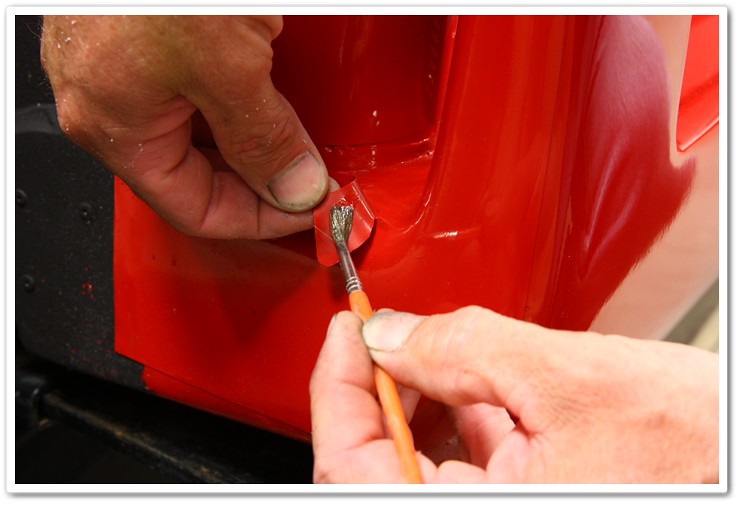
And even some of the decals within the engine compartment were tended to as well to re-adhere edges that were coming up

Here’s the master Craig Reed himself at work (post hair-cut…Jason Statham would have been a dead ringer for the role!)

Craig actually re-dyed the fabric on this hose to restore it to like-new condition
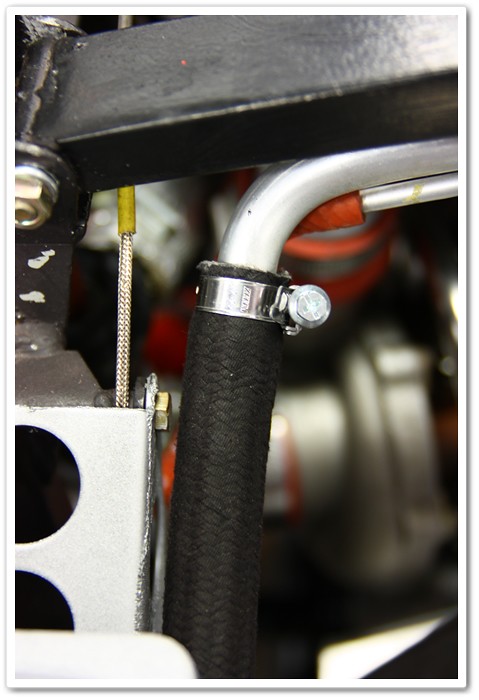
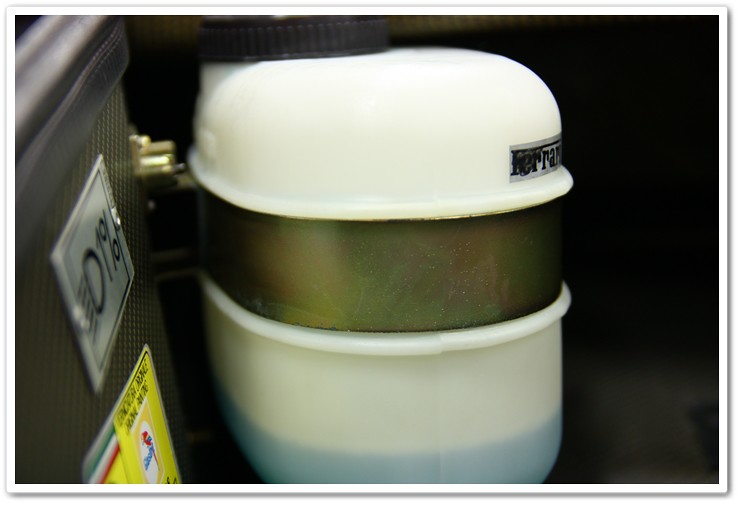
Even small details were taken care of…note the buildup of washer fluid around the bracket before
After
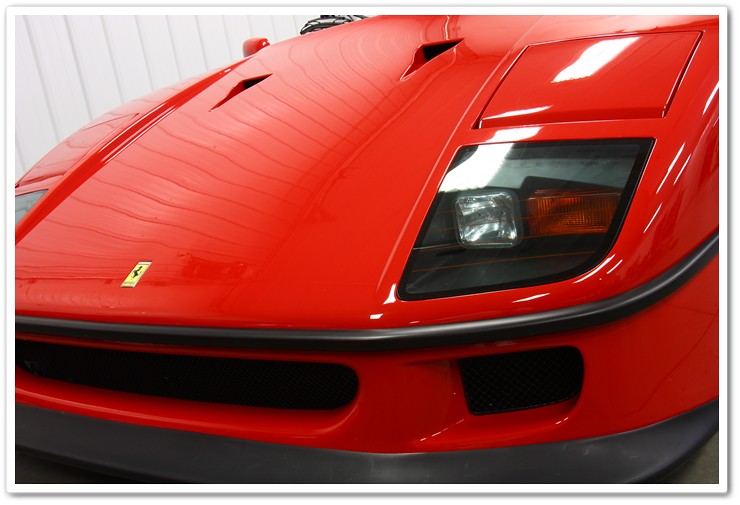
From a wide view you can see the headlight mechanism on the underneath side of the hood.
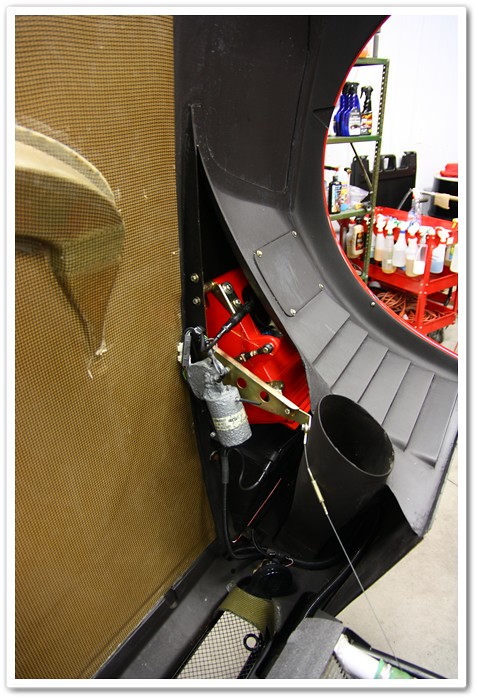
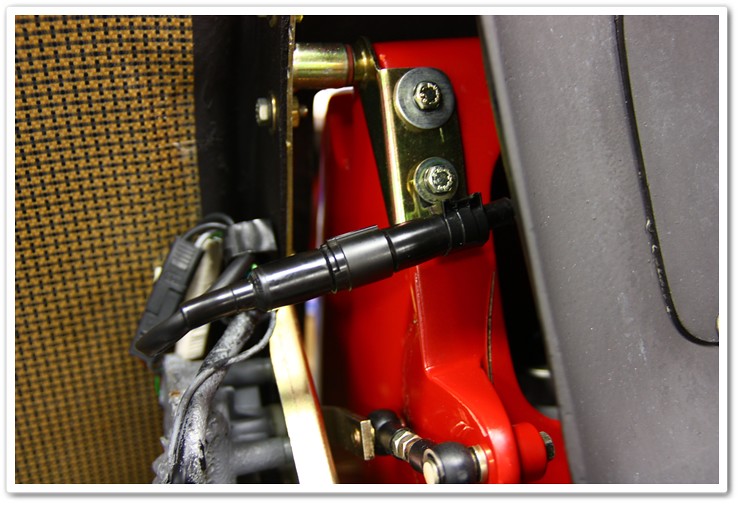
When I zoom in, you can see that all of the mechanical components and hoses were completely detailed as well (all of the gray stuff you see on the left is factory applied and original)
We’ve covered about all areas of the F40 now from paint correction to engine and suspension detailing to cosmetic repairs. Craig and I both put a lot of passion into the restorative detail on this piece of automotive history, and it is properly freshened up for many years to come.
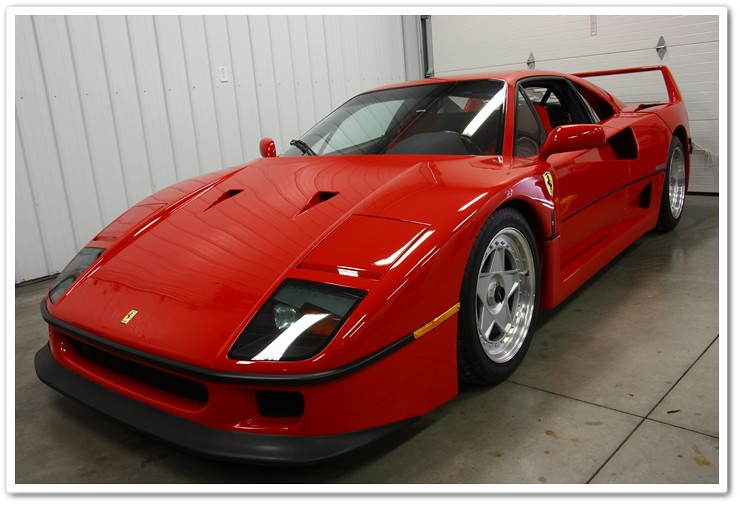
Ferrari F40 Images: Finished Product


Truly a beautiful sight!


The F40 ended up with a very high level of gloss and depth once the detail was completed.

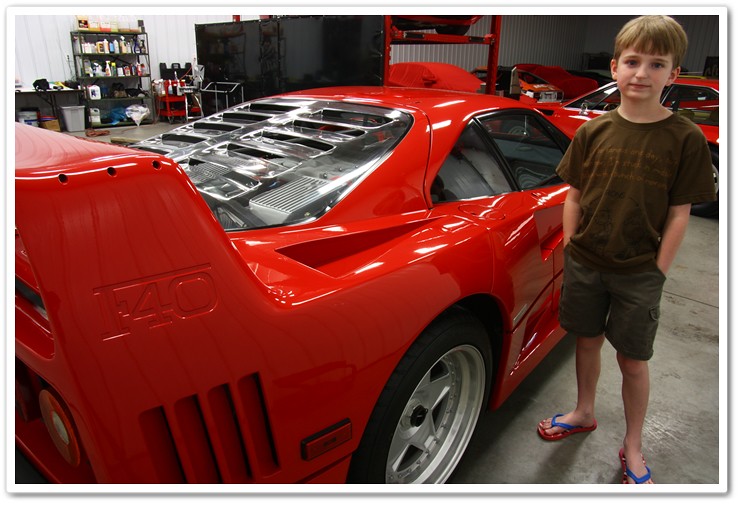
For those of you who have never seen an F40 in person, I wanted to give you some perspective on how low the car sits by having my 10 year old son Cameron stand next to it. The F40 is one of his favorites. 🙂


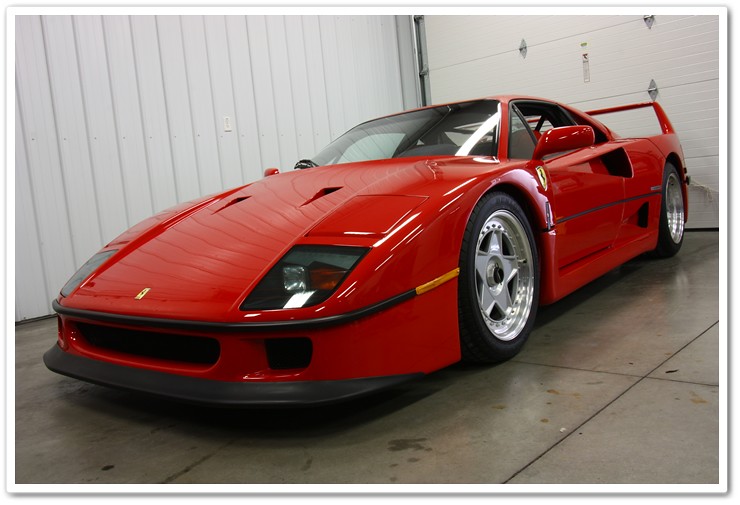
What a stunning automobile!
And finally…
Well I certainly thank you for taking the time to go through all of the details and photos on this successful project. Craig and I both put a tremendous amount of effort into it, and we were very happy with the results (as was the owner of the car).
If you’re an F40 owner that wishes to have a similar level of restorative detail, or the owner of a special vehicle(s) that desires to have an appearance and mechanical makeover performed by a highly qualified team, please get in touch with Craig and me and we’ll gladly discuss options. We regularly arrange the transport of vehicles to Columbus from across the country, so no need to worry if you’re not in the Ohio area.
Related Posts


I have to bookmark this and read it again. This is amazing work. I keep thinking of the restoration of a fine piece of art like the Mona Lisa or the Sistine Chapel. Please keep the write ups and photos coming. Esoteric and the Guys from Autolavish have some of the most amazingly documented work I’ve ever seen. I learn so much from your work.
A few questions:
How many miles does this car have?
Was it ever track driven?
I’m amazed at the results from the P21S Wheel Cleaner. Were the inner wheel wells pitted at all?
What kind of adhesive was used to readhere the decals?
Thanks again.
Tim
Hey thanks Tim! Like I said in my article…it’s truly an honor and a privelage to work on such a fine piece of automotive history and I’m glad we got to share it with everybody.
3500 miles…not sure if it’s seen track time or not in its life…P21S Wheel Gel rocks…not much pitting…I’m not sure on the adhesive because it’s from Craig’s secret stash!
Thanks again,
Todd
Never mind about the mileage. Sorry.
Ooo…this is the write-up I’ve been waiting for! This is incredible! Fantastic job Todd.
Ha…thanks Steven, I thought you might like this one. 🙂
All I can say is WOW! Both of you did a great job! Congrats guys!
Thank you kindly Stelian from both of us.
Wow Todd! Great job on the F40. You are a true artist and I am always excited to read all of your write ups!
Thank you Ryan for the kind words, and I’m glad you enjoy the articles. I’ll do my best to keep them coming without sounding repetitive from vehicle to vehicle.
I agree, this is like restoring the Mona Lisa! Bravo Todd and Craig, Bravo!
Thank you Jared!
Now THAT boys and girls is how it’s done. Awesome job guys!
Thank you Jesse, I certainly appreciate the compliments from fellow detailers of your skillset!
EVERYONE STOP AND PAUSE……..The bar has been raised again!!! Nice work guy’s!!! Todd I guess quitting your day job wasn’t such a bad idea after all!!!
Thanks, and yes…it’s working out quite nicely. 🙂
Bravo! All aspects covered. A perfect example of master craftsmen earning their reputations.
Thanks very much there Mr. Harris! 🙂
You guys had me highly anticipating the full detailed writeup and you certainly did not disappoint! F40 is truly my all time favorite “machine” and sadly I have yet to see one in person. Your work is always stunning and you certainly turned this F40 into better than new status. Great work and thanks for sharing the experience!
I’m glad you enjoyed the article and photos Frederick, and hopefully you’ll get the opportunity to see one of these rare beauties in person sometime…it won’t disappoint! Thanks.
AMAZING! Thank you for the intricate shots, especially of the engine/suspension.
Thank you Jaison!
Outstanding treatment provided on this F40.
Thanks Barry…I knew that of all people, you’d really appreciate a detail of this level.
Stunning work Todd. Simply amazing.
Thank you kindly Pat. 🙂
Nothing short of spectacular.
Thanks Justin…I’ll take this as a big compliment coming from somebody with experience detailing the mighty F40!
Fantastic Todd, loved the article!!!!!
Your fine work on my car has just won a third trophy.
Be well,
Steve
Hey Steve!
Thanks, and congrats on yet another trophy on your Foose Mustang. It’s a beautiful car and deserves to win awards.
Incredible, Todd!! Taking it to another level with every detail
Thank you Aaron…
Todd, you can go ahead and bring the car back to the house anytime!
Yeah…sorry about taking it out without asking your permission! 🙂
I’m at a loss for words Todd! I would expect nothing less from you!
Craig does some amazing work as well! Please let him know that! =)
Thanks Denzil!
On our next major project I’ll do a better job of going over exactly what Craig is working on. He’s blending paints just to re-do and factory match small engine parts, he made his own plating system, and he re-paints all of the yellow spots on the nuts/bolts just like they were from the factory. The guy is incredibly talented and knowledgeable.
What did you use to clean the Tubi exhaust pipes? Is it the same technique as exhaust tips? I’ve got that blue/gold heat discoloration I’d like to remove….Thanks!
Andrew,
I think I should probably do a separate write-up just on that subject! If you want to simply remove discoloration, you can use a trick that I learned in my 22 years working in the motorcycle business…toilet bowl cleaner! Get yourself some Lime Away or similar product, brush it on, and watch it take most of the discoloration away…then rinse it off. I highly recommend doing this OFF the car though because that stuff can do damage to surrounding parts (very acidic). If you want to polish it out, you can use a heavy polish like Meguiar’s M105 Ultra-Cut Compound by hand or even by Porter Cable with a 4″ spot pad.
Truly amazing work on the F40, Todd! Many long, but very rewarding hours, went into that detail I’m sure. Though I haven’t had the pleasure of meeting you, your reputation precedes you and the write up was most impressive! Happy Detailing.
Matt Williams
Thank you Matt, and I’m sure we’ll run into one another at a local area event sooner or later!
Take care,
Todd
Thanks for the tip on the exhaust. I knew I forgot a question. Have you ever noticed anything negative using the toilet bowl cleaner? I mean, if you let it dwell too long or if it’s rusted.
I only use it on exhausts in good condition, and mostly on stainless steel at that. I’ve never let it dwell too long to find out if there are any negative reactions! 🙂 The biggest issue is to make sure it doesn’t get on any other surfaces because you could potentially cause all kinds of problems if you do.
That is the best detail of an F40 ive ever seen
If you guys ever plan on coming to Australia, there is an original 1,300 km euro spec waiting for you
Regards
Sam
Well Sam, I’ve always wanted to go to Australia! Now THAT would make for a great article. 🙂
Thank you!
Todd
Your website was forwarded to me by a friend of mine who lives in Seattle and I’m glad he did. I am stunned by your attention to detail. It is great to hear about people like yourself who are enthusiastic and take so much obvious pride in the work they do.
Can you tell me how you clean the glass. After a year or two I always get residue/water marks build up on areas where the windscreen wipers do not make contact. I have all sorts of things but I can never get rid of it – any thoughts.I live in New Zealand so there is no chance of me seding a car to you.
All the very best.
Hi Paul, you must be a friend of Max!
I have a few options for you to try. The first and easiest would be to clean the areas with a 50/50 mixture of vinegar and water. If that doesn’t work, then try a specialty product like Chemical Guys Water Spot Remover. If you still have a problem then you’ll need to go more aggressive and have it polished. If you want to do it yourself you’d need a Lake Country Glass Polishing Kit and use it with either a Porter Cable d/a or a rotary polisher.
Please let me know if I can be of additional assistance…any friend of Max is a friend of mine!
Todd
All time best pre-globalization Ferrari produced in my opinion. Also the last Ferrari model to be approved by Enzo Ferrari himself before his death.
The detail job is top noth!
Speaking of Enzo, do you have one of those lined up soon?
No, but you can bet on a massive write-up when it comes along…
Both of you are absolutely incredible at what you do, just an insane amount of work that goes into a project like this. This is my favorite car as well, just to see her taken care by you guys was a definite blessing!
All the best!
Marcus
Thank you kindly Marcus! Yes it was a tremendous amount of work that had to be coordinated between the two of us, but in the end it was all worth it to take this F40 back in time a bit.
Todd
Thanks Todd – yes I am a friend of Max
Absolutely amazing work Todd! Can’t believe I’m just now reading this! 🙂
Thanks Rasky!
this is great!! i am 16 and i clean cars around the neighborhood for money on the side and i really enjoy it. After seeing this i will definitely take even more precautions with cleaning them.
Thank you. Yes…the wash and dry process is the most critical in keeping a car looking its best. Make sure you spend some time reading through my Wash and Dry Tutorial.
You two are truly gods among men. No joke!
I’m feeling a lot of love in this room today David…thank you! 🙂
Congratulations for the extremely painstaking but truly respectful work on this beautiful F40 (my fav. Ferrari). People working in the detailing sector, putting many hours in a service that is built on patience and craftsmanship, are in my opinion ARTISTS!. Thumbs up!!!
PS: Is the F40 for sale?
Thank you Taner, and I appreciate the fact that you truly understand the skillset that is required by professional detailers. I too consider it a form of art, especially when I watch the transformation and sit back to enjoy the final work when it is all completed.
No…the vehicle is not for sale.
nice job.nice car.
Thank you, and yes I have to agree about the car! 🙂
Just amazing – what a great job you have done!!
Wish we had somebody like you over here…
Greetings from Germany
Frank
Thank you kindly Frank. All it takes is a ticket to Germany and I will be there! 🙂
~Todd
Being the lucky owner of a F40 for more than 10 years, I can only be impressed by your work. I detail mine all the time but I use only Mothers products. My car has been tracked and driven in all weather ( even snow) and spending like you a huge amount of time, can only keep these great cars in shape.
Yes, it takes time to detail every corners of the car but the end results are rewarding.
You can be proud of your accomplisment!
Thanks for sharing with al of us.
Ah, Mr. Linder himself…you definitely know a thing or two about the F40, and we appreciate you stopping in to comment on the work we did on this particular model. This car was purchased earlier in the year, and the new owner wanted to freshen it up and remove some years of wear and tear. He too is a driver of his vehicles…rain or shine. None of his cars are garage queens. 🙂
Thanks again Roland,
Todd
Hey Cousin Todd !
Dena sent your autoblog article out on facebook and I had to write you and tell you how excited I was to see what you have been doing these days. Wow! How impressive! Your work is amazing and my two sons were drooling over the keyboard when they looked at the photos. If you are ever allowed to show your work to family members, we would love to come see you in action. We live in Dayton, so we aren’t too far.
Just wanted to say congratulations and keep having fun! Hope to see you sometime.
Love and hugs, Dawn
Dawn,
Hey girl…how have you been? Thank you kindly for stopping in to say hello, and I certainly appreciate the compliments on my work. I hope to see you all soon! 🙂
çok güzel mükemmel oldu perfect :))
Todd and Craig,
Awesome job guys! I thought I was good. How did you clean or ‘bring out’ the intake manifold, air filter housings, transmission bell and other similar material/finish surfaces so well?
I’m 32 now but start detailing cars (as a hobby ) when I was 9. I started with my dad’s car. The best results for the transmission casing I got were from Brasso, but even that doesn’t always work. I was hoping you could show me a few tricks.
You’re guys are very fortunate, and deservedly so, that you make a living doing what you love!
Phil
Thanks Phil,
The hardcore engine detailing is Craig’s baby, and he uses some of his own tools and techniques to achieve the stellar (yet safe) results that he does. He’s not as open with his trade secrets as I am! 🙂
If you liked that, take a look at the engine detailing before and after photos included on this page. Scroll down a bit and you’ll see what I’m referring to.
I have been looking for some reference material to build a 1:24 scale replica, and was solely looking for engine pics and trying to find out where some coolant and oil lines run. For the most part, your in depth photos have provided me with most of the information that i was looking for. do you happen to have any other in-depth photos of the engine like a close-up of the fuel rail and lines, and coolant lines? You did an exceptional job and have provided me with more reference material that i had thought! Keep up the good work.
Thank you Mark!
I don’t have any additional detail shots of the engine, but you may want to try F-Chat.
Best of luck on your replica!
Todd
Amazing work Todd! What did you use on the black plastic / rubber trim?
Thanks Vince.
I don’t remember specifically on this one, but most likely I was using 303 Aerospace Protectant.
What was the cleaner/method you used on the suspension and the suspension rubber?
Matt,
We have a custom tool / setup that siphons degreaser and water from a bucket and mixes it with compressed air. We can control how much force is used and it is much safer than using a pressure washer! That takes the majority of crud off, and then we go back and work everything by hand with towels for the finishing touches.
You are absolutely awsome, it seems you love your job as much as i do, it takes me some times even longer to do a nice polish, but its hard to find people that will pay for this type of high quality work, so i do those on a few lucky not so special cars. congrats, wish i could see you guys work in person. im in Los Angeles by the way..
thx.
Thank you kindly! It’s challenging, and sometimes stressful work (at this level, on this type of car), but it’s also very rewarding in the end when you get to see the transformation the vehicle goes through.
Typical Todd Cooperider work quality right there. That is not a detail, it is a “REFINISH”
Our choice of products may differ alot but I agree with your methodology of preserving the paint instead of 100% correction
Thanks Matthew, and thanks for stopping by the blog!
Hi Todd first off i am truly inspired by your skill and dedication to restoring a car like this back to pristine condition…i have a question for you did you resort to any type of paint thickness gauge when doing this detail i am interested in investing in one and would love to know what a gauge a professional like you uses esp. for thee carbon fiber and aluminum areas. thanks alex
Alex,
You have a couple of different types, and they vary greatly in price. The first one would be a DeFelsko DFT Combo that measures both steel and aluminum. These just give a total thickness, and sell for just under $700. Now if you also need the ability to measure on plastic, fiberglass, carbon fiber, or other exotic materials, you need to step all the way up to the DeFelsko PosiTector 200B/Advanced. Not only will it measure all of those types of materials, but it also gives you the thickness of the individual layers so you’ll know exactly how much clearcoat you have to work with. This high-end tool will set you back for about $2700.
Thanks,
Todd
stunning simply stunning. it is amazing how much you got done in a short space of time. great work and an amazing write up…
Thank you Rollo!
Outstanding work Todd and thank you very much for allowing us the rare opportunity of the inside look of the metamorphosis this F40 went through.
Cheers,
James
I’m glad you enjoyed it! Thank you…
wow todd this is amazing you did a fantastic job, I really look up too you, i have such a strong passion for detailing i’ve been doing it for a little over 2 years and got into paint correction real early and have been studying and trying to master it ever since. I want so bad to have the opportunity to work in a shop like yours around here in indiana there really are no amazing shops that would take the pride and effort to preform a perfect paint correction like I would. My last job was good and did good work but I was the only one who even knew a single thing about paint correction and I’ve been searching for a great facility to show my skills for a long time now. maybe one day I will find my home and be happy in a detail shop and find one who takes the pride and passion as we do. anyways great job todd your my inspiration.
Hi Greg, and thanks for the compliments. It sounds like you need to start doing the work on your own, build up your reputation, and work your way up to opening your OWN place that does exactly what you want it to do. Create your own dreams my friend!
WOW!! Amazing job! I love your work! I’m actual from Columbus, if there is ever a time I could meet you that would be awesome!!!
I started detailing cars when I was 14 years old, your work gave me so much inspiration! Thank you!!!
Thank you, and feel free to stop by the shop anytime.
Marvelous work !!
Thanks for your review.
What did you use on the taillight lenses? It’s me again with the ’02 trans am. As you know, the taillight lens is about 50% of the back end on those.
Wow, Brilliant design!
I love your F40 detailing article. So much better than the other websites…..congrats!!!
By the way, may I ask the detailing process of the interior; it did not mention in this article.
Thank you…
Thanks for the interesting article. I must query a couple of details. Can I post them here or should I personal mail you.
After study many of the web sites for your internet site now, i really appreciate your strategy for blogging. I bookmarked it to my bookmark site list and will be checking back soon. Pls have a look at my web-site too and figure out what you consider.
I’m impressed, I must say. Truly rarely do I encounter a weblog that’s both educative and entertaining, and let me tell you, you’ve got hit the nail around the head. Your concept is outstanding; the catch is a thing that insufficient persons are speaking intelligently about. I am happy which i found this at my try to find something relating to this.
It’s great of you to share your perspective. Thank you!
Hi Todd! Your post never ceases to amaze me! This was a very informative one especially your dedication to restoring a car like this back to its best condition. I’d like to ask can you tell me how you clean the glass? All the best!