Beginner Paint Correction Kit: Getting Started on a Budget
by Zach McGovernIn my opinion, every car enthusiast should own the bare essentials required to maintain their paint at a very high level. In addition to washing and drying, being able to perform a basic paint correction as needed to remove swirl marks and enhance shine is great to know how to do yourself. Many people are wary of learning the basics of paint correction due to the perception that in order to make an improvement you will need to take out a loan to purchase several different machines, an entire cabinet full of pads, and have a full week of free time to complete each job. I am happy to say that this is just not true! You can enhance your paintwork in a single day with just a handful of items, and for a lot less money than most people realize.
Machines
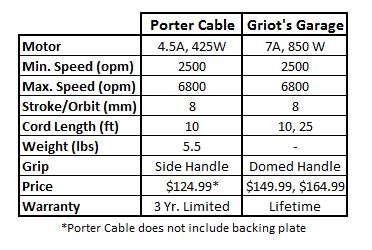
A dual action polisher (also known as random orbital polisher) is an essential part of the detailing process. If you are still doing the old “wax on, wax off” by hand, it is time to stop! A good DA machine will allow the user to produce far superior results compared to working by hand and it will also speed up the process. In my opinion, there are two tools that rule the market for entry-level dual action polishers – the Porter Cable 7424XP and the Griot’s Garage Random Orbital Polisher. The two machines are very similar in terms of overall size and functionality, but there are some key differences. I’ve laid out some of the specs of each machine in the table below, and it is worth noting that Detailed Image has put together a comprehensive buffer comparison chart for all of the machines they sell here.

Both machines offer the same 2500-6800 opm range, but the Griot’s Garage Polisher is powered by a stronger motor which should enable the user to put more strain on the tool without bogging it down. Each machine utilizes an 8 mm orbit size (or stroke) and come equipped with a 10 foot, 18 gauge power cord. Griot’s Garage offers a HD version at a slightly higher price which includes a 25 foot, 16 gauge power cord. The GG machine comes equipped with a 6-inch hook and loop backing plate that allows the user to use a variety of pads, however the Porter Cable machine comes equipped with a polishing pad that is permanently fixed to a threaded backing plate so a hook and loop backing plate must be purchased separately. Both machines have a handle that the user may use if desired. The Griot’s tool has an adjustable d-shaped handle that is centered over the top of the machine. The Porter Cable has a side-mounted handle. I personally do not find either handle to be particularly beneficial and opt to remove them during use. In my opinion, one of the most notable benefits of the Griot’s Garage machine is the lifetime manufacturers warranty that is backed by an awesome customer support system. With the added power and the excellent warranty, the Griot’s Garage Random Orbital Polisher gets the slight edge as the better entry-level polisher, though you simply cannot go wrong with either option! I actually got started with a PC7424XP and used it exclusively for years before purchasing a professional grade machine. I still use my PC7424XP for certain tasks.

Backing Plate & Pads
As previously mentioned, the GG machine includes a 6-inch hook and loop backing plate that allows users to attach a 6-inch pad of their choice, however the porter cable requires you to purchase a backing plate separately. I personally prefer 5-inch pads to the 6-inch as I feel it is a perfect compromise that allows for maximum performance and usability. So if you are picking up a PC7424XP I would recommend purchasing a 5-inch backing plate to go along with it, and if you are buying a GG DA then you might want to consider replacing the included backing plate with a 5-inch one if your budget allows.
When it comes to pads there is a massive assortment in every color of the rainbow. Some have holes in the center, some have beveled edges, some have variations in the face, some are foam, some are wool, some are microfiber… it can be overwhelming.
Over the years I have discovered that among my relatively large stash of pads there are just a few that I grab for the majority of the time and those are therefore the ones I consider to be essential to a beginner kit. These are the Meguiar’s Microfiber Cutting Pads, Lake Country Orange Foam Cutting Pad, White Polishing Pad, and Black Finishing Pad. These 4 pad types offer a broad range of cutting and finishing abilities that, when paired with the appropriate compounds and polishes, anyone should be able to make considerable improvements to the condition of their paint. It is a good idea to have at least 2 of each pad on hand so you can rotate between the two as you work in order to keep the pads clean. I discuss more on this topic in one of my previous articles.
Compound & Polish
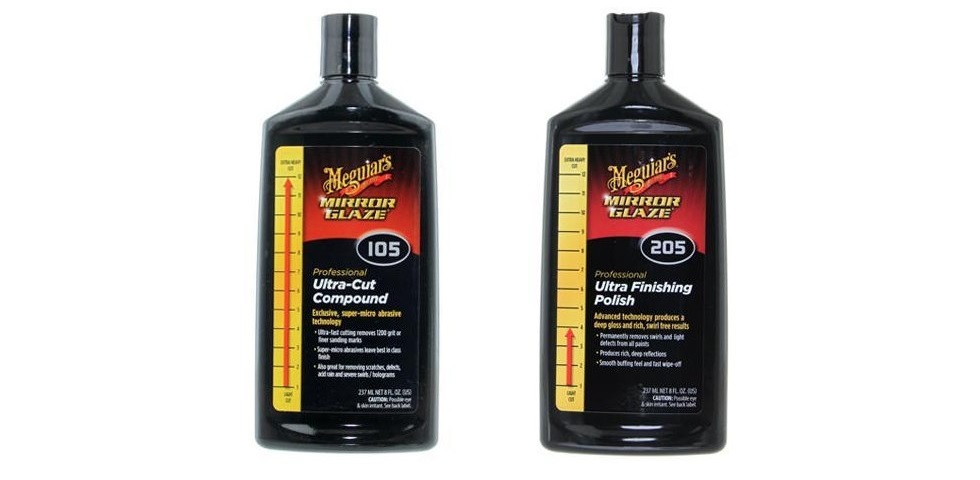
Alright, now that we have the machine and pads out of the way there is just one more topic to touch on. Compounds and polishes are the abrasive liquids that you will use in conjunction with your machine and pads to perform the paint correction and polishing work. A good modern compound will provide quick cutting and minimal haze in most cases. Polishes should produce perfect clarity without being difficult to wipe away. Similar to pads, there are an overwhelming assortment of compounds and polishes to choose from, but again I have discovered that the vast majority of my work can be completed with just a couple products that I grab time and time again because they meet all of my needs. One of my favorite beginner combos is the Meguiar’s M105 and M205 duo. This renowned pair has become a very well known set in the detailing industry for good reason. I especially like that these two products are available in smaller 8 oz. bottles that make them a great option for DIYers who would spend 10 years going through a 32 oz. bottle. These two have been discussed many times on the blog – check out this great article on how to use M105 and M205.

Summary of Supplies
To sum it all up, this is a list that incorporates the absolute bare essentials, in my opinion, for enhancing your paintwork by means of paint correction. Yes, there are many other pads, backing plates, compounds, polishes, and tools that may be required to maximize your results, but this article is not intended for anyone seeking a Concours d’Elegance level detail.
Machine & Backing Plate: Griot’s Garage Random Orbital Polisher or Porter Cable 7424XP & 5 inch backing plate
Pads: Microfiber Cutting Pad, Orange Light Cutting Pad, White Polishing Pad, Black Finishing Pad
Compound & Polish: Meguiar’s M105, Meguiar’s M205
Money Saving Kits
Now that I have broken down my personal favorite options for beginners and DIYers looking for a very basic setup, I wanted to also direct some attention towards some great packages that Detailed Image has put together that are geared towards the same audience that I hope will find this article helpful. These packages may not be identical to my personal product and tool selections, but they are similar and are offered at discounted packaged prices!
Porter Cable 7424 XP and Meguiar’s Polish Kit


I’m really getting into this detailing thing and only problem I have is pricing do you have any guides on how to price vehicles
Hi Jason – pricing is a very subjective topic and therefore there is no “guide” on how to do it. The goal of any successful business is to maximize profits, and therefore charge as much as you can for your services without causing harm to your business. It is something that takes trial and error. I’m sure you will also find that as your skill and confidence grow, so will your customer base. With higher demand comes higher prices 🙂
awesome article and a good first read for that person who needs some direction.
One suggestion, I’ve found M100 superior to M105 due to less dusting and longer working time with M100.
Hi TG – thanks for reading. I absolutely agree with you there. In fact, I have an article coming out in the near future regarding my most recommended Meguiar’s products for paint correction and it includes M100, M101, and M205. In this article, I included M105 because it is the only one of the Meguiar’s products that comes in a smaller bottle. This may be beneficial to a beginner on a budget.