$4.99 Shipping over $49 w/coupon DI499 | 3,200+ Products | 100 Brands | 13,000+ Reviews | 2,250+ Detailing Articles
Close Menu
Clean ⋅ Shine ⋅ Protect
Cookies are disabled in your web browser. To shop with Detailed Image, please turn cookies on and then refresh the page.

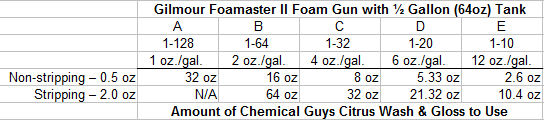
Gilmour Foamaster II and Chemical Guys Citrus Wash and Gloss with Mixing Ratios

May 23rd, 2008

The Gilmour Foamaster II is an excellent tool for quickly applying suds all over your vehicle. It mists a ton of suds all over the vehicle, covering your vehicle top to bottom. Two of the major benefits of this product is that it’s safer than traditional washings and leaves the shampoo on the surface longer. After covering your vehicle the shampoo starts to soften and loosen contaminants before your mitt touches the surface. This means the shampoo is already spread over the whole vehicle so you don’t rely on your mitt to bring the water and shampoo to the surface. This reduces the amount of passes you’ll need to do with your mitt, which helps further minimize the possibility of adding swirls or fine scratches to the surface. I really like using the Foamaster II with the Chemical Guys Citrus Wash and Gloss because this product is a highly effective shampoo. Using the Citrus Wash and Gloss in a concentrated ratio (2oz/1Gal) will strip off the protection and if you use it diluted (.5oz/1 Gal) it won’t strip off the protection. I enjoy this versatility because it helps me get the most out of my washings from one product. Now that I’m using it with the Foamaster II I wanted to share with everyone the appropriate ratios to use.

The amount of Citrus Wash and Gloss needed is should be added to the tank and the rest of the container would be filled with water.  Once mixed together, shake to generate some suds and start washing.

Detailed Image Cards Now Available for Gift Orders

May 20th, 2008

Detailed Image Gift Cards
Sending your order as a gift? We’re now offering Detailed Image Cards that can be included in any order for free. We will hand-write a custom message on the inside and include the card with the order when it is shipped. We also won’t include the receipt so the recipient doesn’t know how much you spent.

To include a Gift Card with your order, simply request it in the Comments section of the Checkout page. If you have any questions or special requests you can email us at support [at] detailedimage [dot] com and we’ll be happy to help.

10 Common Mistakes People Make When Washing Thier Cars

May 17th, 2008

Over the years we’ve seen many mistakes in detailers washing and drying methods. Here are some of the common mistakes and solutions on how to better your process.

  1. Using Dawn (or another dish detergent) as their automotive shampoo. Washing with Dawn will strip off any protection you may have on your paint, so using a detergent on a regular basis leaves you with no protection from you coat(s) of sealant and/or wax. Using a dish detergent on a regular basis can also dry out your trim, which can accelerate fading and cracking. Solution: Use a quality automotive shampoo that has gentle cleaners the help maximize the durability of your sealant or wax, such as Poorboy’s World Super Slick & Suds shampoo.
  2. Using a bath towel to dry your paint. Big mistake! Most bath towels are cotton or terry cloth, which can easily add swirls and other imperfections in your paint. The washing and drying process is where a majority swirls and other imperfections stem from. Here’s a side by side comparison of a neglected side of a van and one that’s been properly polished.
    Using improper drying towels can easily cause these imperfections that take away from the finish of your vehicle and take hours to properly correct. Solution: Invest in quality paint safe drying towels. The best ones we’ve found are our Microfiber Waffle Weave Towels. Our towels are very absorbent, tagless, silk edging and a textured waffle pattern that helps pull contamination away from the surface.
  3. Washing with a traditional sponge or a kitchen sponge. Traditional wash sponges push dirt and other contamination around on the surface, which can easily create swirls and other imperfections in your paint (as shown in the picture above). Solution: Use a paint safe wash alternative, such as a sheepskin wash mitt. The sheepskin fibers do an excellent job releasing contamination from the surface without pushing it around on your paint, minimizing adding imperfections.
  4. Washing in direct sunlight. Washing in direct sunlight can cause water spotting on your paint, which ultimately take away from the finish of your vehicle. As water evaporates, it often leaves behind calcium and other minerals behind. Solution: Wash in the shade, as the sun is rising or just as the sun is setting. If washing in the shade is not an option, rinse as frequently as possible and work in small sections. Ideally, to minimize adding water spots to your finish, invest in a water de-ionizer such as the CRSpotless system.
  5. Using a water blade to dry your paint. Nothing screams adding imperfections more than unnecessary friction on your paint. While it may seem like your saving time by drying your vehicle with a water blade, you’ll pay for it in the end as you’ll need to spend hours polishing away the marring, swirls and scratches created from using a water blade after each wash. Solution: Utilize the sheeting method prior to drying your paint and dry with a quality, paint safe waffle weave drying towel.
  6. Not utilizing the sheeting method prior to drying your paint. One of the least favorite parts of the auto detailing process for many detailers is drying their paint. One thing you can do to save time and minimize adding imperfections to you paint is to utilize the sheeting method. After you have rinsed off your vehicle for the final time, remove your spray nozzle from your hose. Use free flowing water to flood the surface of the vehicle from the top down. The flooding creates a “sheeting” effect that will self dry the vehicle. Start from the top of the vehicle and move left to right with the hose. On the way back, right to left, lower the hose to the point where the water is falling and proceed to “catch” the falling water from your initial pass. Continue this method until you reach the bottom of the car. If you have a fresh coat of sealant or wax, this should leave you with 80% or more of the water removed from your vehicle without ever putting a towel to it.
  7. Washing your wheels & tires with the same mitt as your paint. Your wheels and tires are often the most contaminated parts of your vehicle. To minimize adding imperfections to your paint, you want to avoid using the same mitt on your wheels and tires as you would your paint. Solution: We recommend using at least 2 quality wash mitts when you wash your vehicle.
  8. Wearing clothing and jewelry that can damage your paint. This is one of the easiest ways to damage your paint. Think about it, as you lean over your vehicle to clean the roof of your vehicle, your belt, rivet, jewelry, watches and more can easily damage your paint. Before going into any detail, you should be aware of the types of clothes and jewelry you have on. We recommend wearing clothes with elastic waste bands and avoid wearing jewelry.
  9. Using 1 wash bucket. Using 1 bucket to wash your vehicle can often lead to adding swirls, scratches and other imperfections to your paint. As you clean off an area and dunk your mitt into the bucket to rinse off and get more suds, you’re putting the dirt and grime you just removed from your paint right into your bucket of shampoo. When you put the mitt back onto the paint, chances are you’re mitt will still be contaminated and you’ll be adding swirls and other imperfections to your finish. Solution: Use a 2 bucket wash system. Fill 1 bucket with clean water and utilize this as your rinse bucket. The second bucket filled with suds. After cleaning a panel, before you dunk your mitts back into the suds, rinse it off in your rinse bucket to release contamination and help prevent from putting it back onto the paint. Ideally, add a Grit Guard bucket insert to the bottom of your rinse bucket to glide your mitt across and help trap dirt and contamination on the bottom.
  10. Using pressure to remove contamination. This is possibly the biggest mistake I see detailers make. DO NOT USE pressure to remove dirt and contamination! This is one of the easiest ways to add swirl marks and fine scratches in your paint. You should use minimal pressure with your wash mitt and just glide the mitt across the paint. The automotive shampoo you are using should be doing the cleaning work. If contamination still remains on your paint after a gentle glide, consider treating it with a pre-wash degreaser or utilizing a clay bar to remove it after your wash.

Blackfire Products On Sale

April 11th, 2008

Detailed Image now proudly carries the Blackfire line of products.  Blackfire has recently developed some outstanding products that have really made this brand stand out to to detailing enthusiasts.  Blackfire’s owners have several decades of detailing experience and vast product development experience.  This has helped them create and refine some ultra high quality products that exceed the needs of even the most particular detailers.  They have products to help you care for your wheels, tires, paint, trim, interior and so much more.

One particular group of products I really like is the Blackfire polishes (Final Polish and Compound).  Blackfire has partnered with Menzerna to develop some of the most refined and effective polishes on the market.  Menzerna has become the world leader for polishes and shared some of the trade secrets with Blackfire.  The Blackfire polishes use a uniquely refined polishing particle that is densely clustered for exceptional cutting power and a remarkably smooth finish.  Some traditional polishes use a larger particle for increased cutting power which creates far more haze and micro-marring.

I’m also impressed with several other Blackfire products that are highly versatile and safe to use.  These products make detailing more cost effective and easier to do.  Each product is very well balanced and doesn’t have the major downsides that other manufacturers accept.  Please look through the Blackfire line of products and see what products they have created to help you complete an outstanding detail.

Chemical Guys Now Available At Detailed Image

April 11th, 2008

At Detailed Image we constantly review brands and their respective products.  We pride ourselves on doing all the research for our customers and offering them only the highest quality products.  This process requires us to continuously search for high quality suppliers that we can develop long term relationships with.  This winter we spent a lot of time looking over various different opportunities and we picked up the Chemical Guys (CG) brand.  Even though we put plenty of hours into researching the CG brand it actually wound up being a very easy decision.  After speaking with the CG representatives and testing their products, we can now proudly offer you some of the finest CG products!

CG has a large selection of diverse products (clay bar, polishes, sealants, waxes, quick detailers, odor eliminators, etc) that are highly effective and innovative.  Most products are developed in house by CG’s own highly talented staff.  These employees are surrounded by detailing enthusiasts who really embody high quality auto detailing.  The CG products all have to produce exceptional results while being user friendly.  Products like CG Jetseal 109 is a great example of their best work.  This product is extraordinarily strong, easy to use and looks outstanding.  It has quickly swept through the detailing industry and become one of, if not, the best sealants in the industry.  Industry leading products like the Jetseal 109 and many others is why Detailed Image now carries CG and why they are one of the premier brands in detailing.

Probably one best factors about the CG brand is their constant refining and improvement of their products.  Even when they are the industry leader they continuously look for improvement.  CG has been in business for over 30 years because they never rest on their laurels.  It was really important to for us to know we can depend on the CG brand to constantly deliver some of the newest and best products on the market.  Please look through our selection of Chemical Guys products and let us know if we can help you pick out the ones that will work best for you.

Menzerna PO106FF now in 16oz size

March 5th, 2008

If you’ve been holding off on trying one of the best finishing polishes, Menzerna PO106FF, now is the time to test it out with the more affordable 16oz version.  This polish will enhance the depth and gloss on virtually any vehicle.  The reason this polish works so well is that it utilizes some of the smallest abrasive particles available, but they are sharper than normal abrasives.  Using sharper abrasives means it’s easier to break down and give you the results you are looking for.  For maximum results, we recommend applying this polish (or any polish for that matter) with a quality buffer, like the Flex XC3401VRG or the Porter Cable 7424.  This polish leaves behind an addictive gloss and once you get a chance to use the PO106FF, it will be your new finishing polish.

Good detail work starts before the detail…

February 11th, 2008

So you’ve done all the research, gathered all the right products and you are ready to detail. You’ve completed a large part of the preparation but there is more you can do before the detail begins. We’ll go over some things you can do before you detail that ensures your detail will go smoothly.

The day before and the day of your detail you should check the weather to be sure it will be conducive to the detail. Extremely high and low temperatures or precipitation can affect your decision on whether or not to detail. Check the weather forecast and plan accordingly.

Detailing may require you to use some muscle groups you do not use on a regular basis. To help loosen these muscles and minimize soreness you should develop a good stretching routine. Your arms, back and legs will all get a good work out, so take the time to stretch them out before beginning.

Wear clothing that is appropriate for the weather and safe to have on around a vehicle. Your clothes are likely to touch the paint at some point, even if you are careful. Clothing articles like rivets on jeans, belt buckles, zippers, buttons and other objects can do plenty of damage to your vehicle. Make sure you take off any jewelry, keys, cell phones, etc. that may scratch the paint or other surfaces. The clear coat can be scratched much easier than you might think, so don’t underestimate the importance of wearing appropriate clothes.

You should also try and estimate how long the detail will take and allocate more time than you think will be needed. I typically try and make sure that I have 25% more time than I think I need, just to be sure I have enough time to complete the detail. For example if you think the detail will take 4 hours, allocate 5 hours just in case it’s needed. If you end up rushing you will likely sacrifice some quality and add more stress to your day. There are very few times I detail where I don’t see something I just “have to” take care of, while I didn’t plan for it. Sometimes I need to clay an especially contaminated area, polish out a scratch I had not seen previously, remove tar or other unexpected detailing needs. You may also have other unexpected interruptions like phone calls, neighbors stopping by, errands, etc. While these things are unexpected they are very normal and should be planned for by adding some extra time for the detail.

You should also plan plenty of breaks, where you can rest, eat and re-hydrate. We all get wrapped up in our work at times, but it’s important to pace yourself. If you burn yourself out in the first couple of hours you could be putting your health at risk and reduce the quality of your detail. You need to be disciplined and stick to a schedule where you take breaks and stay energized. We recommend taking a short break hourly and drinking fluids each time. You may also want to make sure you get out of the sun and elevate your feet as needed. While it seems obvious, you should plan on eating as well. You’re going to be expending plenty of energy and your body will need more nutrition to keep going. Make sure you have some food in your home so you don’t have to take an extended break that could interrupt your detailing plans.

Flex Carrying Case Now In Stock

February 7th, 2008

Flex Carrying CaseSo you got the new Flex XC 3401 VRG, pads and polishes, but where do you store them all? Detailed Image just added this durable, light weight bag to our product line up so you can easily store all of your polishing equipment in one place. It’s important to store your buffer and pads in a place that is not subject to dust or other contamination that could get on your pads or in your buffer. This will help prolong the life of your buffer and make sure you get the most out of your pads and polisher.

One of the nicest features about the carrying case is the roomy interior and the large shoulder strap. The large adjustable strap makes it easy to carry and fits all body types. Treat you and your buffer to this professional bag by Flex today.

CRSpotless Water De-ionizers Available

February 2nd, 2008

Detailed Image is proud to announce that we are now offering CRSpotless Water De-ionizers.  CRSpotless has been the industry favorite for water purification units.  CRSpotless offers two sized units, a 100 gallon unit and a 300 gallon unit.  The standard units can be wall mounted, or for an additional $50 you can turn them into mobile units with wheels and a handle attached.  CRSpotless units come pre-assembled so you can be using pure, de-ionized water in minutes.  Each unit comes with an electronic display to let you know if your cartridges (or resin) needs replacing.

Replacement cartridges are available as well as loose resin bags or a large 1 cubic foot drum of resin.   With the drum of resin, you can enjoy 900 gallons of de-ionized water for as low as $0.22 per gallon.

If you’re serious about detailing and never want to worry about water spots again, a CRSpotless water de-ionizer may be for you.  Simplify your washing and drying process and improve your detailing results.

Sheeting Method – Dry your vehicle with Water

January 30th, 2008

I find that many people hate the drying process, and this is also the time when you are most likely to add imperfections to the paint. One of the best things you can do to not only cut down on your time, but minimize adding swirls, scratches, water spots, and other imperfections, is to utilize the sheeting method. This works best if you have a fresh coat of sealant or wax on your paint.

After washing your vehicle and rinsing down the paint so there are no suds left behind, remove your hose nozzle so you get free flowing water. Start at your top panels and let the free flowing water flow down your vehicle. Create a cascading effect by moving the hose so the water moves left to right, then a little lower moving right to left, then a little lower and from left to right. The water will flow together and eventually run off of your vehicle, leaving behind much less water that you can easily blot dry with a quality waffle weave drying towel. Since this minimizes wiping your paint, you minimize adding imperfections. It will also save you time, which is important when you are washing so water spots are not left behind.

Below is a very brief video taken from a cell phone. The first few seconds show wetting the hood of the car, then the last few seconds are using the free flowing water moving left to right quickly. You can see the water pool together and run right off of the hood with very little water left behind. We’ll be creating a new video of this technique in the spring, but this should help for now. The wax on this car was Pinnacle Souveran.

« Newer PostsOlder Posts »
My Offers
Memorial Day Sale
Quantity Discounts - Buy More, Save More!
Free Stuff
Big Discounts While Supplies Last - Clearance Items - Shop Now
Close overlay